Practical ideas from FARM SHOW MagazineSubscribe · Free issue · Send us your shop tip
Subscribe to FARM SHOW
Issues / Vol. 49, No. 3 (2025)

Vol. 49, No. 3 (2025)

Money-Saving Repairs & Maintenance Shortcuts · Printed section pp. 32–35

37 selected entries · Complete text of selected entries

This issue’s section includes reader tips and feature-length shop stories. Held items and editorial notices are not reproduced.

Archive text: prices, coupons, availability and contact details reflect the original publication, not current offers. Reader methods are not universal instructions; follow manufacturer guidance and proper safety practices.

Reader shop tips

From the archive · Full text
Reader shop tip

Ralph Volkman

Ralph Volkman, Black Creek, Wis.

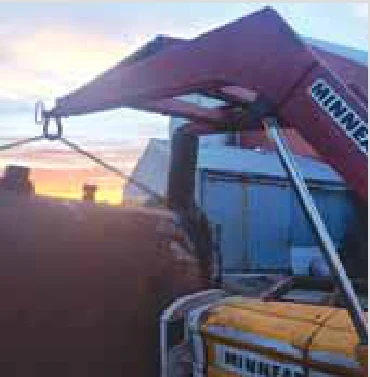
“When I sprung the arms on my tractor loader, I straightened them by picking up a heavy object with the high side. Then, I placed a post below the other arm. I carefully raised the front of my tractor while watching the frame twist. Next, on a level concrete slab, I checked to see how much I’d corrected it. Don’t do too much at once, as it’s very easy to overcorrect.”

From the archive · Full text
Reader shop tip

Eli Apple

Eli Apple, Hillsborough, N.C.

“I bought a tool cart from Harbor Freight to use around my shop. It was a nice cart, but it wobbled a lot. I took 3/8-in. Grade-8 washers and put them between the casters and the metal. It steadied it very well.”

From the archive · Full text
Reader shop tip

David Krapfl

David Krapfl, New Vienna, Iowa

“Equipment jacks often get rusty outside. I put the jack in a drill press and bore several 1/4-in. holes through the outer and inner tubes, and then spray penetrating or lube oil through the holes onto the threaded shaft. I’ve saved a few jacks this way.”

From the archive · Full text
Reader shop tip

Wallace Bengtson

Wallace Bengtson, Braham, Minn.

“When I have a frozen grease fitting, I use a short piece of 17-gauge electric fence wire to push in the stuck grease and move the ball inside.”

From the archive · Full text
Reader shop tip

Dan Spinden

Dan Spinden, Fort Collins, Colo.

“I made my own paint booth by attaching clear plastic sheeting to the rafters. I unroll it whenever I have to paint a tractor or other equipment. It isolates my tools and equipment from overspray.”

From the archive · Full text
Reader shop tip

Roger Kahler

Roger Kahler, Dunnell, Minn.

“When installing a rim on a hub without studs, cut the bead off a log bolt, taper the end and screw it into the top side of the hub. Then, hang the rim, install the other lug bolts and remove the headless bolt.”

From the archive · Full text
Reader shop tip

Herb Dunham

Herb Dunham, Millerton, Penn.

“Now on my 89th trip around the sun, I needed to add another step to get aboard my IH 300 utility tractor. So, I bolted an old buggy step below the original.”

From the archive · Full text
Reader shop tip 1 of 3

Gary F. Thomsen

Individual tip 1 of 3 from this reader’s published contribution.
Gary F. Thomsen, Arion, Iowa

“I used two bicycle hoists to lift my topper off my Ranger to install a bed protector. I replaced the hoist’s ropes with nylon ropes and mounted the hoist pulleys to 2 by 4s, slightly closer than the topper length.

From the archive · Full text
Reader shop tip 2 of 3

Gary F. Thomsen

Individual tip 2 of 3 from this reader’s published contribution.
Gary F. Thomsen, Arion, Iowa

“A leak suddenly appeared on one horn loader cylinder, oil spraying in my face. I wrapped an old tube sock around the piston end of the cylinder. It still leaked, but not as much. I got my day’s work done and installed a new seal later.

From the archive · Full text
Reader shop tip 3 of 3

Gary F. Thomsen

Individual tip 3 of 3 from this reader’s published contribution.
Gary F. Thomsen, Arion, Iowa

“I mounted an electric 440-lb. hoist to an old hay track in the barn’s hay mow. It’s much easier to lift tires, wheels and other stuff upstairs. I replaced the ladder with salvaged stairs.”

From the archive · Full text
Reader shop tip 1 of 3

Anonymous

Individual tip 1 of 3 from this reader’s published contribution.
Anonymous, Pa.

“Everyone but me probably knows this, but R4 industrial tires don’t get near the traction of ag tires in the field, similar to the difference between summer and winter tires in snow.

From the archive · Full text
Reader shop tip 2 of 3

Anonymous

Individual tip 2 of 3 from this reader’s published contribution.
Anonymous, Pa.

“Try the rubber tarp straps with holes every 4 in. along the length. They’re so convenient that you’ll want to throw away the ones without holes.

From the archive · Full text
Reader shop tip 3 of 3

Anonymous

Individual tip 3 of 3 from this reader’s published contribution.
Anonymous, Pa.

“I wanted to move several small items a long distance in my Ford F-150, which only has tie downs in the bottom corners of the bed. I threaded a light chain through anchors, pulled it tight, and tied it off with a quick link, which gave me decent tie-down points everywhere. It worked pretty well.”

From the archive · Full text
Reader shop tip

Jim Lacey

Jim Lacey, Dell Rapids, S.D.

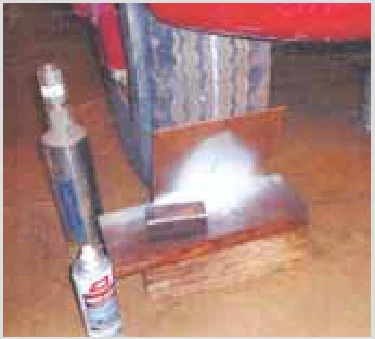
“I checked the alignment on one of our trucks, and all the joints were tight. After jacking up the wheels, I cut a slot in a piece of Masonite, tacked it to a 2 by 6 cut at an angle, spun the wheel, and sprayed aluminum paint. Presto—instant true line to check for correct alignment.”

From the archive · Full text
Reader shop tip

Glen Ray Goodson

Glen Ray Goodson, Galax, Va.

“I’ve read in FARM SHOW about people having problems with the teeth breaking on their Troy-Bilt walk-behind sickle bar mowers. I have a 1991 model and replaced the bar that holds the cutting teeth with one I took off of a New Holland sickle bar mower built in the 1970s. I haven’t had any broken teeth since. It also cuts better and uses less gas. I need to replace the teeth and the bar guards so it’ll cut as well as my 1969 Jari Chief walk-behind sickle bar mower.”

From the archive · Full text
Reader shop tip

Steve Hood

Steve Hood, Claremont, N.H.

“My gas-powered wood splitter leaked at the gasket that joins the carburetor to the engine. I rubbed hydraulic oil on the leak. It’s four years later, and I haven’t had any more issues with it.”

From the archive · Full text
Reader shop tip

Larry Goodman

Larry Goodman, Ionia, Mich.

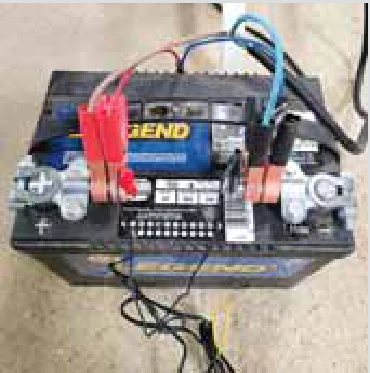
“I purchased a piece of equipment that required a 12-volt battery for power. It had two clamps for positive and negative, plus two small alligator clips. I used battery post clamps for large cables. I cut down 3/8-in. bolts, which extend 2 in. past the battery terminals, and I drilled a 7/32-in. hole near the end to clamp the alligator clips. Works great.”

From the archive · Full text
Reader shop tip

Gary Lobb

Gary Lobb, Makinen, Minn.

“When plastic grease fittings on PTO shafts are broken, use a needle point (designed for greasing sprockets on chainsaw bars) instead of the standard grease couplers. The needle point also works on broken or damaged grease fittings. You can get into tighter places than regular grease couplers.”

From the archive · Full text
Reader shop tip

Fritz Groszkruger

Fritz Groszkruger, Dumont, Iowa

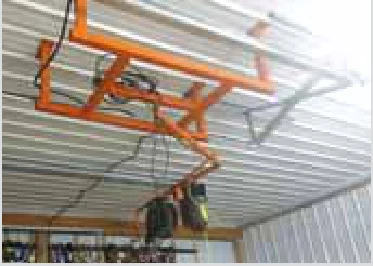
“I made a swinging air, electric and light reel for the center of the shop between two overhead doors. It originally had bearings on the main pivot that I had to cut off. It rotated too easily. I used a bushing instead and now it works fine.”

From the archive · Full text
Reader shop tip

J.L. Blue

J.L. Blue, Pinebluff, N.C.

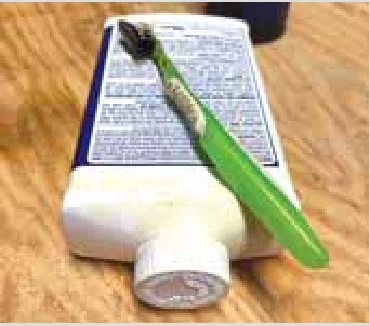
“When you buy a can of boiled linseed oil, pour it into another empty can, leaving a small amount in the original can. Flip it on its side and use an old toothbrush to dip out oil for use on various woodworking jobs and hard-to-reach places.”

From the archive · Full text
Reader shop tip

Rick Nudd

Rick Nudd, Walworth, N.Y.

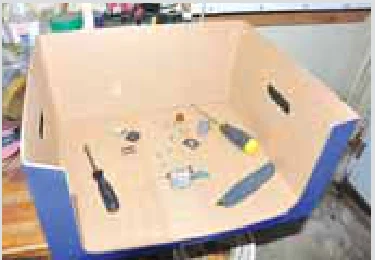
“When I disassemble and reassemble small things like carburetors, I do it in a cardboard box. This way, if a spring jumps or parts fall out, they are easy to find and retrieve. The box is clean, and with the bottom closed, it doesn’t offer many places for small parts to hide. Sometimes, I line the bottom and sides with paper that covers the box’s bottom crevices.

“I like boxes with closed bottoms and front cutouts from discount grocery stores in our area. They encourage us to take groceries home in their empty boxes instead of paper bags, which are taxed in New York. These are great for reaching into instead of down into the box. They make an ideal ‘surgery center’ for complicated components with small parts and a clean work area, which can be thrown away after use.”

From the archive · Full text
Reader shop tip

John Cowell

John Cowell, Granath Mesa, Colo.

“For many years, I’ve used 1/2-in. two-hole conduit clamps (pipe clamps) to fasten wire to wood fence posts, using dichromate-coated ‘gold’ screws. This practice makes fence repair much easier. I use this system for smooth and barbed wire. The zinc-coated or stainless clamps cost less than 10¢ each when bought in quantities of 100.”

Shop feature stories

From the archive · Full text
Feature story

Mobile Hydraulic Pump Has Many Uses

Featured source: John Humeniuk, Baudette, Minn.

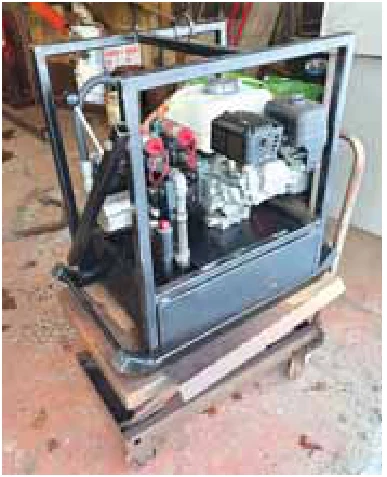
John Humeniuk gets a ton of use out of his mobile hydraulic pump. It powers his log splitter, grain conveyor, sawmill, dump trailer and more. There’s no need to pull up a tractor with hydraulics when he can use his truck with the pump or the pump alone.

“I have an old grain trailer with a lift cylinder on it that I use for wood, sand and more,” says Humeniuk.

“With the pump in the back of my truck, I can drive into town and dump a load of firewood. The auxiliary pump works great if I’m splitting wood too.”

Separating the splitter from a tractor was the reason he decided to build a mobile pump in the first place. He’d built a hydraulic-powered splitter to mount to his tractor’s 3-pt. He put it on skids so it would be easier to move around.

“I got to thinking that a separate motor and pump would be handier than running the hydraulics off of a tractor,” says Humeniuk.

“I discovered I could build one for about $1,200 to $1,300, while I would pay $3,000 for anything like it online.”

He’d put one together about 10 years earlier, but decided it was time for an upgrade. The new one has a 5-hp Honda 160 engine with an electric start that he bought for about $800. A 16-gpm pump was $150. He estimates the valves, battery, hoses, coupling and incidentals added several hundred more.

His first pump had the reservoir on the end. He moved it to a spot under the motor, battery and pump on the upgrade. The more compact design makes it easier to move.

Humeniuk used 1-in. square tubing for the frame and 1 1/2-in. tubing for the skids. A “picking ring” added to the crossbar on the top of the frame makes it easy to pick up and set down with his loader or an excavator.

“I put a detent valve on it, so I can use it with my wood splitter for take-off and return,” says Humeniuk.

“It’s also been great for use with my Timber King 1400 sawmill. With the aid of the auxiliary pump, I’ve upgraded the sawmill to include many of the hydraulic features of the next model up. Building and adding them myself saved many thousands of dollars.”

A piece of steel tubing pinned to one side of the auxiliary’s frame lets him run hydraulic motors, too. He raises the tubing, pulls the detent down, and lowers the tubing to hold the valve in the open position.

The pump also makes it easy to move equipment with hydraulic cylinders around.

“I can set the pump in the back of the truck, back up to a disc or bushhog, and raise it up for towing to another location,” says Humeniuk.

“No tractor needed.”

Contact: FARM SHOW Followup, John Humeniuk, 303 4th Ave. SE, Baudette, Minn. 56623 (ph 218-434-1113; [email protected]).

From the archive · Full text
Feature story

Handy Outdoor Gantry Crane

Featured source: Roy Bertalotto, Dartmouth, Mass.

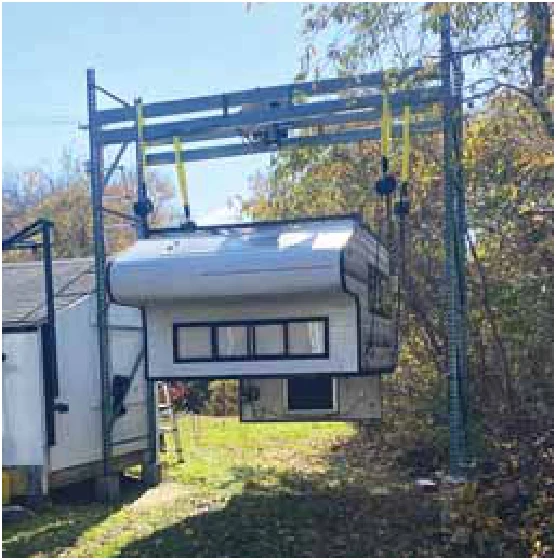
Roy Bertalotto’s gantry crane makes pulling a camper off a truck or lifting a tractor to work on easy. The crane is 12 ft. high, 11 ft. wide and 44 in. deep. Building it with pallet racking was easy, too.

“My biggest concern was that it might tip over, but it’s rock solid,” says Bertalotto.

“I bolted two uprights 44 in. apart to a storage shed and set the other two on concrete piers. I used double stringers between each set of uprights and bolted them together with angle iron to increase load capacity.”

Bertalotto centered a 4,500-lb. winch between the stringers. He estimates the gantry will support a lift of about 1,000 lbs.

“When I want to lift a camper off my pickup, I attach two one-ton chain falls (or chain hoists) to each stringer at the width of the camper,” says Bertalotto.

When he set out to build the crane, he priced pallet racking. He found a wide price range and had several quotes in the $600 to $700 range.

“I ran across a guy online who had bought out a warehouse,” says Bertalotto.

“He had 20 or 30 pieces left. I paid about $75 for each upright and $20 for each stringer.”

Contact: FARM SHOW Followup, Roy Bertalotto, Dartmouth, Mass. (www.rvbprecision.com; YouTube: roybertalotto6355).

From the archive · Full text
Feature story

Handy Air Tool Storage

Featured source: Tool Wrangler

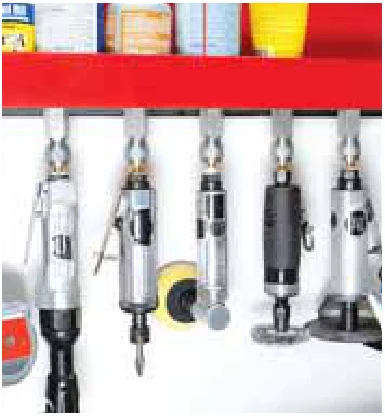
If you’re looking for a quick and easy way to store air tools in your shop, Air Wrangler modular locking pneumatic holders may do the trick. The 1/4-in. quick-connect plug patent-pending design locks tools in automatically.

You can organize your workspace, protect your tools from damage and leave your bits, blades, cutting disks and other accessories installed without damage.

The connectors accept all five types of 1/4-in. quick-connect plugs, including Milton (M and I/M), High Flow (V), Lincoln (L), Tru-Flate (T), and ARO (A). They also work with many other types commonly used across Europe. This simplified design means they’ll work with anything in your shop with a 1/4-in. plug.

They can be bolted to metal or screwed into wood. They feature a threaded bolt hole (M6) in the back and have a pass-through, allowing screws to mount the holders into wood with the included hardware.

Air Wranglers are solid steel, have been tested to 100 lbs., and come with a two-year warranty. When hanging, they keep dirt out and oil in.

They can be installed virtually anywhere in any orientation, such as toolboxes, shop carts or custom racks.

“I love that it doesn’t take two hands to use. It was worth the extra cost. Five stars,” says Ian W. in his online review. Some users commented that while the price was high, the design and strength made them worth the cost over time.

They’re priced at $50 for five air tool holders and are available at the Tool Wrangler website and other retailers. Shipping is additional.

Contact: FARM SHOW Followup, Tool Wrangler LLC USA, 4058 Hwy. 93 S., Unit B, Kalispell, Mont. 59901 or Tool Wrangler Ltd. Canada, 4220 23 St. NE, Bay 6, Calgary, Alberta, Canada T2E 6X7 ([email protected]; www.toolwrangler.com).

From the archive · Full text
Feature story

‘War Wagon’ Trailer Improved

Featured source: Gary Swensen, Yankton, S.D.

Gary Swensen, Yankton, S.D.: “I shared in modifying a one-ton pickup box and rear frame into a field trailer. I’d mounted an 80-gal. propane tank to the tongue to serve as a high-capacity air supply. Recently, I made the trailer we call ‘The War Wagon’ even better.

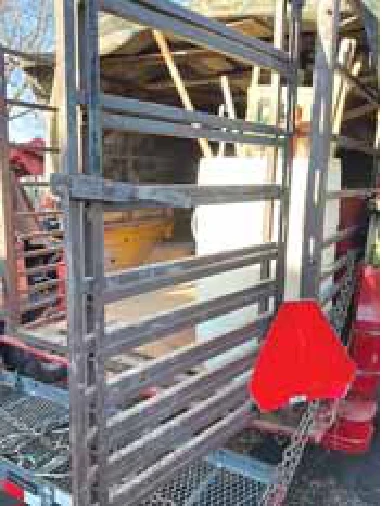
“I slid a 10-ft. stock rack into the trailer bed. It gives me an extra 2 ft. of storage space, as I can leave the tailgate down. It has a sliding door that I can lock to secure tools and supplies.

“The used, factory-built livestock rack only cost me $150, but it’s already been a real plus.”

From the archive · Full text
Feature story

Shop Sink Made From A 5-Gal. Bucket

Featured source: Elijah Apple, Hillsborough, N.C.

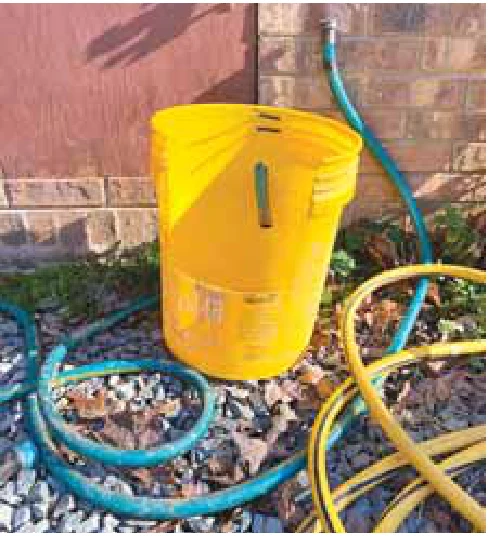
Elijah Apple of Hillsborough, N.C., transformed an old 5-gal. bucket into a shop sink.

“My mom and sister didn’t like me using the bathroom sink because I’d get it dirty,” he says.

“This alternative was really easy to make. All I had to do was cut part of the front out, cut a hole for the hose in the back, cut a drain hole, and that was it.”

Apple used repurposed materials, so the project was free. He estimates that it took him under 15 min. to build.

“The sink works great for what it is,” says Apple.

“I wouldn’t change anything about it.”

Contact: FARM SHOW Followup, Eli Apple, 4725 Kimbro Rd., Hillsborough, N.C. 27278 (ph 984-364-7662; [email protected]).

From the archive · Full text
Feature story

Magnetic Holder Keeps Tools In Place

Featured source: Socket Straps LLC, Murray, Utah

Socket Straps can keep wrenches, sockets, screwdrivers and pliers, as well as nuts, bolts and screws, in place. The magnetic strips come in various sizes and feature powerful magnets.

Made from flexible, seamless urethane rubber, they won’t scratch surfaces and clean up easily. They’re also resistant to chemicals like brake cleaner. Their narrow design allows placement in spots where magnetic dishes won’t fit, such as implements, vehicle frames, and metal shop posts.

Socket Straps keep everything close at hand and not rolling on the shop floor or ground. The strips are black, red or blue and come in small, medium or large sizes. They also have a heavy-duty version suited for large sockets with magnets about three times as strong as other versions. Holes have also been added to both ends to allow a carabiner to secure the socket strap to a belt loop and free up your hands (e.g. when climbing a ladder).

“I was working on my Ford E-350 and didn’t have space for a magnet bowl, but the socket strap worked great. I mainly used it to hold the screws. The magnets are strong enough to put two to three screws in each groove. That made it so easy to keep track of which screw went where, since I put them on the magnet in the same order I removed them,” says Andy Brooks from an online review.

Prices start at $25 and vary based on size. Their website offers free shipping within the U.S. on orders of $50 or more.

Contact: FARM SHOW Followup, Socket Straps LLC, 4218 S 500 W, Murray, Utah 84123 ([email protected]; www.socketstraps.com).

From the archive · Full text
Feature story

Tray Keeps Gear Organized

Featured source: Stupid Technologies, Wauconda, Ill.

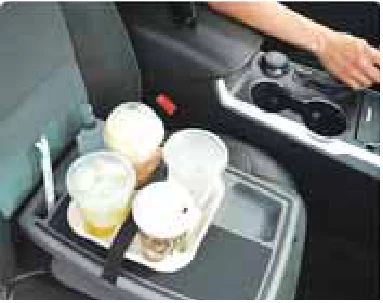
The Stupid Car Tray provides a stable, flat surface for various tasks.

Made in the U.S., it’s designed for use in both front and back seats. It’s ideal for everything from holding lunch while parked to keeping tools, notebooks, and large cups or water bottles steady on rough terrain.

One end features a leg to keep it level in a seat, while an arm slides between the seat cushion and backrest for added stability. A built-in cargo strap helps secure items and can be stowed under the tray when not in use.

The tray is handy for holding a laptop or tablet when parked, making your vehicle a convenient mobile office. Its dimensions are 18 in. by 12 in. by 4 1/2 in. The cargo strap helps secure items like pizza boxes, bakery boxes, or anything else that might slide off the seat while driving.

Priced at $29.99 for the tray alone and $39.99 for the bundle with drink holders, it’s an affordable, multipurpose addition to any vehicle. Discounted shipping is available on the website, and orders over $50 qualify for free shipping. The tray comes in several colors and has an easy-to-clean surface.

One satisfied customer noted, “I bought the Tray for my truck, and it’s been a game-changer. It keeps my coffee and work gear from flying everywhere when I hit a bump.”

Whether you’re a farmer, rancher or someone who spends a lot of time in their vehicle, the Stupid Car Tray proves that sometimes the simplest ideas can be the most practical.

Contact: FARM SHOW Followup, Stupid Technologies, Wauconda, Ill. 60084 ([email protected]; www.stupidtech.com).

From the archive · Full text
Feature story

Made-It-Myself Solar Heater

Featured source: Doug Taylor, Bengough, Sask., Canada

Doug Taylor of Bengough, Sask., built a solar air heater for his shop that exceeded his original expectations.

“I built this heater last October, hoping it would supplement my shop’s heat pump,” he says.

“When sunny, this is my primary heat source, and the heat pump doesn’t even cut in.”

Taylor’s shop measures 30 ft. by 72 ft., while the solar heater is 11 1/2 ft. high by 32 ft. long.

“My walls are concrete-faced foam, but I think the design could be installed over any material,” he says.

“Steel siding would work great. I used 2 by 4s upright, 4 ft. apart. Then, I stapled a wire screen between them. Each screen measures 2 ft. by 4 ft.”

Taylor added three layers of screen spaced a 1/4 in. apart.

“They’re fastened at an angle, out at the bottom and in at the top. The next row higher overlaps the lower row.”

He spray-painted everything flat black and attached twin wall polycarbonate sheets to the 2 by 4s. At the bottom of each 2 by 4, he installed a 4-in. dryer flap that closes when there isn’t airflow.

“This keeps cold air from entering the shop at night,” he says.

At the top, he cut a 4-in. hole for the ducting that goes to the fan.

“I’ve got a thermostatic switch that I put at the top of the heater. When the temperature reaches 80 F, the fan cuts in and heats the shop. Even on -20 F days, it would get to 176 F in the panel. The air from the fan is cooler, though, ranging from 104 to 140 F. It’ll heat the shop between 53 and 57 F on a freezing winter day, plenty warm enough to work in.”

On sunny days when the temperature is around freezing and above, Taylor finds the shop stays warm enough that the heat pump won’t kick in at night.

“When it gets too warm, I’ll just cover the panel with a silver reflective tarp,” he says.

Taylor found the heater to be a quick and affordable project.

“It cost around $1,000 CAD ($700 USD) to build, but I already had the lumber, fan and screen. If I had to buy everything, it would probably be closer to $1,600 to $1,800 CAD.” He estimates it took him a week to build, working two to four hours daily.

“If I had to do it again, I’d paint the wall flat black before installing the screens,” he says.

“The black wall would probably absorb more heat that way.”

For readers interested in making their own heater, Taylor highlights the importance of improvisation.

“If you happen to have lots of old windows lying around, use them,” he says.

“Double-pane windows would definitely be more efficient. I used a heavy 1/8-in. mesh for the screen because I had lots on hand. However, a metal window screen would probably work about the same and be easier to work with. I went with three layers of screen. Two might work, and four might be even better. Take your time to experiment, and you’ll likely come up with some creative solutions.”

Contact: FARM SHOW Followup, Doug Taylor, Bengough, Sask., Canada ([email protected]).

From the archive · Full text
Feature story

Tool Cleans Windshields Inside And Out

Featured source: John Moulton

Windshield WOW! makes it possible to clean both sides of your windshield simultaneously.

“The idea began in early 2018 when I was driving in a torrential rainstorm,” says founder John Moulton.

“The glare from oncoming headlights shining off the dirty windshield made for a dangerous situation. I did the usual gas station squeegee outside cleaning the next day, but it didn’t remove the built-up film and haze. I eventually realized the source of the problem was the inside.”

Moulton learned that vinyl and plastic off-gassing in a vehicle’s interior causes haze and film to build up on the windshield.

“I attempted to scrub the interior, but most people know how awkward that is. I resorted to a microfiber pad on a long stick, but this proved only slightly better than using my arm.” After several days, he came up with a solution: two magnetic cleaning paddles. After 18 mos. and more than 20 prototypes, Moulton had a rugged but flexible magnetic cleaning paddle that could handle a vehicle’s curved glass.

“I showed it to friends and family, and the universal response was ‘WOW!’” he says.

Today, the patent-pending flexible paddles surround strong magnets. It provides consistent pressure across contours for an even clean. When placed on both sides of the windshield, they will bind to each other and improve your cleaning potential. Move the exterior paddle, and the interior will follow.

“It’s quite simple to use,” says Moulton.

“Attach clean microfiber cloths to the Velcro paddles and spray them with glass cleaner. Set the external paddle on the outside windshield, and then reach in and attach the inside paddle. Through magnetic force, both paddles are now magnetically connected, and by moving the outside paddle, the inside moves in unison automatically. Yes, new users experience a bit of a learning curve. But after a few goes, most people can master it.”

The Windshield WOW! works for most vehicle glass, including rear windows with defroster wires embedded into or on them. It’s also safe for use on tinted windows, so long as the tint was professionally installed and doesn’t usually scratch from hand cleaning. This system should not be used for home windows, as the magnet strength is only optimized for automotive glass. Home windows are thicker, so the magnets will not work.

The Windshield WOW! Basic set costs $99.95 and includes dual flexible cleaning paddles, two foam storage/paddle separator trays, a 10-pack of reusable microfiber cloths, a 2-pack of buffing cloths, and a rigid storage box. A Pro set costs $129.95 and adds an adjustable extension arm for easy reach, double the microfiber and buffing cloths, a 4-oz Sprayway glass cleaner spray can, and a silicone scuff guard. Additional reusable microfiber cloths are sold at $14.95 per 10-pack, and buffing cloths are sold for $3.95 for two.

“All of our cleaning cloths can get hundreds of uses as they can be washed and reused,” says Moulton.

Contact: FARM SHOW Followup, Windshield WOW! (www.windshieldwow.com).

From the archive · Full text
Feature story

Eye Wash Station Goes Anywhere

Featured source: Allen Sassman

WASH+OUT® attaches to a standard water bottle, and with a squeeze, it can flush out eye and face irritants in seconds.

It’s lightweight, reusable, and compact enough to keep in your car, tractor or toolbox.

The easy-to-store eye cup attaches to most water bottles instantly and flushes irritants away from the eyes and face.

Allen Sassman often had to make do with what was available while working on job sites, wiping his eyes with a rag or walking to find a hose. However, water bottles were almost always within reach. Inspired by vintage eye wash cups, he designed WASH+OUT to turn any water bottle into an instant eyewash station.

It fits most common water bottles, including Deer Park, Poland Spring, Crystal Geyser, Pure Life, Niagara, Aquafina, Kirkland, Fiji, Essentia, Glaceau Smart Water, Pur Aqua Spring Water, Icelandic Glacial and more.

WASH+OUT’s ergonomic design comfortably fits the contours of either eye.

WASH+OUT is available on the company’s website and on Amazon. It’s made in the U.S. and is veteran-owned. A three-pack starts at $12, plus shipping.

“Have you ever gotten something in your eye? Most of us have. Usually, we’re working on a project, and our hands are dirty. WASH+OUT is easy to use and eliminates problems. We grab our water bottle, spin on the eye cup, flush out the offending particle, and go back to work,” says Ivan Raupp in a review on the company site.

Contact: FARM SHOW Followup, WASH+OUT Company (ph 610-937-1175; [email protected]; www.washoutco.com).

From the archive · Full text
Feature story

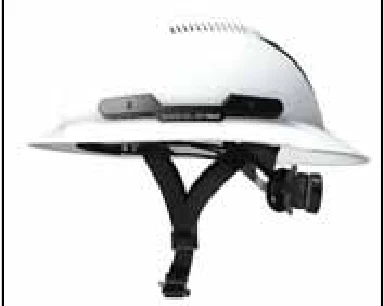
Hard Hats With Advanced Protection

Featured source: David Visnack

The WaveCel impact mitigation system aims to keep your head safe when it’s most at risk. This patented material adds a protective layer to the helmet’s interior, lowering your risk of traumatic brain injuries on the job.

“Think of the dynamic when you hit your head,” says company representative David Visnack.

“First, there’s an impact that could fracture your skull. Every helmet out there protects against fractures. The problem is issues don’t stop there; you can be in serious trouble even without a cracked skull.”

WaveCel addresses this problem by absorbing up to 73% more rotational force than standard helmet linings. The patented material works as a network of interconnected shock absorbers, connecting your head with the helmet’s outer shell to distribute the energy. This lets the helmet absorb impact similar to the crumple zone of a car, flexing and gliding to divert rotational forces.

“If you hit your head, it spins, creating acceleration in the brain,” says Visnack.

“Picture a boxing match where the teeth move separately from the skull.

In contrast, WaveCel absorbs lateral impacts and rotational spin. It’s the only material capable of absorbing both; others will absorb one or the other.” He notes that WaveCel also offers an advantage in terms of comfort.

“It’s a porous material with big cells; there’s way more circulation than standard helmets. Much better airflow.”

Each WaveCel helmet offers a low-profile, lightweight design to avoid head bumping and clipping when working in tight spaces. Since the material eliminates the need for a tall air space to absorb impacts, the dome falls about 20% lower than standard helmets. This, along with a variable-thickness shell design, improves balance, strength and weight to make each helmet lighter and more stable for all-day use. The helmets are rated for temperature ranges from -30 C to 50 C (-22 F to 122 F) and have a five-year recommended lifespan, though any safety equipment used in direct sunlight may need more frequent replacement.

The material is Type II rated for protection from crown, front, side and back impacts. Each helmet comes fully assembled, with an oversized dial, vertical height adjustment, and an optional four-point chin strap with a magnetic FIDLOCK buckle.

All WaveCel equipment is designed, manufactured and assembled in Oregon. The helmets are one size fits most, accommodating head circumferences from 53 to 63 cm or sizes 6 5/8 to 7 7/8. Choose from white, black, blue, red, green, grey or high-visibility yellow and orange. Custom logos and colors are also available upon request.

The hard hats come in two varieties: Pro and Max. While Max is suitable for a variety of projects, Pro is non-ventilated to comply with Class E electrical rating requirements for electrical work and mining. Both varieties are sold through distributors, including White Cap, with an MSRP of $149.

“Anyone that sells safety equipment will have it,” says Visnack.

“And please reach out to us directly with any further questions.”

Contact: FARM SHOW Followup, WaveCel, David Visnack (ph 888-261-2451; [email protected]; www.wavecel.com).

From the archive · Full text
Feature story

Rolling Workshop Made From Camper

Featured source: Dennis Frisbey, Rocheport, Mo.

Dennis Frisbey, of Rocheport, Mo., renovates old camping trailers into a variety of creative projects.

“I found an old gray 28-ft. camper sitting abandoned and noticed the old relic had one strong point—the frame was solid, boxed-tubing construction with a lot of cross braces.” He saw the potential immediately.

“I called the Highway Patrol to apply for a new title. Since there were no serial numbers to trace, I claimed the carcass and dragged it home.”

Frisbey first removed the aluminum siding and salvaged usable items from the interior.

“I cut the body off with a Sawzall and borrowed a tractor to shove it aside. It was more work than expected, especially to replace all the wiring and plumbing,” he says. The camper’s wired for 240 volts, 50 amps, which includes a 12-volt converter and lights.

“With a deep-cycle battery mounted near the hitch, I have interior and exterior lights at all times,” he says.

After sitting dormant for three decades, Frisbey found the brakes too rusty to rebuild.

“Fortunately, there are kits available with the backing plates, shoes and electric hardware ready to bolt on as a complete assembly. I bought four, and it was ready to roll within hours.”

The wheels and tires were also dry-rotted and rusted, which required internet searching to replace.

“The price ended up being cheaper than the local tire store,” he says.

Frisbey used a Sawzall to cut the wheel openings in the outer sheet metal after it was screwed in place.

“Building the doors from scratch was easier than it looks,” he says.

“By using tin that was already cut away, I merely had to trim it down to fit the door.”

The rolling workshop is Frisbey’s most elaborate project to date.

“I got burned out about halfway through,” he says.

“I lost track of how much it cost—don’t ask! But I have no regrets now that I use it weekly.” He laughs that the workshop went way over budget because he wanted to include everything he’d ever need. There are plenty of comforts inside, including a small half bath.

“I’ve got a cot and sleeping bag in the storage bin above the water tank, as well as a camp stove and a few canned goods. I haven’t had to sleep here yet, but who knows what the future holds.”

Some aspects, including homemade fenders, allowed for cost savings.

“It came with cheap inner fenders that couldn’t be salvaged,” he says.

“Pre-fabricated steel fenders could work, but I’m retired now. I had barn tin lying around, so I built the fenders one piece at a time. Not a penny out of pocket, just many hours of work.”

His biggest regret is not using enough wood supports for the sides and roof.

“It seems okay, but I worry about snow sitting on it. I was initially concerned about using Rust-Oleum paint on the workshop trailer, but it’s been several years now, and it still looks good.”

Overall, the workshop works better than he’d hoped.

“I live on an 80-acre campground with several other families. I have an on-board generator and can do anything from welding to electrical or plumbing repair,” he says.

“With the drill press, table saw, band saw and my large toolbox already onboard, I can fix nearly anything that the campground throws at me. This includes a new deck with a wheelchair-accessible ramp for one of my neighbors. Sadly, I don’t get to enjoy a clean workshop often because I’m always in the middle of several projects. I may be retired, but I’m never bored.”

Contact: FARM SHOW Followup, Dennis Frisbey, 401 N. Roby Farm Rd., Lot 12, Rocheport, Mo. 65279 (ph 816-807-1477).