Practical ideas from FARM SHOW MagazineSubscribe · Free issue · Send us your shop tip
Subscribe to FARM SHOW
Issues / Vol. 50, No. 4 (2026)

Vol. 50, No. 4 (2026)

Money-Saving Repairs & Maintenance Shortcuts · Printed section pp. 32–34

36 selected entries · Complete text of selected entries

This issue’s section includes reader tips and feature-length shop stories. Held items and editorial notices are not reproduced.

Archive text: prices, coupons, availability and contact details reflect the original publication, not current offers. Reader methods are not universal instructions; follow manufacturer guidance and proper safety practices.

Reader shop tips

From the archive · Full text
Reader shop tip

Jay E. Wulff

Jay E. Wulff, Council Bluffs, Iowa

“When disassembling or assembling anything with small parts, you’ll likely drop one on the floor. I’ve found that if you get a flashlight, turn it on, lay it on the floor, and shine it around where you think you lost the part, the light will cast a shadow and make it look larger, making it easier to find.”

From the archive · Full text
Reader shop tip

Max Blowers

Max Blowers, Bryant, Ind.

“I bought a box scraper from Tractor Supply and added a bar across the ends of the teeth. Then, with a few more pieces of scrap iron, I built a system to raise and lower the teeth using a hydraulic cylinder. If I set the upper link of the 3-pt. hitch so the box rides on the back scraper, it won’t dig in. I can go to where I want to get dirt, run the teeth down, fill the box, raise the teeth, and the box will slide along the grass to where I want to drop the dirt by raising the box. Back I go for another box full. I pull the box with my 530 Case tractor.”

From the archive · Full text
Reader shop tip

Larry Goodman

Larry Goodman, Ionia, Mich.

“Tired of sorting through loose wrenches, I used a large carabiner for 9/16 to 3/4-in. wrenches and a medium-sized one for 1/2-in. and smaller wrenches. It’s easy to remove them for use.”

From the archive · Full text
Reader shop tip

Monty Montgomery

Monty Montgomery, Hayden Lake, Idaho

“To remove frozen or rusted nuts, bolts, lug nuts and more, the Bolt Buster heat induction tool can save you a lot of grief (www.boltbusterinc.com; ph 630-628-8083). It really works.”

From the archive · Full text
Reader shop tip

Stan Rivers

Stan Rivers, Beaverton, Ore.

“I use an old fold-up ping-pong table in my shop as a large parts and tool storage table when working on equipment. I can roll the table to where I’m working, spread out my old and new parts and tools, and have a place to set my coffee mug, too.”

From the archive · Full text
Reader shop tip

William Watner

William Watner, St. Marys, Kan.

“Tubes of caulk always harden. I’ve tried big wire nuts, and they help. But the best solution I’ve found is to wrap the end of the tube with electrical tape until a tail forms. Sometimes I bend the tail over and tape it back as well.”

From the archive · Full text
Reader shop tip

Ryan Van Der Bill

Ryan Van Der Bill, Sioux Falls, S.D.

“When you cut off excess length from a zip tie, it leaves a razor-sharp edge that can cut you. Use a torch or lighter to slightly melt the end so it’s harmless.”

From the archive · Full text
Reader shop tip

Larry Limb

Larry Limb, Ladysmith, B.C.

“To remove a roller bearing’s outer race from a machine, use a stick welder to carefully run a bead around the inside of the race, then let it cool. It’ll shrink and fall out.”

From the archive · Full text
Reader shop tip

Kelly Creed

Kelly Creed, Ada, Okla.

“My dad taught us that when we have to remove the inside bearing on the front wheel of a rear-wheel-drive vehicle, we remove the cotter pin and nut, then the outside bearing. Screw the nut back on, then slide the wheel/rotor off, allowing the inside bearing to hang on the nut. The bearing and seal hang on the stud, off the floor and out of the dirt.”

From the archive · Full text
Reader shop tip

Anonymous

Anonymous, Pa.

“If you cut a lot of firewood and skid it to one location before cutting to length, you may want to consider getting a load of sawdust to spread on the ground. Roll your logs onto it to prevent blocking up or worrying about what you’ll hit if you cut through. It works great and lasts for several years if you spread it about 4 in. deep.”

From the archive · Full text
Reader shop tip 1 of 2

John Fleissner

Individual tip 1 of 2 from this reader’s published contribution.
John Fleissner, East Aurora, N.Y.

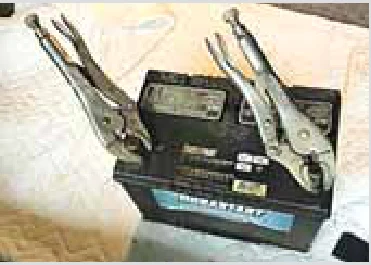
“Don’t put a 9-volt battery in your pants pocket if your keys are in there. I did, and after about 15 min. of sitting at my computer, my right leg started getting really warm. I discovered the battery was shorting out on my keys.

From the archive · Full text
Reader shop tip 2 of 2

John Fleissner

Individual tip 2 of 2 from this reader’s published contribution.
John Fleissner, East Aurora, N.Y.

“I’ve found that a water sealer for boots or shoes works just as well as car wax sprays to keep snow from sticking to your snowblower and clogging it. Just spray the blower after each use.”

From the archive · Full text
Reader shop tip 1 of 4

Fritz Groszkruger

Individual tip 1 of 4 from this reader’s published contribution.
Fritz Groszkruger, Dumont, Iowa

“Get parts from eBay or Amazon instead of the dealer. Chinese parts can be good. Vendors have always treated me right if I communicate through their messaging system.

From the archive · Full text
Reader shop tip 3 of 4

Fritz Groszkruger

Individual tip 3 of 4 from this reader’s published contribution.
Fritz Groszkruger, Dumont, Iowa

“Project Farm on YouTube is an excellent source for comparing products. He runs detailed tests and speaks clearly. You can use the cursor to go back and repeat anything you don’t understand or don’t quite get the first time through, or to get to the summaries.

From the archive · Full text
Reader shop tip 4 of 4

Fritz Groszkruger

Individual tip 4 of 4 from this reader’s published contribution.
Fritz Groszkruger, Dumont, Iowa

“Use a gate hinge that allows the gate to swing 360 degrees for working cattle. The heavy gate has a foot on it. They fold flat against the wall for cleaning out.”

From the archive · Full text
Reader shop tip

Dan Ashburn

Dan Ashburn, Bloomfield, N.M.

“For penetrating oil and chain lube, save your old ATF and mix it 50/50 with diesel. There are better penetrating oils out there, but not for the price. Lighter fluid is typically less than 25% gasoline, with the rest being diesel. Stop wasting your money on this stuff and

mix it yourself. When you’re broke, you learn to save money in a lot of different ways.”

From the archive · Full text
Reader shop tip

Don Wooley

Don Wooley, Lawton, Okla.

“If you’re in a hurry, strapping a rusty gas tank to a tractor wheel or a concrete mixer is a good idea. If there’s no hurry, add 2 in. of water and a pint or two of coarse sand, then carry the tank in your truck bed for a week. Very easy.”

From the archive · Full text
Reader shop tip

Terry Parrish

Terry Parrish

“I don’t use glue to seal the caulking tube end, as it results in cutting the end of the tube. Instead, I use a 3 1/2-in. screw to seal the end, and it works great.”

From the archive · Full text
Reader shop tip

Frank Gross

Frank Gross, Kingston Springs, Tenn.

“I saw a YouTube video showing how to replace valve stem oil seals without removing cylinder heads. Remove the valve covers and the spark plug. Connect compressed air to the cylinder through the spark plug tube. This prevents the valve from falling in. You can now access the seals and replace them.”

From the archive · Full text
Reader shop tip 1 of 3

Darrell Cooper

Individual tip 1 of 3 from this reader’s published contribution.
Darrell Cooper, Chillicothe, Mo.

“A simple way to keep your grease gun clean is to wrap a piece of aluminum foil around the end to catch the oil. You can also do this with any grease line while working on a tractor.

From the archive · Full text
Reader shop tip 2 of 3

Darrell Cooper

Individual tip 2 of 3 from this reader’s published contribution.
Darrell Cooper, Chillicothe, Mo.

“When you need to replace roller chain, take a zip tie, wrap it around each end of the chain, tighten it, and then add a connector link to the chain. The zip tie works like a third hand.

From the archive · Full text
Reader shop tip 3 of 3

Darrell Cooper

Individual tip 3 of 3 from this reader’s published contribution.
Darrell Cooper, Chillicothe, Mo.

“The Stihl GTA 40 steel chainsaw comes with a small screw wrench, but you can use a small zip tie to release it without any tools. You just insert the zip tie into the little round hole on the chainsaw to release it if you need to tighten the chain.”

From the archive · Full text
Reader shop tip 2 of 3

Alan “Lindy” Linda

Individual tip 2 of 3 from this reader’s published contribution.
Alan “Lindy” Linda, New York Mills, Minn.

“A couple of years ago, I bought a new Stihl MS 250. The bar plugged up at the end. I had to stop and clean it several times. I went back to the dealer, but he said there wasn’t a warranty on the bar. I sold the saw. Then I saw a post somewhere about Stihl bars plugging up and that you should just buy a bar from a different manufacturer.

“I had a chance to buy my brother’s 250, so I did. The bar plugged up on pine and popple, just like the other one. I switched to a different brand, and no more plugging.

From the archive · Full text
Reader shop tip 3 of 3

Alan “Lindy” Linda

Individual tip 3 of 3 from this reader’s published contribution.
Alan “Lindy” Linda, New York Mills, Minn.

“Stihl gas and oil plugs gave me all kinds of fits. I’ve poured oil and gas down my leg numerous times. I broke a couple of them. I got to looking at one one day when it absolutely refused to turn in and lock. You have to be careful with them because the inside of the cap can turn around to the outside and no longer lock. All you have to do is rotate the inside back to where it should be. No more trouble.”

Shop feature stories

From the archive · Full text
Feature story

Nifty Removeable Cooler Frame

Featured source: Dale Freeman, Monroe, Va.

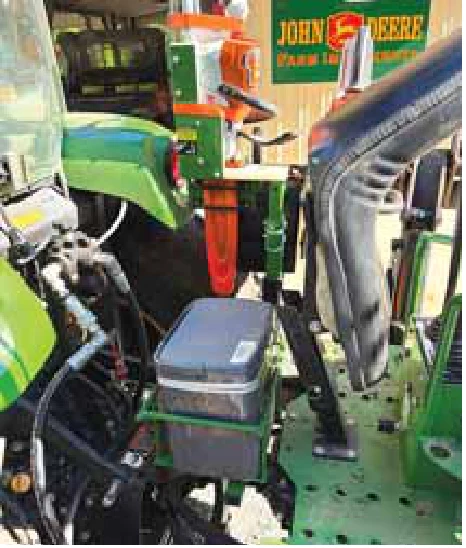
Dale Freeman doesn’t believe in wasted space. When he found room under his backhoe seat for a cooler, he put it to use. As with his chainsaw holders (Vol. 50, No. 3), he used a receiver hitch mount so it’s removable. To access the cooler, he simply tips his seat forward.

“I welded a 1 1/2-in. receiver hitch to the chainsaw holder on the backhoe and fabricated the cooler-holding frame with 1 1/4-in. square tubing on the underside,” says Freeman.

“I just pull one clip to remove the frame and the cooler.”

He was surprised when he first lifted the seat to check the available space.

“I discovered an equipment manual for the backhoe in a plastic holder under the seat,” says Freeman.

“I had another manual and didn’t know the plastic-covered one was there. Removing it gave me another 3 in. of space.”

After selecting a cooler that would fit the space, Freeman designed the frame. He used four 3/8-in. bolts for the cooler frame’s vertical elements, double-nutted the ends, and welded them to two 1-in. wide, 1/4-in. steel flat stock pieces for the base. He then welded half-inch round stock to the top of the bolt heads to complete the frame.

He attached the frame’s flat steel stock base to the 1 1/4-in. square tubing using countersunk flat head bolts. The bolts allow the cooler to lie flat on the base.

Freeman added a drawer-handle-style footman loop to the front of the cooler lid to make it easier to open.

“I used a rubber rivet with a nut inside,” says Freeman.

“The rivet expands as the nut is tightened, locking the loop in place. I get them from Valley Fasteners, one of the best places to get bolts and fasteners.”

Contact: FARM SHOW Followup, Dale Freeman, Monroe, Va.

From the archive · Full text
Feature story

Remote-Controlled Winch Lifts Sickle Bar

Featured source: Jerry Carra, Grayson, Ky.

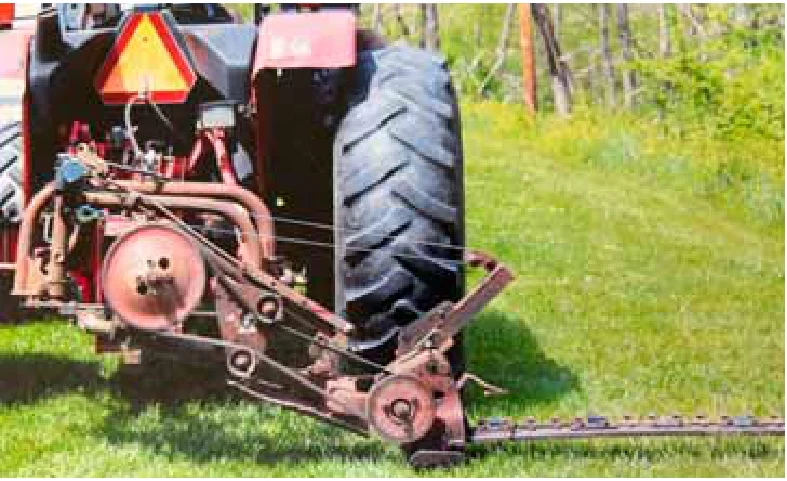
When Jerry Carra’s slightly older friend repeatedly complained about getting on and off his tractor to lift his sickle bar, Carra came up with a solution. He picked up a 12-volt remote-control winch from Harbor Freight and installed it on the mower.

“I mounted the winch on the 3-pt. frame of the mower and made a bracket for a pulley sheave to mount on the sickle bar,” says Carra.

“The bracket was a piece of 2-in. angle iron, reinforced with some channel iron. I welded it to the outboard side of the sickle bar hinge.”

Carra ran the 1/4-in. cable from the winch around the sheave and back to the mower frame beneath the winch. The double line proved just right for raising and lowering the sickle bar. Connecting the winch to the tractor battery was simple, and the remote control eliminated the need to climb on and off the tractor to raise the bar.

“It raises the sickle bar about 80 degrees, which lets him use it for trimming light brush along the field edge,” says Carra.

“He was 86 when I made the lift assist, and he still uses it at 90. It keeps him going, even on our steep hills.”

Contact: FARM SHOW Followup, Jerry Carra, 104 Dogwood Dr., Grayson, Ky. 41143 (ph 606-474-4919).

From the archive · Full text
Feature story

Added Weights Help Blade Dig In

Featured source: Dale Freeman, Monroe, Va.

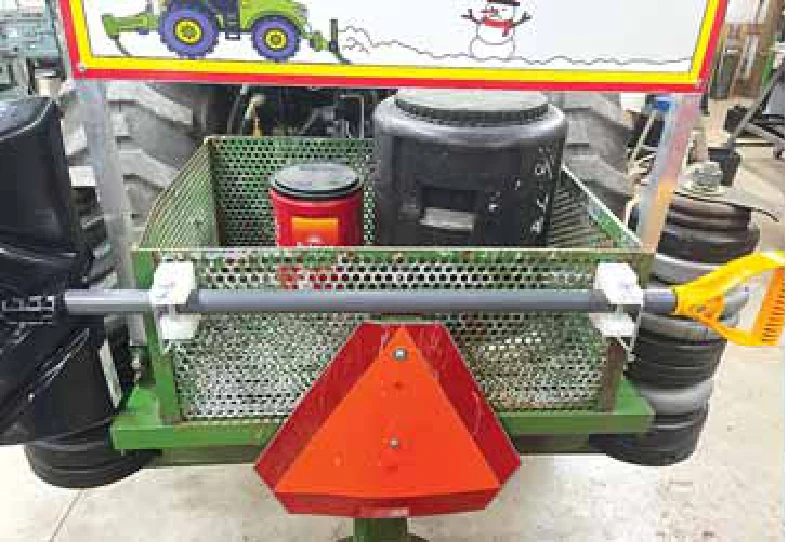
Dale Freeman’s rear-mounted blade digs in rather than sliding over the snow. All it took was some weight. A sand-filled, 10-in. dia., 30-in. long, schedule 40 steel pipe mounted over the blade was just the start.

“I added a 19 by 25 by 10 1/2-in. deep angle-iron frame with expanded-metal sides to the top of the pipe,” says Freeman.

“It works great for holding a small poly barrel of salt and a bucket with tractor-tire chains, should they be needed.”

For added weight, Freeman welded lengths of 3 by 1-in. channel iron to the pipe. They extend beyond the pipe ends by about 11 in.

“I mounted 1-in. all-thread rod in the channel iron and stack old barbell weights on them for additional down pressure,” says Freeman.

At the rear of the catch-all box, Freeman mounted two snow-shovel holders he fabricated from nylon blocks. With the addition of D-clips, they keep a shovel handy for clearing snow as needed.

“I like being prepared, like the Boy Scout manual suggests,” says Freeman.

As part of his preparation, Freeman also outfitted the snow blade with receiver hitches for his chainsaw holders (Vol. 50, No. 3). A length of 2-in. square tubing is welded to the blade’s lower link cross member. He can mount his 20-in. gas chainsaw holder to it. The receiving tube is equipped with jam bolts to reduce vibration when the chainsaw holder is in place.

A second receiver hitch, made from 1 1/2-in. square steel tube, is welded to the angle-iron frame at the right end of the catch-all box. Freeman can mount his battery-powered 10-in. chainsaw carrier to it.

“If a tree or branches fall in a storm, I have my chainsaws handy,” says Freeman.

Contact: FARM SHOW Followup, Dale Freeman, Monroe, Va.

From the archive · Full text
Feature story

Security System Stops Copper Theft

Featured source: Bobby Rader

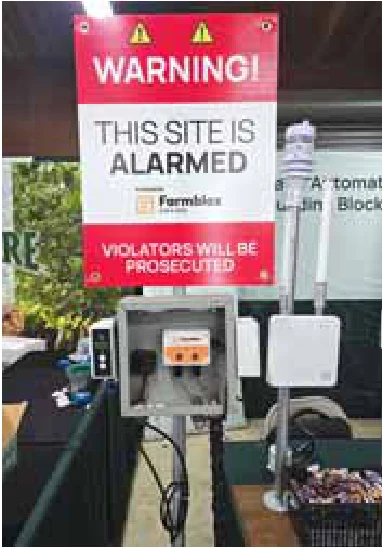
“Copper wire theft is a multi-billion-dollar problem just in agriculture, not counting municipalities and cities, where the loss impacts so many people,” says Bobby Rader, co-creator of the Farmblox COP-R-LOCK Security System.

COP-R-LOCK is a patent-pending system that integrates with electrical panels and supply lines serving well heads, irrigation towers, other farm equipment and commercial businesses. A typical setup will cost a fraction of the repair costs associated with theft.

Rader says, “If someone tampers with the system, an alarm sounds, and soon there’s going to be a police siren and flashing lights. The farmer gets an immediate alert on their phone that activates when the theft is occurring. Law enforcement will also be notified. The wire is protected on the outside and inside of conduits. Motion and distance sensors can also be placed inside the box.”

COP-R-LOCK is built on rugged hardware that works reliably in remote agricultural environments, even those without internet, says Nathan Rosenberg, CEO and co-founder of Farmblox. Tamper-proof equipment is installed on wellheads, irrigation systems, buildings, fences and other equipment that uses costly wiring.

Sensors plug into the Farmblox Monitor, which communicates wirelessly with the Base Station and sends data in real time to a phone or computer app. The system instantly detects problems and sends out alerts. Systems are currently in use by growers in the Central Valley of California and other areas.

“Sales have exploded because of how well the system works,” Rosenberg says.

“We have more than 15,000 COP-R-LOCK devices deployed, protecting more than 680,000 acres of farmland.” William DeBoer, a dairy farmer in Tulare County, Calif., had wires stolen four times from irrigation wells, resulting in a $100,000 loss. Thieves used battery-powered tools and Sawzalls to cut the conduit and wires.

“More lights and fences didn’t solve the problem,” DeBoer says.

“We put cement blocks over conduit, built steel enclosures, and tried other means of protection that thieves were able to break into. After we installed COP-R-LOCK, the devices were totally protected. It gives me peace of mind that my equipment isn’t being messed with. Now I can actually sleep at night.”

Contact the company by phone or through its website for information on pricing, availability and installation.

Contact: FARM SHOW Followup, Farmblox (ph 617-237-0392; [email protected]; www.farmblox.com).

From the archive · Full text
Feature story

Gutschmidt’s Shop Tips

Featured source: Roger Gutschmidt, Gackle, N.D.

Roger Gutschmidt, Gackle, N.D.: “My pickup tines on my baler get bent when they hit rocks or mole or gopher piles. I bend them straight with two simple tools.

“One is a 12-in. long piece of 1/2-in. by 1/2-in. key stock with a 5/16-in. hole drilled at one end. The other is a piece of pipe a little bigger than the tine.

“I slide the hole in the key stock over the bent tine and brace it against something solid. With the tine braced, I slide the pipe over it and bend it back in line with the others.

“It only takes a minute and beats replacing bent tines or having them break off.”

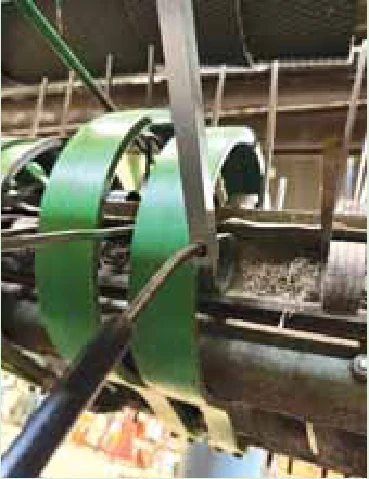
“Debris gets into the bearings on the front auger shafts that connect to the PTO. Dust and debris often cause them to fail. I’ve found some simple ways to protect them.

“One method uses flanges inside solenoids on Delco starters. I’ve rebuilt hundreds of starters over the years in my on-farm repair business. I always cut the solenoid apart to save the copper. The flange is inside. Most people wouldn’t even know it was there.

“Lots of companies use shields to protect bearings. Looking at the flanges, I realized they would work as shields for the bearings on many auger shafts. If the shaft and bearing are apart, you can just slip one on. If not, and you don’t want to take the shaft and bearing apart, use a cutting wheel to cut the flange in half. Slip it over the shaft and use a hose clamp to keep it in place.

“On bigger augers with larger shafts, you can make a shield using a piece of pipe that fits over the shaft and a washer with the correct outside diameter to cover the bearing seal and the shaft. Weld the washer to the pipe, then cut it in half lengthwise. Center it on the hole and clamp it to the shaft. It’ll extend the life of your bearings.”

“A plastic water bottle can save a lot of money when repairing a hydraulic cylinder. Seals for hydraulic cylinder barrels come in packs. You have to buy the pack, even if you only need one or two. Sliding the piston into the barrel can easily damage a seal, requiring you to buy another pack.

“I drink a lot of water when working in the shop, and one day it occurred to me that the quart-sized water bottle was the right size to fit over the piston. I cut off the top and bottom with scissors and made a vertical cut along the length of the bottle, turning the bottle into a sleeve.

“With the seals in place, I wrapped the plastic sleeve around the piston, lubricated it lightly and slid it into the barrel.

“Once the piston was past the seals, I slid the plastic sleeve out. Not only were the seals undamaged, but I was able to reuse the sleeve for the next hydraulic cylinder repair.”

“I picked up four old leg vises with plans to mount them on semi-truck brake drums. I decided to clean them up first. It was a simple process, but it really made them look great.

“I took them apart to check for any damage. Then I sandblasted them and repainted the pieces. Once I sandblast and paint the brake drums, I’ll decide if I want to sell them or not.”

From the archive · Full text
Feature story

Homemade Lawn Clipping Blower

Featured source: Jerry Reid, New Market, Ala.

Jerry Reid puts his lawn clippings where he wants them, whether on the lawn or into the weeds. He can adjust the direction on the go or remove his adapter to blow the clippings vertically. That gives him a smooth spread and no windrowing, which is common with OEM mower output in heavy grass.

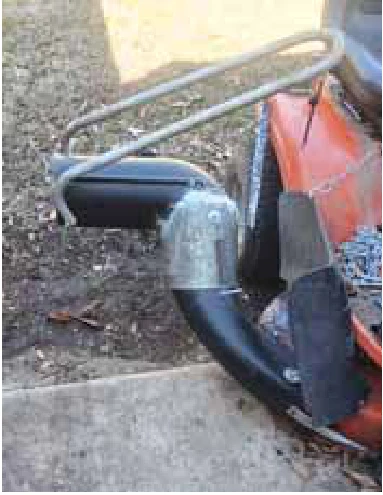
Reid’s lawn-clipping blower was a by-product of his leaf collection system (Vol. 50, No. 3). He’d modified the mower’s output by adding a tube that directed shredded leaves to the leaf cart. He also replaced the mower blades with shredding blades. However, when the leaf cart was removed and the mower blades were returned, the grass clippings were blown into the air.

“When the grass clippings covered the front porch, my wife was not pleased,” recalls Reid.

“At first, I put a bucket over the output tube, but then it had to be cleaned out periodically.”

Reid’s solution was an elbow he could use to direct the flow of lawn clippings. Although he acknowledges that he could have purchased a swivel elbow, he chose to make one from salvaged materials. He designed it to fit loosely over the output pipe. A piece of aluminum tubing salvaged from an old lawn chair was attached to the end of the elbow to serve as a handle.

“The elbow is loose enough that I can tilt it to direct the clippings toward the ground, like a regular discharge,” says Reid.

“I can also direct the clippings up and away from the edge of the lawn and into the woods at the side of the lawn.”

The only downside is that he has to hold the handle with one hand while mowing. Reid notes that in fabricating the elbow with salvaged materials, he had to fill some gaps with putty or caulk.

“I also had to add a spring between the discharge tube and the elbow, or the air flow would blow it off,” says Reid.

“The air pressure is enough that I can use the mower like a leaf blower if needed. It’s enough pressure that it hurts my hand if placed in the flow.”

Contact: FARM SHOW Followup, Jerry Reid, 173 Henry Taylor Rd., New Market, Ala. 35761 (ph 256-519-0819).

From the archive · Full text
Feature story

Cylinder Add-On To Lift Discharge Auger

Featured source: Roger Gutschmidt, Gackle, N.D.

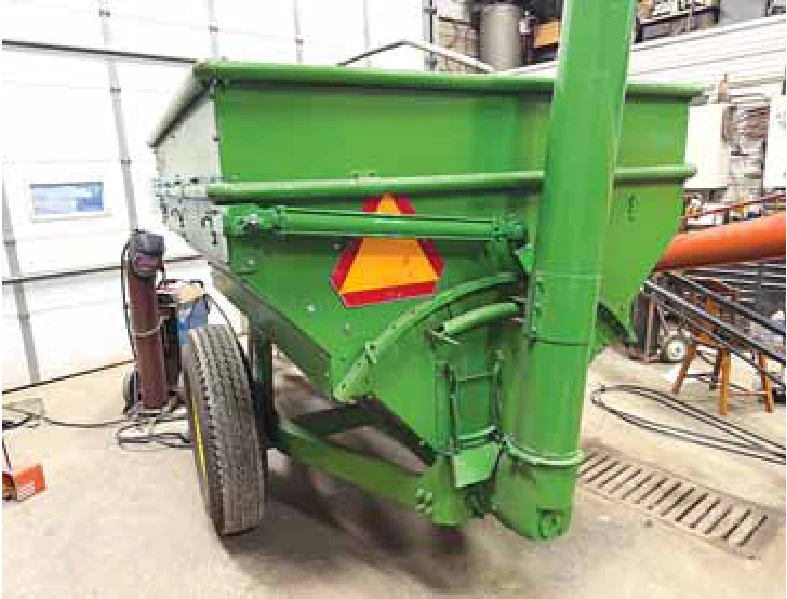
Lifting and lowering a discharge auger isn’t too bad if it isn’t full of grain, notes Roger Gutschmidt. However, it’s still heavy enough even when it’s empty, he adds.

“A 12-ft long, 8-in. discharge auger gets pretty heavy when it’s full,” he says.

“Connected to a horizontal auger under the cart, it’s not like you can empty it from the bottom. The OEM spring assist simply isn’t enough.”

Gutschmidt installs a solution on his own grain cart and on those of customers of his on-farm fabrication business. He mounts a hydraulic cylinder between the auger and a corner of the grain cart.

“I make a heavy-duty bracket to mount to the cart,” says Gutschmidt.

“I use 1/2-in. steel plate for an L-bracket for the cylinder’s base. It’s bolted to a steel plate that extends around the corner of the cart.”

Bolts on the bracket and the steel plate extend through the sides of the cart and through matching steel plates on the inside of the cart.

“The steel plates are stronger than individual washers would be and reinforce the corner of the cart,” says Gutschmidt.

Contact: FARM SHOW Followup, Roger Gutschmidt, Gutschmidt Manufacturing, 202 Elm St. E., Box 311, Gackle, N.D. 58442 (ph 701-269-0537).