Practical ideas from FARM SHOW MagazineSubscribe · Free issue · Send us your shop tip
Subscribe to FARM SHOW
Issues / Vol. 28, No. 5 (2004)

Vol. 28, No. 5 (2004)

Money-Saving Repairs & Maintenance Shortcuts · Printed section pp. 36–39

41 selected entries · Complete text of selected entries

This issue’s section includes reader tips and feature-length shop stories. Held items and editorial notices are not reproduced.

Archive text: prices, coupons, availability and contact details reflect the original publication, not current offers. Reader methods are not universal instructions; follow manufacturer guidance and proper safety practices.

Reader shop tips

From the archive · Full text
Reader shop tip

Stan McDonald

Stan McDonald, Foxboro, Ontario

“Re-cently I was asked to cut some small diameter round stock using a lathe. The problem arose when I attempted to cut the thread. The pressure applied by the tool caused the material to bend out of the way. After some quick research, I came up with this attachment for my South Bend lathe.

“A conventional follower rest has bronze fingers which in time wear away, so I decided to make steel rollers on mine since they could be replaced if needed.

“It works so well I now sell the completed follower rest for $100 (U.S.) plus shipping.” Contact: Stan Mcdonald, 402 Mudcat Road, Foxboro, Ontario K0K 2B0 Canada (ph 613 968-9516; email: [email protected]).

From the archive · Full text
Reader shop tip

Ken Scharabok

Ken Scharabok, 1645 West Blue Creek Rd., Waverly, Tenn. 37185

“The blacksmithing tools I make for sale on eBay (See Vol. 28, No. 3) require that I keep a small quantity of many sizes of steel on hand. To use space efficiently, I built this rack onto the walls of my shop. In 24 ft. of wall space, I have room for 48 sizes of stock. I made the racks simply by drilling upward tilting holes in the 4 by 6 posts and the 2 by 4 studs in between. I then drove 10-in. sections of 3/8-in. dia. rebar into the holes. The rebar was a lot cheaper than big spikes would have been.”

From the archive · Full text
Reader shop tip

H.L. Baggett

H.L. Baggett, Hollow Road, Tenn.

“I traded for a Snapper SRI30 riding mower with a 12 hp. Briggs & Stratton engine. Unfortunately, it had a lot of problems so I had to do some work on it.

“I cut 2 in. off the forward bottom edge of the deck, giving the blades a more open-angle to cut the grass and weeds. I also welded the deck-lift arm to the deck lift shaft to strengthen it. And I bolted chain in place of the original ‘fishing line’ dia. decklift attachments at the rear of the deck.

“In addition, I moved the seat back 7 in. to accommodate my girth. I mounted the steel seat on hinges to make it easier to change the air filter. And I replaced the two-piece carb with an old single-piece carb.

“I put roller thrust bearings on the front spindles, to ease steering between the axle and lower washer on the spindle. Finally, I repainted the tractor.

“This mower now cuts 4-ft. tall weeds and brush at 1/4 throttle. In fact, I mowed an acre of 4-ft. high weeds and brush on 1 gal. of gas. Cutting off the front 2 in. on the deck made it much easier for the mower to cut tall stuff.”

From the archive · Full text
Reader shop tip

Steve Nienow

Steve Nienow, Rochester, Minn.

“I use old, worn-out V-belts to hold ropes, hoes and extension cords on hooks. They grip well and are easy to use by looping them around. Works great.”

From the archive · Full text
Reader shop tip

Lee Dietsch

Lee Dietsch, Hamler, Ohio

Here’s a quick and easy way Lee came up with to fix leaks in pipe such as hydraulic lines on heavy equipment and copper plumbing. Great for farmers and excavators and anyone else running heavy equipment where hydraulic lines can get dinged while working. You can make a quick repair and keep working without a lot of downtime.

Here’s how it works: Rather than cut the pipe and install a new section or coupler, Lee simply wraps a piece of wire around the pipe over the leak and then solders it in place. He uses steel wire on steel hydraulic lines and copper wire on copper piping. The wire reinforces the pipe and the leak is easy to seal by covering the wire patch with solder.

From the archive · Full text
Reader shop tip

Everett W. Gustafson

Everett W. Gustafson, Brockway, Penn.

“I added a step to my Farmall Cub tractor to make it easier to get on. I used a 2-in. wide piece of strap iron, twisted and bent into the shape of a stirrup. I hooked one end over the right pedal bracket and found a convenient place to bolt the other end.

“Then, I braced it with a piece of angle iron that runs up under the operating platform.”

From the archive · Full text
Reader shop tip

Don Hofer

Don Hofer, Wrentham, Canada

“My uncle Dave built a large table-mounted belt sander for his blacksmith shop. It has a swivel so you can sand sideways on the long plate or small plate by tilting the sander straight up with the swivel. The sander has a belt tightening device to easily tighten the sandpaper or loosen and release the sandpaper to replace it. The belt is driven by a 5 horsepower motor so it has tremendous power.”

From the archive · Full text
Reader shop tip

Bob Johnson

Bob Johnson, Irvington, Ky

“To get rid of my old oil without having to go outside in winter, I put a 55-gallon barrel on a stand outside the building and ran a piece of 3/4-in. heater hose from the barrel into the shop through a hole in the outside wall. The hose connects to a 2 1/2-gal. bucket in the shop. Now, I just pour all my old motor oil in the bucket and it drains into the barrel.“

From the archive · Full text
Reader shop tip

Mark Bruellman

Mark Bruellman, Rolfe, Iowa

“Whenever I use the chop saw in my shop, I don’t like all the dust and smell it makes. To solve the problem, I placed the chop saw on a workbench in front of a d o u b l e hung window with a spring in it so it d o e s n ’ t take much effort to go up and down. I hooked a rope up to the window and ran it over a pulley, so that whenever I grab the rope it automatically pulls the window up and all the dust shoots out the window. It saves having to reach over the back of the workbench to open the window. A long lag bolt is embedded in the window frame, and I simply push it down to shut the window. If I did a lot of cutting, a vacuum system might work better. But for occasional shop use, this idea works fine.”

From the archive · Full text
Reader shop tip

Larry Johnson

Larry Johnson, Ontario, N.Y.

“I have three 25-year-old pieces of equipment that are all powered by single cylinder Kohler engines that won’t start after they sit idle for a day or two. To solve the problem I put the primer bulbs off outboard motor gas tanks on the gas lines. Now all it takes is a few squeezes and they start the first time over.”

From the archive · Full text
Reader shop tip

Michael S. Metcalf

Michael S. Metcalf, Albion, N.Y.

“The coulter hubs on my IH 710 and 720 plows kept wearing out on the bottom where soil rubbed on them. To solve the problem, I built a guard out of pipe and a flat iron bracket to fit under each hub. They work great.”

From the archive · Full text
Reader shop tip 1 of 3

Gerald A. Borders

Individual tip 1 of 3 from this reader’s published contribution.
Gerald A. Borders, Sullivan, Ind.

“To extend the life of sealed bearings I use a grease needle like the kind used on chainsaw tips. I simply poke a hole in the seal and shoot some grease in. Saves a lot of down time.

From the archive · Full text
Reader shop tip 3 of 3

Gerald A. Borders

Individual tip 3 of 3 from this reader’s published contribution.
Gerald A. Borders, Sullivan, Ind.

“I use a non-contact electronic thermometer to check the temperature of bearings, radiators, engines, electrical connections, etc. Saves a lot of problems and time.”

From the archive · Full text
Reader shop tip

Stan McMurachy

Stan McMurachy, Hamiota, Manitoba

“After retiring from farming we moved into town. The house we bought had 9 1/2-ft. high ceilings which were too high to reach when changing light bulbs. To make it easier, I attached a small funnel to the end of a 6-ft. long mop handle and then glued a 2-in. wide strip of inner tubing inside the funnel. The strip of inner tubing holds the bulb upright so I can both remove a burned-out bulb and install a new one in the socket.”

From the archive · Full text
Reader shop tip

Jason Godfrey

Jason Godfrey, ph 828 453-8527; email

[email protected]: “On the farm working out of my truck, I sometimes find myself needing a vise for tough jobs. So I came up with this simple vise stand that fits into the receiver hitch on my pickup. The vise mounts on top of a bent metal arm. I can either rotate the vise sideways for transport or straight back, which allows me to let down the pickup tailgate and use it as a work bench.”

From the archive · Full text
Reader shop tip

Jake Penner

Jake Penner, Winnipeg, Manitoba

“I found a cheap way to obtain carbide-tipped cutting tools for my metal lathe. I remove carbide tips from junked 10-in. table saw blades and silver solder them onto my lathe tool, then grind them down to fit my needs.”

From the archive · Full text
Reader shop tip

Larry Hershberger

Larry Hershberger, Kalona, Iowa

“I needed a cart for my welding torch so I converted an old gas grill into a torch cart. I re-moved the lid from grill and cut holes the size of my welder’s tanks into the bottom. Then I mounted awn mower wheels on it.”

From the archive · Full text
Reader shop tip 1 of 2

Russ Kowtun

Individual tip 1 of 2 from this reader’s published contribution.
Russ Kowtun, St. Paul, Alberta

“The chain tightener rub blocks on my New Idea 486 baler caused the chain to wear prema-turely. To solve the problem I replaced the blocks with chain idler pulleys. It worked and didn’t cost much.

From the archive · Full text
Reader shop tip 2 of 2

Russ Kowtun

Individual tip 2 of 2 from this reader’s published contribution.
Russ Kowtun, St. Paul, Alberta

“The floor sump pit in my farm shop re-quires cleaning every two to three years, but it’s worth it because it keeps grit out of the sewage system.”

From the archive · Full text
Reader shop tip 1 of 2

Gary Anderson

Individual tip 1 of 2 from this reader’s published contribution.
Gary Anderson, Bowden, Alberta

“After the ‘turtles’ on the cutterbar on our Deere 935 discbine started showing wear, we simply swapped the clockwise turning units with the counter clockwise turning units. This doubled their life expectancy.

From the archive · Full text
Reader shop tip 2 of 2

Gary Anderson

Individual tip 2 of 2 from this reader’s published contribution.
Gary Anderson, Bowden, Alberta

“We use several older house dressers with large drawers to store spare parts for our major machines. Each dresser and drawer is labeled clearly as to what’s inside.”

From the archive · Full text
Reader shop tip

Robert Larsen

Robert Larsen, Potlatch, Idaho

“The overdrive transmission on my 1993 Dodge Intrepid wouldn’t shift into gear after it sat overnight. I had to let the car run for some time in park before the transmission would go into gear. Transmission shops told me it needed a $3,000 overhaul. Instead, I used four ounces of limited slip additive which solved the problem. That was a year and 8,000 miles ago, and the transmission still works perfect. The car has about 150,000 miles on it.”

From the archive · Full text
Reader shop tip

Lee W. Pedersen

Lee W. Pedersen, 78 Taft Ave., Lynbrook, N.Y. 11563

Pedersen sells a new alcohol-resistant gas tank sealer for gas engines, tractors, cars, trucks, boats and planes. It’s formulated to resist most gasoline additives such as alcohol and methanol.

According to Pedersen, the product seals pin holes and leaking seams and keeps rust and scale out of fuel lines and filters in steel, cast iron, and aluminum fuel tanks. It pre-vents deterioration of both old and new tanks and is not affected by gasoline, kerosene, or diesel fuel. To use it, you simply shake loose rust and scale out of the tank, pour in the sealer, and rotate the tank to evenly cover all surfaces. You can pour excess sealer back into the can for reuse. The product can be used to seal carburetor and gas tank floats, too.

Available in pint, quart, and 1-gal. sizes. A pint sells for $23.75 including S&H; a quart for $29.75.

From the archive · Full text
Reader shop tip 1 of 2

Dave Nicholas

Individual tip 1 of 2 from this reader’s published contribution.
Dave Nicholas, Martinsville, Ohio

“Whenever I find a big discount store like Walmart with rubbing alcohol on sale for 25 cents a pint or so, I buy a case. Twice a year, around Easter and Thanksgiving, I dump a pint of rubbing alcohol into the fuel tank of every wheeled vehicle that I own. It prevents condensation from building up in the tank. Isopropyl, the compound found in rubbing alcohol, can absorb up to three times its own volume in water, yet the fuel remains combustible. The alcohol mixes with the water and the resultant compound loses its surface tension and dissipates throughout the gas and gets burned. Eliminating condensation in the tank keeps rust scale from forming in the fuel lines and fouling up the fuel jet and carburetor orifices. It also keeps water from forming in low spots in the fuel line which eliminates freeze-up.

From the archive · Full text
Reader shop tip 2 of 2

Dave Nicholas

Individual tip 2 of 2 from this reader’s published contribution.
Dave Nicholas, Martinsville, Ohio

“Once every year I put two teaspoons of brake fluid into the auto transmissions on my vehicles. The brake fluid keeps the front seal and other seals inside the transmission soft so they don’t crack and dry up. I started using this idea 50 years ago and have never had a front seal in an automatic transmission go bad. The same idea will work in power steering systems to keep them from leaking. The small amount of brake fluid isn’t enough to cause any damage.”

From the archive · Full text
Reader shop tip

Pat Prom

Pat Prom, Eden Prairie, Minn. 55347

“I modified my Makita handheld grinder so I could use it like a lathe to ‘turn’ down a hardened 1 1/2-in. dia. steel shaft to mount a bearing and a sprocket hub on it. I removed the side-mounted handle from the grinder and bolted on a small angle iron bracket. The angle iron fits into the cross feed slot on my turning lathe, where the tool bit would normally mount. The grinder’s body is laid on its side, and its 4-in. dia. stone wheel is actually below the center of the shaft. However, that isn’t a problem because the wheel turns in the same direction as the shaft. It works great.”

From the archive · Full text
Reader shop tip

Steering Wobble On GM Pickups

Steering Wobble On GM Pickups

On 1973 to 1991 GM vehicles equipped with steering column tilt assembly, often the assembly comes loose and wobbles as the vehicle ages. Most people believe the column is worn out but that’s not the case. For some reason, GM did not use thread-lock on the four screws on the tilt assembly so they loosen, causing the wobble. This is especially found on lifted trucks where the steering column is used as a grab handle during entry.

To fix the problem, you disassemble the steering column and reinstall the four screws using thread-lock compound. This will permenently solve the problem. (4-Wheeler Magazine)

From the archive · Full text
Reader shop tip

Illinois Glove Company

Illinois Glove Company

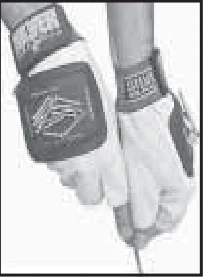
Have you ever looked at the pieces of a project and wondered how you were ever going to keep from losing all the screws and other parts? Now, with Silver Back Magnetic Gloves, you won’t have to worry about it. Metal parts will stick to the magnets on the back of each glove.

The magnets are actually strong enough to hold a hammer and the magnetism is permanent.

The gloves have half fingers so you have complete control over small items. They’re made of soft and durable suede cowhide which can be cleaned with suede leather cleaner.

You can check out their website at www.silverbackgloves.com to find a retailer nearby that sells them or order them online for $30.00 plus S&H.

Shop feature stories

From the archive · Full text
Feature story

Do-It-Yourself Soft-Jawed Vise

Featured source:

Here’s an oldie but goodie that we spotted recently in an auto repair magazine.

When you’ve got a soft part to put into a vise, it’s always tricky to keep from bending or crushing whatever you’re working on. A good alternative is to make your own soft-jawed vise.

You can make one out of a single piece of 2 by 8 pine and it’ll be easier and quicker to use than a conventional vise.

You cut the wood as shown in the diagrams and then bolt the two stationary pieces to the top of your work surface. The third piece simply slides in to wedge itself against the part you want to hold. You can give it a couple taps with a hammer to lock it in place.

From the archive · Full text
Feature story

“Fusion Powder” Stretches Life Of Steel Parts

Featured source:

Why do Larry Schmedding’s feed mixer knives last five to seven times longer than factory-installed knives? It’s all in the powder, he says.

“We apply a 3/4-in. wide band of tungsten carbide/borium mix to the flat side edge,” says Schmedding of Agri-Tool & Supply, Inc.

“It’s applied with a fusion powder torch. We don’t put anything on the back side because it cuts on an angle and self sharpens.”

Tungsten carbide is next to industrial dia-monds in hardness. Adding it to the borium creates a fine particle size for smoother application and less wear or breakage of the tungsten.

Customers tell him one of the big savings is reduced machine down time. They don’t have to take time to replace worn knives, and the mill operates at its peak efficiency, says Schmedding.

Another advantage of his replacement knives is their fit. Blades as narrow as 3/8 in. and 1/2 in. often require a backing plate. The hard edge acts as a large shim and keeps them stiff and in place.

“Our knives don’t need a backing plate because they fit exactly,” says Schmedding.

The special fusion powder process is not limited to feed mixer knives. It can be put on any surface subject to wear including auger flighting, wear plates, sweeps, drill bits and many other surfaces.

“We sell the powder with application specifications to people who have a fusion torch. If they don’t have a torch, we’ll sell them one and the powder,” says Schmedding.

“Some folks have the torches, but don’t know how to use them. I can teach them over the phone whether they bought them from me or not. It is part of my service to answer the phone 24/7.”

Blade prices range from $20 to $96 depending on make, model and steel prices. An entire do-it-yourself package of torch, five pounds of powder and instructions sells for $850.

Schmedding specializes in farmer friendly welding materials, such as an all-purpose welding rod with 85,000-lb. tensile strength. The electrode can be used in any position, even overhead. He also does a lot of chrome coating of high-wear parts.

“We have approximately 250 different wear resistant castings for use in various agricultural applications,” says Schmedding.

Contact: FARM SHOW Followup, Larry Schmedding, Agri-Tool & Supply, P.O. Box 612, Greenacres, Wash. 99016 (ph 800 321-5460 or 509 928-1872; website: www.perfectpass.biz).

From the archive · Full text
Feature story

Lawn Mower Blade Tools

Featured source:

Here’s a handy set of tools I’ve been using to sharpen lawn mower blades.

I spotted them in a recent J.C. Whitney catalog and have been using them for several months.

In the past I just sharpened blades on a grinding wheel. While that works, it’s hard to do it evenly and I worried about blades getting unbalanced and putting undue strain on the motor and bearings.

The kit consists of two parts: a sharpener wheel that mounts in an electric drill chuck and a balancer for checking your work.

The sharpener has a beveled grinding stone and a plastic disk just behind it that you place against the back of the blade as you move along, sharpening. It can be used to sharpen other blades, too. Fits 1/4 and 3/8-in. drills.

The balancer consists of a pyramid-shaped top part that floats freely on an upright pin. You set the blade on the top part and it settles down to the right level, depending on the size of its center hole. If the blade is sharpened evenly, it’ll stay level. If it tilts, you can sharpen a bit more material off the heavier side.

I paid $3.99 for each tool. Contact: FARM SHOW Followup, J.C. Whitney, www.jcw.com. (ph 800 603-4383)

From the archive · Full text
Feature story

Power Hacksaw Made From Washing Machine Parts

Featured source:

Alvin Wallace used a transmission from an old washing machine to create the reciprocating action needed for this power hacksaw. It was an upright washing machine with a “dasher” that sloshed water first one way, and then the other.

The main frame for the saw was fashioned out of 6-in. channel iron. The saw blade is held by a couple pieces of 2-in. flat iron, one of which pivots for mounting and dismount-ing the blade.

There is a connecting rod from the washing machine agitator gear to the saw. It changes rotary motion to reciprocating motion.

Just in back of the driving mechanism is an extension on the main arm that has notches for adjusting a hanging weight. The placement of the weight determines how much down pressure to apply to the metal being sawed.

Contact: FARM SHOW Followup, Alvin Wallace, Rt. 2, Blyth, Ontario N0M 1H0 Canada (ph 519 523-9268).

From the archive · Full text
Feature story

Don’t Throw That Old Cordless Drill Away

Featured source:

You can recycle cordless drills by replacing the worn-out batteries with an old electric cord and a couple of alligator clips. Then, any 12-volt car, truck, or tractor battery can become a power source, says Gary Goldsberry, Stillwater, Okla.

“About five years ago the batteries in my Makita 7.8-volt drill would no longer hold a charge,” says Goldsberry.

“Replacement batteries cost more than the old cordless drill was worth. So, I thought I could finish the old cordless drill off by removing the dead batteries and replacing them with a cord and clips to use on a small 12-volt motorcycle battery that I could easily carry around. However, I discovered that the drill ran a lot faster on 12 volts than it did before and a lot longer without needing a charge. It even outlasted the motorcycle battery, so I started using the drill with any battery that was handy, in or out of a vehicle. Adding longer cords didn’t seem to affect the drill’s performance.”

Just about any cordless drill can be converted, says Goldsberry.

“I’ve converted Makita, Black & Decker, and Skil models, and I don’t think the drill’s original voltage makes much difference. Lower voltage drills run faster; higher voltage drills run slower.”

To make the conversion, Goldsberry opens the drill’s body and removes the batteries, then solders the electric cord wires to the battery contacts. Next, he makes a hole for the cord in the handle, then closes the body and solders alligator clips to the other end of the cord. He’s now ready to put the drill back to work.

Contact: FARM SHOW Followup, Gary Goldsberry, 925 W. 9th Ave., Stillwater, Okla. 74074 (ph 405 372-1612; email: [email protected]).

From the archive · Full text
Feature story

Repowered IH Crawler

Featured source:

When the diesel engine wore out on his 1956 IH crawler tractor, Kevin Cohrs, Glencoe, Minn., found a low-cost way to repower it with a diesel engine out of an IH 4386 4-WD tractor.

The original engine was equipped with a torque converter and 8-speed manual shift transmission. He removed the engine and torque converter but kept the transmission and installed the 4-WD tractor’s DT466 engine. Then he made a short driveshaft and coupled the crawler’s 8-speed transmission to a 5-speed Spicer manual transmission, which he got out of a truck.

“It was a perfect swap,” says Cohrs, who uses the crawler to pull his 5-ft. laser-con-trolled tile plow.

“I got the replacement engine from a friend who does mechanical work.

“The IH crawler is a great machine but its engine was never very good and parts for it are hard to find and very expensive. On the other hand, the IH 4-WD tractor’s DT466 engine has a great reputation and is widely used in the company’s tractors and trucks. I also used the tractor’s muffler, air intake, fan, shroud, and tachometer.

“The crawler’s original engine had 1,000 cu. in. and 230 hp. The new engine has 466 cu. in. and 225 hp, which is about the same horsepower. However, the new engine is much smaller, which made it easy to install and also makes it easy to work on. And because the crawler now has two transmissions, I can go as slow as 1/3 mph with the engine only at half throttle. At that speed the tractor goes so slow I can hardly see it move. The slow speed works great for plowing tile because the laser has more time to control the plow.”

Contact: FARM SHOW Followup, Kevin Cohrs, 6468 90th St., Glencoe, Minn. 55336 (ph 320 864-5780; email: Cohrsfarms @hotmail.com).

From the archive · Full text
Feature story

Chain Saw Chop Saw

Featured source:

You can convert an old chain saw into a low-cost steel chop saw, says Vern Desotell, Clarissa, Minn., who mounted a 14-in. dia. chop saw blade onto the bar of an old chain saw that he already had.

“It was an old saw made in the 1960’s and was too heavy to haul into the woods any more,” he says.

So he removed the saw’s chain and drilled a couple of holes at the outer end of the bar. Then he took the arbor from a cheap table saw and bolted it to the bar. He welded a pulley to the chain saw’s clutch and ran a V-belt between the pulley and the arbor. He then bolted the chop saw blade to the opposite side of the arbor. The last step was to mount a steel guard over the blade.

“It’s really handy. I use it any time I need to cut a chunk of steel,” says Desotell.

“Commercial chop saws with this much power cost about $600 so I saved a lot of money. I already had the chain saw as well as the arbor. My only cost was the $10 I paid for the chop saw blade. I use the chain saw’s bar tension adjuster to tighten or loosen the belt. I think the same idea would work on newer chain saws, as long as they have enough power.”

Contact: FARM SHOW Followup, Vern Desotell, 39825 22 nd Ave., Clarissa, Minn. 56440 (ph 218 756-2160).

From the archive · Full text
Feature story

Ford F-250 Powered By Converted Olds Diesel

Featured source:

There’s a ’84 Ford F-250 3/4-ton pickup in New Jersey that’s had an unconventional life. There were more than 270,000 miles on its original 351 engine before it was replaced in 1995 with an Oldsmobile diesel engine that had been converted to gas. They also installed a GM transmission.

Owner Antonio Seda and some friends got the Oldsmobile engine at an auction. He lives at Great Meadows, N.J. and was assisted by Eric Barsony and Mike Haynes.

To convert the diesel engine to gas, the trio took the whole top of the engine off and put on a new set of heads. They modified the intake manifold and installed a four-barrel Oldsmobile carburetor. All they used from the original was the block.

The block is a 1968 or 1969 and according to Barsony, it was easy to put in because the original drive shaft length was a good fit. Only a few minor modifications were necessary, like elongating the holes on the frame for the motor mounts, putting on brackets for the back end of the transmission, modifying the shifting linkage, and changing the yoke on the drive shaft.

“The job was made a lot easier because we also installed the TH400 GM transmission,” Barsony says.

Since the converted engine was installed, Seda has put on another 120,000 miles and it’s still going strong.

“I’ve driven to California with it 18 times,” Seda says.

“I’d put it up against anything else out there. I get about 18 miles per gallon and it has a lot of power. I do a lot of driving and hauling with it. The truck has a heavy frame - the type that’s suitable for a tow truck or ambulance.”

Because the engine was originally a diesel, it has a stronger crankshaft and bearings in it and a stronger block, according to Seda.

“I have a lot of Oldsmobile diesels on hand and would consider selling some of them,” Seda says.

Contact: FARM SHOW Followup, Antonio Seda, 66 Danville Mt. Rd., Great Mead-ows, N.J. 07838 (ph 908 637-9843).

From the archive · Full text
Feature story

Service Truck Has A Fold-Out Roof

Featured source:

“It lets me do repair work outside even when it’s raining,” says Lee Schunk, Clare, Mich., about his home-built service truck that’s equipped with a pair of “roofed” toolboxes, one on each side.

The truck is a 1999 Chevrolet 3500A 1-ton model equipped with a 12-ft. flatbed on it. On each side of the flatbed are toolboxes that measure 4 ft. long, 4 ft. high, and 2 ft. deep. The door on each toolbox is hinged at the top and swings out - with help from a pair of gas shock assist cylinders - to create a “roof” that’s about 8 ft. high. A metal bench folds down just below each toolbox to create a 1-ft. deep work area.

One toolbox contains a rack that’s hinged at one end and swings out. Both sides of the rack carry tools. Shelves behind the rack are used for storing larger tools such as cutting torches, pipe wrenches and threaders, etc. A generator is stored in a compartment in front of this toolbox, while a compartment behind it contains clear plastic trays. A metal bracket containing a 5-gal. water jug mounts on back of it.

The toolbox on the other side of the truck is filled with parts trays. A 4-ft. wide open area between the boxes provides room for extra storage.

Power outlets mount all the way around the truck for operating drills and grinders, etc.

“It’s really handy,” says Schunk.

“There’s a light on the underside of each door which automatically comes on whenever I open a toolbox. I built it four years ago for my brother who does repair work for an oil company and uses it in the oilfields. He likes it because he can keep working even when it’s raining. I haven’t had time yet to build one for my own farm.”

Contact: FARM SHOW Followup, Lee Schunk, 5503 S. Cornwell Ave., Clare, Mich. 48617 (ph 989 429-3921).

From the archive · Full text
Feature story

“Made-It-Myself” Tire Bead-Seater

Featured source:

Brian Maring of Eddyville, Nebraska, spent only $1.50 and about two hours of time to make a tool that would cost him $300 to $350 to buy at a tire shop.

The main components of the tire bead seater consist of an 8-gal. air tank and a butterfly valve.

“In the middle of the tank, I welded a 3-in. pipe nipple and screwed on a very large quarter turn ball valve,” he explains.

“It connects to an 18-in. long, 2 1/2-in. dia. piece of pipe, with the end squeezed to a flat oval shape. To the top side of that, I welded on a 3-in. piece of angle iron. A quick coupler on the tank hooks up to an air hose, and that’s what cost $1.50.”

To seat a tire bead, you fill the tank with air and then rest the angle iron piece against the rim so the pipe points between the tire and the rim. A quick open of the valve blows the air into the tire so fast that it brings the tire up and seals it off. Then you can finish airing up the tire and check the pressure.

“The biggest tire I’ve used it on was a 22-in. truck tire and it worked wonderfully,” he says.

Contact: FARM SHOW Followup, Brian Maring, HC 2, Box 73, Eddyville, Neb. 68834 (ph 308 858-4637; email: [email protected]).

From the archive · Full text
Feature story

Big Crusher Takes On All Filters

Featured source:

Martin Erickson doesn’t mess around when it’s time to crush a used oil filter or chemical can, paint can, etc. With 34,000 lbs. of crush-ing power, he flattens them like an armadillo on a Texas two-lane.

“My son-in-law is in the oil lube business here in College Station, and he was having trouble with commercial crushers,” says Erickson.

“I told him I could build something better. He told others in the business, and I’ve been selling them by word of mouth, as far away as Virginia.”

Erickson’s can crushers weigh in at 500 lbs. and come with either 12 or 18-in. high chambers. Interior width and depth on both is 12 by 11 5/8-in. A 5 hp motor drives the single hydraulic cylinder.

“The 12-in. has a cycle time of 18 seconds, and the 18-in. cycles every 25 seconds,” says Erickson.

“They can crush three or four small filters at one time, reducing them to 1/4 their original size and removing up to 95 percent of the remaining oil.”

The crushers mount on a 24 by 32 by 34 1/ 2-in. high steel table. A safety bar stops the crusher when the door is open.

While he keeps the two crusher sizes in stock, he will make other crushers to order.

“I have designed units for fiber filters that need to lay flat and long when crushed,” he says.

“Give us the size of your filter, and we will match it with the right unit.”

Contact: FARM SHOW Followup, Martin Erickson, 10516 Woodview Dr., College Station, Texas 77845 (ph 979 774-7904; fax 979 696-3027; email: [email protected]; website: http://filtercrusher.anthill.com).