Practical ideas from FARM SHOW MagazineSubscribe · Free issue · Send us your shop tip
Subscribe to FARM SHOW
Issues / Vol. 40, No. 4 (2016)

Vol. 40, No. 4 (2016)

Money-Saving Repairs & Maintenance Shortcuts · Printed section pp. 32–35

36 selected entries · Complete text of selected entries

This issue’s section includes reader tips and feature-length shop stories. Held items and editorial notices are not reproduced.

Archive text: prices, coupons, availability and contact details reflect the original publication, not current offers. Reader methods are not universal instructions; follow manufacturer guidance and proper safety practices.

Reader shop tips

From the archive · Full text
Reader shop tip

Bud Falkenstein

Bud Falkenstein, Mono, Ontario

“To add oil to mowers, rototillers, generators and other small engines, just pour the oil into a squeeze ketchup bottle. The oil won’t flow until you squeeze the bottle, which means no more oil spills.”

From the archive · Full text
Reader shop tip

Darrell Cooper

Darrell Cooper, Chillicothe, Mo.

“Here’s an easy way to repair a rusted area on a grain bin - use foam insulation in a can to seal it. We’ve used this idea on bins that rusted down where the bin’s metal sides meet the concrete and the foam lasts a long time, in some cases more than 20 years.”

From the archive · Full text
Reader shop tip

John Torrance

John Torrance, Rocanville, Sask.

“This is in response to the reader who has a 2010 Deere 3005 4-WD compact utility tractor equipped with a Yanmar 3-cyl. diesel engine that keeps shutting down (Vol. 39, No. 6). Unfortunately, replacing the fuel filters or the solenoids in the injector pump won’t help, and I have no idea what the timer behind the dash is for or why he replaced it. I think the problem is a poor ground, and the place to start trouble shooting for that is with the battery. After that, you can work your way to the engine solenoid. The problem could be a ground wire at the switch. Poor grounds can cause a lot of problems.”

From the archive · Full text
Reader shop tip

David Nordhus

David Nordhus, Seneca, Kansas

“I couldn’t add front weights on my tractor because the bolt hole in the mounting bracket was plugged with dirt, and I couldn’t screw the mounting bolt in tight. Using a screwdriver, I was able to clean some dirt out of the bolt hole and casting nut but not the threads. I could have used a commercial thread-cutting die to clean out the threads, but my newer-style tractor uses metric bolts and there’s no store in my area that carries metric dies.

“To solve the problem, I used my circular saw to cut 1-in. long grooves into the bolt threads at three different places, cutting the grooves slightly deeper than the threads. As a result, any dirt will stay in the grooves and not in the threads. The grooves don’t affect the performance of the bolt at all and they give the dirt somewhere to go.”

From the archive · Full text
Reader shop tip

John Slater

John Slater, Olin, Iowa

“I spray Fluid Film onto disc openers, shanks, and corn head gathering chains, etc. - anything metal that might rust during the off season. When

I’m ready to use the equipment again, it’s ready to go (www.fluid-film.com; ph 650 761-3536).”

From the archive · Full text
Reader shop tip

Kurt Hofmeister

Kurt Hofmeister, Woodburn, Oregon

“Trying to assemble anything with loose washers often can be a frustrating experience. So if the washer is loose, I just roll a small O-ring onto the bolt and use it to hold the washer in place.”

From the archive · Full text
Reader shop tip

Robert Lounsberry

Robert Lounsberry, Bordentown, N.J.

“The wooden block bearing on the feed auger of my Deere square baler dried out and was chattering so much that the noise was driving me nuts. To solve the problem, I added a grease fitting to the bearing in order to keep it from drying out. Adding just a little grease this way has helped me keep my sanity.”

From the archive · Full text
Reader shop tip

Bill Halstead

Bill Halstead, Lacey, Mich. (269 758- 3232)

“I couldn’t justify spending money for new LED light fixtures in my shop, so I came up with a cheap way to install LED bulbs. I removed the ballast from my fluorescent lights and used the existing wiring to install the bulbs. My only cost was for new LED bulb sockets which I bought for $1.46 apiece.

“Each fluorescent light fixture originally contained two long bulbs, which I replaced with three LED bulbs. I cut a small square hole into each fixture to accommodate the outlet on back of the LED bulb socket. I used two different kinds of LED bulbs - some white and some yellow – because that’s what I already had.

“This idea works great. A big advantage of LED lights over fluorescent is that they’re brighter and less expensive to operate. Also, they start right up in cold weather without having to warm up first.”

From the archive · Full text
Reader shop tip

Wayne Bryan

Wayne Bryan, Conesus, N.Y.

“We have a 100-ft. extension cord laying on our gravel driveway that leads to a fuel island. The cord was losing insulation from being driven over all the time.

“To solve the problem, I cut the plug off one end of the cord and used steel electrical conduit fish tape to pull the cord through a 100-ft. garden hose. Then I installed a new plug end on the cord. The hose provides the cord with a protective heavy second ‘skin’, which adds a lot more life to the cord and also keeps it from kinking and tangling up. Now the cord always lays flat and straight.”

From the archive · Full text
Reader shop tip

Donald Jaster

Donald Jaster, Bruce, Wis.

“I needed an adjustable clevis that would let me adjust both brake pedals on my Allis Chalmers B tractor. I don’t have an Allis dealer close by for parts, so I bought an aluminum turnbuckle with an open frame and converted it into a big clevis. I cut the turnbuckle off on the left thread end, and then I cut off the tractor’s left brake link and used a die to make a 5/16 thread. The brake link is slightly bigger than 5/16 so I had to grind it down some to allow the die to work. I paid about $3 for the turnbuckle.”

From the archive · Full text
Reader shop tip

Ron Paustian

Ron Paustian, Eau Claire, Mich.

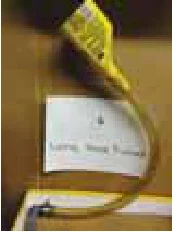
“I put together this long hose funnel to pour oil into hard-to-reach vehicle transmissions. I cut the bottom off a 1-pint plastic fuel additive container and turned it upside down, then friction-fitted one end of a transparent hose to it. A 90-degree pvc elbow is clamped onto the other end of the hose and reaches into the transmission. I used a heat gun to heat up the hose so that it would stretch and fit over the funnel. Once the hose cools down it locks itself on.”

From the archive · Full text
Reader shop tip

Lee Tolliver

Lee Tolliver, Tok, Alaska

A mechanic accidentally put one pint too much oil in the transmission on one of my vehicles. Crawling under the vehicle and draining the surplus oil would have been a messy job.

“Instead, I bought a 1/4-in. dia. clear plastic tube at WalMart - the kind used to keep aquarium tanks clean - and shoved it down into the fill hole. I started sucking on the tube with my mouth, and once I saw the oil coming out of the hose I put my thumb over the end of the hose and let the surplus oil drain into a marked container. I was able to remove exactly a pint of oil this way. I keep the hose under the hood of my car in case I ever need to use it again.”

From the archive · Full text
Reader shop tip

John Youngdahl

John Youngdahl, Green Isle, Minn.

“My wife has a Toro Groundmaster mower with a 4-cyl. aluminum head. One day one of the spark plugs blew right out. After taking a look, I realized the last mechanic who worked on the tractor put short-reach plugs into the long-reach holes, so only about half the threads were used. The tractor had been running for quite a while like that so that the lower, exposed threads were filled up with carbon.

“I didn’t dare just screw in new full-sized plugs because turning through the carbon might damage the threads. So I took an old plug and cut vertical slots across the length of the threads so that when I screwed the plug into each hole, the carbon would have somewhere to go – into those slots. When I pulled the plug out of each hole, the slots were full of carbon. The idea worked perfectly.

“This idea would work anytime you’re using a plug or bolt to clean out a threaded hole. Rather than grind the dirt or rust into the threads, it allows you to pull out whatever is plugging them up.”

From the archive · Full text
Reader shop tip

David Prause

David Prause, China Spring, Texas

“If you’ve got leaking transmission gearbox seals on your shredders or flail choppers, take the top off and fill partially with heavy gun grease. Check regularly after that and add the heaviest gear oil you can get just to top it up. It worked for me, avoiding a burnout.”

From the archive · Full text
Reader shop tip

Lynden Jenkins

Lynden Jenkins, Freedom, Wyo.

“We put a 5010 Deere tractor front-end under the front of a Deere 4020 to make it a better loader tractor. The 4020 front axles just weren’t strong enough. We could never break the 5010 axle.”

From the archive · Full text
Reader shop tip

Dean Weatherly

Dean Weatherly, Clinton, Ark.

“When I buy a new electric drill, grinder or saw, I open up the gearbox and grease it with high temperature grease. Most of these tools are now made in China and they don’t put enough grease in at the factory. I started doing this after I burned up an expensive Milwaukee tool.”

From the archive · Full text
Reader shop tip

Keith Ford

Keith Ford, Houston, Mo.

“Since I repair a lot of riding mowers, I have a pile of inoperative solenoids. A couple weeks ago I was looking through them carefully and noticed that most every one was of the 4-terminal type with the bottom riveted to the body.

“I used my Dremel tool to carefully open and then disassembled the inside of one. The large coil inside tested good. I looked at the switch legs and saw that the solder joints were badly soldered. I decided to try to fix it and reuse it on my mower.

“I used my solder iron to gently reflow solder on the joints and then reassembled the unit. Since I had cut off the rivets I had to figure out how to close it up. I used some small nuts and bolts, drilling the holes out a bit and sealing up the base cap with silicone. I let it cure overnight and installed the repaired solenoid on my mower the next day. It worked!

“I spent maybe a dollar on silicone, solder, hardware and power, and 30 min. of my time, which I have a lot of in late winter. Those solenoids range in price from $10 to $16 plus a trip to town. If I repaired a bunch of them, it would really add up, and it would keep them out of the landfill.

“So if the solenoid on your mower or vehicle goes out, see if you can repair it. After checking 31 ‘bad’ solenoids, I only found 2 that I couldn’t fix.”

From the archive · Full text
Reader shop tip

Jay McCaman

Jay McCaman, Sand Lake, Mich.

“In a recent issue a reader complained about hydraulic oil transferring from the reservoir to the differential on Case 300 and 430 to 630 tractors. I worked at a Case dealership for 16 years and usually leakage of the seals between the two compartments is minimal. The problem comes from hydraulic oil bypassing the 3-pt. hitch piston. It happened on my 300 tractor. Later series tractors had an internal hose that routed oil back to the correct compartment. If that hose broke, the differential could fill with oil.

“Allowing the oil in the transmission/differential to run high will reduce power. It can also cause the differential cross shaft seals to leak, which in turn will coat brake parts with oil.”

From the archive · Full text
Reader shop tip

Bill Smith

Bill Smith, Cherokee, N.C.

“Plastic underarm stick deodorant containers can be used to make handy tool oilers. Once all the deodorant is gone, I remove the cap, fold a piece of 1/2-in. thick felt, and push it down inside the container. Then I pour oil on the felt so it works like a big wick.

“This idea works great for applying a coating of oil on very small things such as a drill bit or the edge of a saw blade. I just rub the felt across the object, and when I’m done I put the deodorant container’s cap back on. The felt wick applies a nice, even coating of oil. There’s no need to spread the oil around with a rag or my hands like with a squirt can so I don’t get my hands messy. And I never have to worry about oil leaking inside a toolbox like with an oil can.”

From the archive · Full text
Reader shop tip

Gary Swensen

Gary Swensen, Yankton, S. Dak.

“When I change oil, I wait until there are just a few threads left before the plug comes out and then I attach a vice grip to the plug to keep my fingers from getting burned. It also helps find the plug later when I’m ready to put it back in. Avoids having the nut fall into a bucket of hot oil.”

From the archive · Full text
Reader shop tip

Larry Fulfs

Larry Fulfs, Winslow, Ill.

Fulfs likes the idea of having shop equipment on wheels.

“I don’t have a large shop, so having things portable lets me move tools whenever I need the space to work,” he says. Fulfs has put heavy-duty casters on storage compartments, his workbench, a planer, a welding table, and a cabinet that holds welding rods. He uses steel wheels or rubber casters depending on how heavy the equipment is.

From the archive · Full text
Reader shop tip 1 of 2

Robert McMahon

Individual tip 1 of 2 from this reader’s published contribution.
Robert McMahon, Knoxville, Tenn.

“I needed a large hold-down clamp on my welding bench for fabrication work, so I made one by modifying a ‘Stronghand’ F-style clamp.

“Start with a 1 by 2-in. piece of channel iron or flat bar and drill a hole for your hold-down bolt. Then weld the channel iron or flat bar to the bottom of the clamp. It’ll result in a super strong hold-down clamp that you can still use as a C-clamp or spreader. Other brands of clamps could be modified as well, but I find that Stronghand F-style clamps work the best.

From the archive · Full text
Reader shop tip 2 of 2

Robert McMahon

Individual tip 2 of 2 from this reader’s published contribution.
Robert McMahon, Knoxville, Tenn.

“I also made some cups that fit onto the clamp pads for holding accessories. I started with 1.625-in. ID tubing and 3/8-in. steel plate and drilled and tapped it. The tubing is slit so that it friction-fits the pad.”

From the archive · Full text
Reader shop tip 1 of 2

Steve Nichols

Individual tip 1 of 2 from this reader’s published contribution.
Steve Nichols, Galesburg, Ill.

“When I wire a trailer, I have learned to wirenut the connector pigtails to the main wiring because the plug-in connector ends get corroded or damaged a lot. This way, I can just disconnect them easily and wirenut a new end onto the front of the trailer.

“I do the same thing at the back of the trailer, wirenutting the lights from the taillights onto the main wiring so if I need to replace a light I can just remove the wirenuts and install a new light.

From the archive · Full text
Reader shop tip 2 of 2

Steve Nichols

Individual tip 2 of 2 from this reader’s published contribution.
Steve Nichols, Galesburg, Ill.

“To protect the plug-ins when not using the trailer, I fasten an extra female connector (the part that goes on the vehicle) to the tongue of the trailer and plug the connector into it to keep it from corroding or ending up in the dirt.”

Shop feature stories

From the archive · Full text
Feature story

Handy Pipe Sizer Tool

Featured source: Sam Bakke

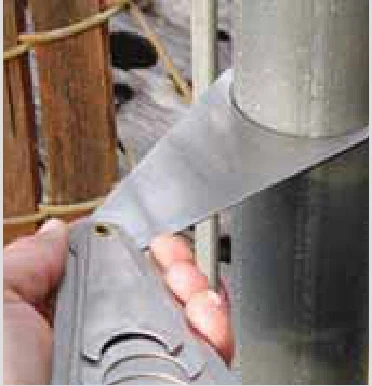
“Our new pipe sizer tool makes it easy to identify the correct pipe size and can help prevent costly mistakes,” says Sam Bakke, Global Span Products, White Sulphur Springs, Mont. The patented stainless steel tool is designed to work on copper, steel, and pvc pipe. It measures 7 different sizes, from 1/2 to 2 1/2 in. The tool works similar to feeler gauges that are used for checking valve tolerances, point gaps and other critical measurements. It consists of 7 riveted-together perfect half circles with pointed ends. The pipe size is marked on each one.

“This tool is especially handy when you’re working down in a hole where you can’t see the pipe very well,” says Bakke.

“When you pull the tool back out it will show you the pipe size. We came up with the idea because we’ve been involved in the landscape irrigation industry for a long time and spend a lot of time installing pipes. By inscribing the tool and then flipping it over to make a complete circle, the tool also can be used as a drilling template for making circles.” Sells for $12.95 plus S&H. Contact: FARM SHOW Followup, Global Span Products, P.O. Box 934, White Sulphur Springs, Mont. 59645 (ph 406 547-3827; www.globalspanproducts.com).

From the archive · Full text
Feature story

Smart Modifications To A Deere STS Combine

Featured source: Roger Gutschmidt

“I recently went through my 9760 STS Deere combine in my shop. These newer series combines are never going to make it to 5,000 hrs. like their predecessors, the 8820 and 9600. The combine junkyards will soon be full of these 50, 60 and 70 series machines. The sheet metal inside them is made way too light to last very long. I’m sure the engineers designed them this way so there would be more breakage, which means more service and parts,” says Roger Gutschmidt, Gackle, N. Dak.

“I recently went through the sieve area on this combine. I took out the top and bottom sieves only to find all kinds of problems in this shaking area. All the damage pretty much starts in the same area on every combine because there’s a support ledge that holds the bottom sieve. The sieve lays on a piece of formed 14-ga. angle iron that’s spot-welded to the outside frame which is attached to the shaking mechanism arms. The sieve puts a lot of fatigue on this poorly welded ledge. The support ledge is welded along the bottom with no welds on the top. Because there are no welds across the top, it ‘peels’ away from the surface it is attached to, from the weight of the sieve and the shaking. Once it does that, the sieve drops to where it doesn’t belong and causes destruction to the whole back end of the combine. This repair typically costs about $10,000 to $15,000 in just parts, without labor. The solution to the problem is to weld along the top ledge. It’s easy to do and will save owners thousands of dollars in repairs.

“I also have a way to prolong the life of sieves. I add silicone rubber with a caulking tube to the sides where the louver wires come through the frame. Over time these louver wires wear thin due to the shaking action of the sieves. A little dab of silicone on each wire cushions the wear point area. Because this silicone rubber is soft and pliable, it still allows the operator to adjust the sieves. My sieves are adjustable from inside the cab with an electric actuator. The rubber gives enough to allow for the sieve to open and close all the way to adjust for any crop being harvested.” Contact: FARM SHOW Followup, Roger Gutschmidt, Gutschmidt Mfg., LLC, 6651 Hwy. 56, Gackle, N. Dak. 58442 (ph 701 698-2310; [email protected]).

From the archive · Full text
Feature story

“Extended Jaws” Channel Lock Pliers

Featured source: Andy Sewell

Our friend Andy Sewell in England recently sent us photos of a German-made channel lock pliers that he modified for his own use by extending the jaws.

“These pliers are made of good quality metal but only come in one size, and I needed a larger jaw opening. So I used a cutting disc to cut through the jaw and welded in a piece of steel. I modified several pairs of pliers this way so I’ve got a range of sizes that I can use.

“I use these modified pliers almost every day and find they work great for holding work and for pressing parts together, such as pressing pins into holes. Obviously the extended jaws don’t close up, but that’s why I have a selection of sizes.” Contact: FARM SHOW Followup, Andy Sewell ([email protected]).

From the archive · Full text
Feature story

How To Clean Greasy Air Filters

Featured source: Lee Tolliver

“My Bobcat has a couple air filters on it that cost $26 to $27 apiece and when I’m on a job, I can go through a set or more in a week. I don’t like throwing them away but when they get greasy, you can’t clean them with compressed air. So I came up with a different way,” says Lee Tolliver, Tok, Alaska.

“My method works on all kinds of air filters, whether they’re paper or foam, or a combination of both. What I do is to spray a can of starter fluid all over the filter, inside and out. Then I soak the filter in a small tub of water with Purple Power Degreaser cleaner added. The filter should be submerged in water and left there overnight.

“The next day I shake it out, rinse it, and put it back into clean degreaser water. The next day, when I take it out, I rinse it off and then use compressed air on it, blowing from the inside out.

“Once it dries, it’ll be as good as new. The savings add up. I buy starter fluid by the case when it’s on sale. And Purple Power Degreaser sells at Walmart for $4 a gallon.

“Another use I have for starter fluid is to clean my chainsaws. A friend showed me this trick. Just spray about half a can of starter fluid onto the sprocket and chain and up under the housing, soaking it heavily. Then just start up the saw right away and watch the grease and dirt go flying. I use this idea to clean all my chainsaws and it works great.” Contact: FARM SHOW Followup, Lee Tolliver, P.O. Box 244, Tok, Alaska 99780.

From the archive · Full text
Feature story

Bearing Repair Solved Factory Defect On Toyota Pickup

Featured source: Roger Jones

A lot of people would never think to look for a solution like the one Roger Jones came up with for his Toyota pickup.

“It probably saved me several hundred dollars in repair work,” says Jones. Back in the mid 1980’s Jones had a problem with the 3-speed transmission on his 1982 Toyota 1/2-ton diesel pickup that turned out to be a factory defect.

“At about 16,000 miles the top sealed bearing on the transmission’s main driveshaft failed and the company promptly replaced it,” says Jones.

“Then at 32,000 miles the same bearing failed again. However, the 30,000-mile warranty had expired so the company refused to fix it. I told them the new bearing had only 16,000 miles on it, but they wouldn’t help.” Jones didn’t want to pay the dealer to make the repair, so he and his hired man took the transmission apart and removed the bearing themselves.

“At first we were going to drill a small hole in the transmission case so that oil could get to the bearing,” says Jones.

“But after studying the problem we discovered that it was a sealed bearing that had been installed backward, with the sealed side next to the oil instead of on the outside where it was supposed to be.

“Apparently the bearing was installed backward at the factory, and the mechanic who replaced the first bearing installed it the same way.” He turned the bearing around, which solved the problem. In fact, he was able to drive the pickup another 100,000 miles without another problem.

“It wasn’t a big job to tear the transmission apart because this was a simple, small 3-speed transmission. But on today’s new cars and pickups such a repair would be a major operation,” notes Jones. Contact: FARM SHOW Followup, Roger Jones, 3468 Rt. 8, Johnsburg, N.Y. 12843 (ph 518 251-3713).

From the archive · Full text
Feature story

Giant Press Has Rolling Cylinders

Featured source: Clair Wilson

Clair Wilson makes pressing big steel pieces look easy with his double carriage, dual cylinder with independent action, chest-high press. Overbuilt doesn’t begin to describe the “ship-channel” construction of the press at his Wilson Seedtime and Harvest shop.

“A friend of mine had a machine shipped in from England on pieces of 15-in. channel iron with a 5/8-in. web called ship channel,” says Wilson.

“I used it for the top of the press and the table frame. The web isn’t tapered like other channel iron, making it ideal for mounting carriages for the cylinders.” The legs of the press are also substantial. Wilson salvaged the 6-in. channel iron with its 5/8-in. web from rafters in a state hospital that a friend was tearing down. The 40-in. wide by 56-in. long table was salvaged from a commercial milling machine. The top level of the table is 3 in. of steel with 8 slots running its length. A second 3-in. steel layer is bolted beneath.

“The slots are ideal for (hold-down) dogs,” says Wilson.

“With their bolt-on heads, I can slide them into position and tighten down on the work piece.” He didn’t salvage the hydraulic cylinders. Those he bought new before cutting off their brackets. The base of each 4-in. cylinder with its 2-in. ram and 18-in. reach is welded to a flat steel plate. The plate sits on the bottom flanges of a carriage with wheels. The wheels allow it to roll back and forth within a second larger carriage, also with wheels. The larger carriage rides on the lower flange of the ship channel at the top of the press.

“I can move a ram anywhere on the table with one carriage moving one way and the other carriage moving the other way,” says Wilson.

“With independent hydraulic pressure on each cylinder, I can put more or less pressure on either one.” When the ram is extended, the cylinder plate lifts off the bottom flange of the carriage to press against the top flange of the inner carriage. It in turn pushes against the top flange of the larger carriage, eventually pushing it against the top flange of the ship channel.

“It is great for taking bends out of a piece of steel,” says Wilson.

“I took a snout from an older corn picker that was all doubled over. You couldn’t beat the bends out, but I could push down on one corner and pry with the other cylinder and push bends out.” As heavy-duty and versatile as the press is, it is also handy for Wilson to operate. Rollers allow him to move it as needed, and visibility is excellent.

“I built it chest high so I don’t have to lean in to see,” says Wilson. Contact: FARM SHOW Followup, Wilson Seedtime and Harvest, 129 Hillview Rd., Winchester, Ill. 62694 (ph 217 742-3918; [email protected]; www.wilsonharvest.com).

From the archive · Full text
Feature story

He Custom Builds Pickup Flatbeds

Featured source: Jim Schmidt

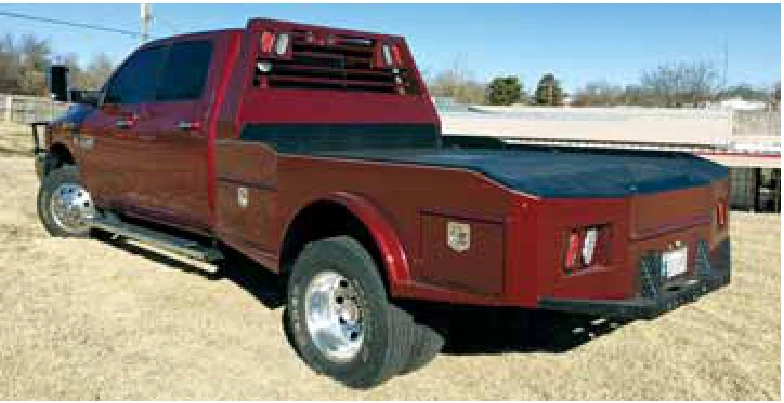
Jim Schmidt, Western Welding, Cordell, Okla., has a full-time business custom building flatbeds for pickups from scratch – and he can’t keep up with the demand.

“Anything that can be put on back of a pickup, I can put on a flatbed,” says Schmidt.

“I’ve been in business for 15 years and have been up to six months behind on orders. People know they’re getting quality work when they do business with me.

“About 95 percent of my customers run cow-calf operations and want me to install bale spike beds for hauling bales. The bale spike is operated by an electric/hydraulic pump.” His standard flatbed includes a steel floor (a Vortex bedliner is optional), a custom-built headache rack, 4 “under-the-bed” toolboxes (2 on each side), LED lights located on the cab window and the rear bumper, and a bale spear with hydraulic pump. A factory backup camera and backup alarm can be re-installed in the bed. He builds 2 different styles of headache racks, one of which is equipped with a built-in fuel tank. The headache rack’s top corners can be dressed up with decorative 1 1/4-in. schedule 40 pipe. To go with the flatbed, Schmidt also builds a low profile toolbox. It measures 48 in. long by 15 in. wide and stands only 9 in. high, thanks to a fold-out tray at the top. The toolbox has notched holders for standard and metric end wrenches; socket holders for standard and metric shallow and deep 1/2 and 3/8-in. drive sockets; and a magnetic strip for ratchets. There’s also a place for 24 and 36-in. prybars underneath the tray.

“The low profile keeps the toolboxes from interfering with your gooseneck trailer when turning,” says Schmidt. Single rear wheel flatbeds sell for $5,999 and dual rear wheel flatbeds for $6,199. The headache rack fuel tank sells for $800, and “The Toolbox” for $700. Contact: FARM SHOW Followup, Western Welding, 402 E. Main St., Cordell, Okla. 73632 (ph 580 832-5213; www.westernwelding.net; [email protected]).

From the archive · Full text
Feature story

How To Tile A Shop Floor

By Roger Meihak
Featured source: Roger Meihak

I recently decided to tile my shop floor. I thought it would make the floor easier to clean and make the shop brighter. Dirty cement absorbs a lot of light. But a shop floor also takes a beating, especially when you work mostly with metal, as I do. I wondered if it would be possible to use a commercial tile that would stand up, and if damaged, could be easily replaced. The tile I selected was the Congoleum commercial type, CH-14. Each tile weighs nearly 1 1/2 lbs. and has the pattern all the way through. Such tile is somewhat brittle, but it does bend before breaking. The price is also attractive, at 50 to 60 cents apiece for a 12-in. square tile. I think my method of installation is unique. As I said, I want to be able to replace any tiles that become damaged. I put just a small amount of adhesive under each tile, about the size of a quarter. I found that such a small amount of adhesive in the center was able to secure the tile and as these tiles are heavy and nearly1/8 in. thick, they’re not going to curl. The adhesive I used was Locktite PL-3, a construction adhesive. I used a brick as a weight, putting it in the center of the tile and leaving it in place for several hours. I’ve proved my system will work because I carelessly ran an air nailer staple into a tile, chipping it. To make the repair I just broke out the old tile and removed the adhesive (it has to be sanded or ground off) and then replaced the tile, all in just a couple of minutes. A word of caution on using the PL-3 adhesive: I haven’t found any solvent that removes it, including gasoline, so it’s best to wear gloves when working with it. I didn’t scrub or wash the floor prior to tiling. I just made sure the floor was clean by using a vacuum and an air gun to make sure there was no loose debris left. Another advantage of tiling a floor this way is that it lets me tile a little at a time. Contact: FARM SHOW Followup, Roger Meihak, 10150 223rd St. No., Forest Lake, Minn. 55025 (ph 651 433-2600; [email protected]).

From the archive · Full text
Feature story

3-In-1 Shop Tools Built For $300

Featured source: Dennis Sensat

“We started out intending to build a heavy duty shop hoist but ended up with a 3-in-1 tool that works as a hoist, press, and removable engine stand all in one. It’s built strong and rides on heavy duty caster wheels so it can be easily moved anywhere,” says Dennis Sensat of Iota, Louisiana. The 3-in-1 tool was built mostly from scrap material, including a lot of 2, 2 1/2, and 3-in. dia. pipe. The 5-ft. long legs at the base of the hoist and engine stand are made from 2 1/2-in. dia. pipe and slip inside the 3-in. pipes that support the press. By removing a bolt, Sensat can pull out the smaller legs under the hoist and roll the press around separately on 4 wheels. The hoist has a 5-ft. long reach and is operated by a 3-ft. long, 8-ton jack. The press is operated by a shorter 20-ton jack. The engine stand sets on a 2 1/2-in. dia. steel post and weighs only 50 lbs., allowing one person to easily lift the stand out of the way. The same post also supports the 8-ton hoist jack.

“Before I built it I looked at a Chinese-built shop chain hoist. I wasn’t impressed,” says Sensat.

“It was built light and had only one upright leg that was made from lightweight square tubing. So I decided to build a beefed-up hoist with two upright legs and mount the 20-ton jack between them so we could also use it as a press. Holes drilled 8 to 10 inches apart into both uprights allow us to adjust the press up or down.

“We’ve used the press to bend 1/4-in. thick by 6-in. wide flat bar with no problem, and even at full reach the hoist is able to lift a 6-cyl. diesel engine.

“My grandson Hunter helped build it and got some good practice welding. He even welded his initials on it. We think our 3-in-1 tool is built heavy enough to last for generations.” He spent a total of about $300 for the caster wheels, the 8-ton jack, and miscellaneous parts.

“If we had bought all three tools separately, we’d have paid at least $1,000 and they wouldn’t be movable or built nearly as well,” says Sensat. Contact: FARM SHOW Followup, Dennis Sensat, 1704 Fabacher Rd., Iota, Louisiana 70543 (ph 337 523-3867; [email protected]).

From the archive · Full text
Feature story

New Tool To Measure Internal Spaces

Featured source: Lee Paxton

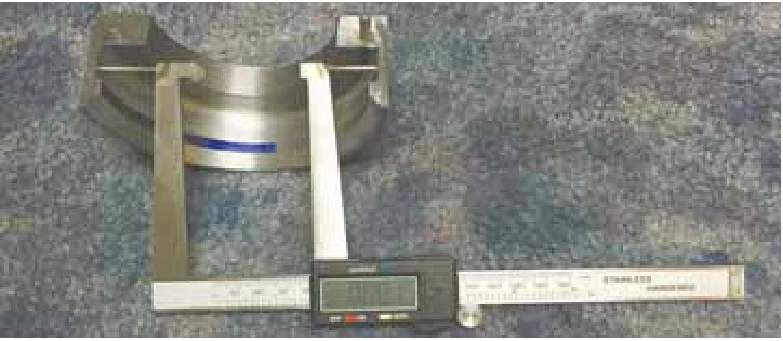
When Lee Paxton needed to measure the interior of a set rim, he made his own measuring device. The simple tool was low cost, easy to make, and exact.

“I needed to get an accurate measurement of an inside stepped bore on a housing I was machining,” says Paxton.

“Standard measuring equipment wouldn’t work, so I made my own.” Paxton has a degree in mechanical engineering and worked in the aerospace industry. He started his own company with a few tools in a garage. Today, he and his staff make robotic and other high-tech equipment for some of the largest and most technologically demanding companies in the country. Solving his problem required no fancy equipment, just ingenuity. The problem was the “stepped bore” design. The deep interior groove to be measured was wider than the surface passage through which the measuring device had to pass. The device had to be inserted, a measurement taken, and then the device collapsed to be removed. Paxton’s solution was to pick up a low cost set of calipers with a digital readout. He recognized that by adding “horns” to the caliper arms, he could get an internal measurement.

“I TIG welded short pieces of welding rod to the ends of the arms,” explains Paxton.

“It didn’t matter how long they were, only that they were fixed in place and short enough to slip inside the bore.” Once inserted into the bore, he spread the caliper arms. When the horns touched opposite sides of the groove, he zeroed out the digital scale. He then collapsed the arms and removed them from the groove.

“I expanded the caliper back until the scale read zero again and measured the distance from one horn to the other with another set of calipers,” explains Paxton.

“I was then able to machine it down the extra few thousands of an inch needed.” Paxton suggests that anyone needing internal measurements, such as machining snap ring grooves, could quickly and easily make a similar device. He bought his calipers with their digital readout at Harbor Freight. Simply attach horns and measure. Contact: FARM SHOW Followup, Paxton Engineering, Inc., 4946 Watt Ave., North Highlands, Calif. 95660 (ph 916 344-7511; [email protected]; www.paxtonengineering.com).

From the archive · Full text
Feature story

Pickup’s Ignition Module Fires Up Garden Tractor

Featured source: Paul Peyton

Paul Peyton didn’t want to spend the money for a new solid state ignition module for his 1960’s Sears Suburban garden tractor, so he found an internet site that provides complete instructions for an innovative fix. He used the instructions to install the solid state ignition module from an old model 1970’s Dodge pickup.

“The tractor had quit running due to a bad module in the solid state ignition. The replacement module cost $185, which I thought was too much,” says Peyton, of Huntsville, Mo. He removed all the tractor’s original ignition components and connected an old car anti-lock disc brake sensor to the ignition module. A standard 12-volt automotive coil provides the spark.

“The disc brake sensor produces a signal whenever the flywheel passes it and initiates the spark, which goes to the automotive ignition coil and fires the engine,” explains Peyton.

“It’s a neat fix. I made the conversion about 5 years ago. I paid a total of about $50 for the ignition module and the automotive coil.

“The really neat feature of this setup is that the flywheel can be modified to produce several sensor signals at progressively advancing positions, thereby providing a spark advance. Almost any motion sensor could be used. This system would be ideal for anyone who competes in tractor pulling competitions, because it has the effect of advancing the timing at higher rpm’s. That results in more horsepower at higher rpm’s.” Contact: FARM SHOW Followup, Paul Peyton, P.O. Box 1071, Ava, Mo. 65608 (ph 660 998-4204; [email protected]).