Practical ideas from FARM SHOW MagazineSubscribe · Free issue · Send us your shop tip
Subscribe to FARM SHOW
Issues / Vol. 40, No. 5 (2016)

Vol. 40, No. 5 (2016)

Money-Saving Repairs & Maintenance Shortcuts · Printed section pp. 32–35

39 selected entries · Complete text of selected entries

This issue’s section includes reader tips and feature-length shop stories. Held items and editorial notices are not reproduced.

Archive text: prices, coupons, availability and contact details reflect the original publication, not current offers. Reader methods are not universal instructions; follow manufacturer guidance and proper safety practices.

Reader shop tips

From the archive · Full text
Reader shop tip

Donald Jaster

Donald Jaster, Bruce, Wis.

In the last issue of FARM SHOW a reader proposed using wire nuts to connect trailer pig tails and lights to make replacement easier. I heartily disagree. Wire nuts should not be used in an outside environment. Compared to the number of times such repairs are needed, the troubles they will cause will be greater. At minimum, if you use wire nuts or scotch locks, fill the end with silicone to keep moisture out.

“My rules for installing trailer lights: 1. To connect 2 wires, twist together, solder, and cover with shrink tubing. 2. For more than 2 wires, twist together, solder, and coat with silicone. 3. Always run a wire ground from all lights and/or brakes to the white wire on the pig tail. Remember, all light current flows back through the common wire so it should be 1 or 2 wire sizes bigger than the hot wires. Brakes need a separate ground return. 4. On the tow vehicle, run a ground wire back to the engine from the light connector. Don’t depend on the tow vehicle frame for ground integrity. Rust is everywhere.”

From the archive · Full text
Reader shop tip

Melvin Doyle

Melvin Doyle, Plummer, Idaho

“I have trouble breaking axle housings on my 350 hp. Versatile. It’s a model 700 with a big Detroit diesel. So far the only solution I’ve come up with to prevent this problem is to baby it on rough ground.”

From the archive · Full text
Reader shop tip

Dale Bowen

Dale Bowen, Southington, Ohio

“I own a Bad Boy 60-in. zero-turn mower which has worked fine for many years. But lately I was having trouble moving the throttle control until the engine warmed up. That’s because the plastic jacket on the cable was too close to the hot engine. After the machine cooled down, the plastic would stick to the wire. I fixed the problem by removing the cable from the mower, cutting off the plastic jacket where it comes close to the engine, and spray painting that part of the bare cable with high temperature paint, then reinstalling it. Problem solved and I didn’t have to buy a new cable.”

From the archive · Full text
Reader shop tip

Roger Stephens

Roger Stephens, Roundup, Mont.

“I broke the overflow nipple on the radiator of my 1989 S-10 Blazer so I drilled out the hole to the diameter of a 357 Magnum shell casing. I drilled out the primer hole on the casing to 1/4 in. and installed the casing from the inside of the fill hole with RTV sealer. This saved me from having to buy a new radiator.”

From the archive · Full text
Reader shop tip 1 of 2

Daryl Bridenbaugh

Individual tip 1 of 2 from this reader’s published contribution.
Daryl Bridenbaugh, Pandora, Ohio

“I change hydraulic and transmission fluid in my large ground-working tractors every year. Since the oil stays very clean, I leave the oil in buckets overnight and then pour it back into the machines. I leave the last 2 in. of oil in the buckets, which is where any filings have settled. Then I add some fresh oil with additives to top off.

From the archive · Full text
Reader shop tip 2 of 2

Daryl Bridenbaugh

Individual tip 2 of 2 from this reader’s published contribution.
Daryl Bridenbaugh, Pandora, Ohio

“I use synthetic oil in all my cars, trucks and tractors because they crank and start easier in the winter and I also get better fuel economy, which helps pay the extra cost.”

From the archive · Full text
Reader shop tip 1 of 2

John T. Hayes Jr.

Individual tip 1 of 2 from this reader’s published contribution.
John T. Hayes Jr., Iron City, Tenn.

“I had to change the starter on my Deere 6300 tractor but you need a special wrench that Deere sells for $100. I made my own by cutting off a box end wrench and welding a rod to it. Cost me just $2.

From the archive · Full text
Reader shop tip 2 of 2

John T. Hayes Jr.

Individual tip 2 of 2 from this reader’s published contribution.
John T. Hayes Jr., Iron City, Tenn.

“I also made my own belt guides for my Deere 535 baler. Deere wanted $14 each. I made mine for less than $1 each. Painted them Deere green and they look like they came from the factory.”

From the archive · Full text
Reader shop tip

William Watner

William Watner, St. Marys, Kansas

“I came up with a method for pulling rubber-lipped oil seals out of vehicle components, like a rear main seal or a pinion seal on a differential.

“I took a screw with aggressive threads, like a sheet metal screw, and welded it to the end of a slide hammer. To pull a seal, I sharpen a small diameter punch to a sharp point and use it to poke a small hole into the metal part of the oil seal. Then I thread the screw on the tip of the slide hammer into the hole, making sure there are no clearance issues behind the seal. Once the screw is threaded in securely, I use the slide hammer to pull the seal out. It’s a very quick and easy method.”

From the archive · Full text
Reader shop tip 1 of 2

Ken Haag

Individual tip 1 of 2 from this reader’s published contribution.
Ken Haag, Unionville, Mich.

“I added power steering to my Deere 1020. To do it, I had to remove a steel ball bearing pressed into the transmission case. It was deep. I used a small chisel to get enough clearance to weld a nut onto it and used a slide hammer to remove it. Worked great.

From the archive · Full text
Reader shop tip 2 of 2

Ken Haag

Individual tip 2 of 2 from this reader’s published contribution.
Ken Haag, Unionville, Mich.

“I have a bucket truck fitted with an Onan generator that would not stay running. It would start for a few seconds and then shut off. The circuit board that controls it has a relay that is energized by the voltage output of the generator but the ‘seal in’ contacts had failed. They were opening after a few seconds. I solved the problem by just ‘jumpering’ around them with wire, saving a few hundred bucks.”

From the archive · Full text
Reader shop tip 1 of 2

Jesse Barley

Individual tip 1 of 2 from this reader’s published contribution.
Jesse Barley, Tyrone, Penn.

“I’m 6 ft., 2 in. tall so most workbenches are so low I have to lean over to work on things. So I made my workbench 44 in. tall. It’s much more comfortable to use now.

From the archive · Full text
Reader shop tip 2 of 2

Jesse Barley

Individual tip 2 of 2 from this reader’s published contribution.
Jesse Barley, Tyrone, Penn.

“I also mounted a 4-ft. LED shop light on a pivot so I can swing it from the workbench over to my drill press so I have good light wherever I need it.”

From the archive · Full text
Reader shop tip

Steve Belcher

Steve Belcher, Russell, Penn.

“My father-in-law showed me the great benefits of using Never-Seez compound on equipment. Anytime something breaks down around here, all the nuts and bolts are given a nice light coating of Never-Seez before I reassemble. If the equipment breaks again, there’s no fighting rusted nuts and bolts. Makes the repair much easier. I use it on everything.”

From the archive · Full text
Reader shop tip

Elton Wylie

Elton Wylie, Hamilton, Texas

“The hydraulic filter on my Mahindra 4025 tractor would not fit. I had to trim down the oil filter boss (where the filter screws on) carefully with a Dremel tool to get the filter on. The engineer who designed this fitting should be fired.”

From the archive · Full text
Reader shop tip 1 of 3

Gary Swenson

Individual tip 1 of 3 from this reader’s published contribution.
Gary Swenson, Yankton, S. Dak.

“With multiple vehicles and pickups, it sometimes gets confusing how many quarts of oil go into each vehicle. I use a black magic marker and write the amount, brand and weight under the hood.

From the archive · Full text
Reader shop tip 2 of 3

Gary Swenson

Individual tip 2 of 3 from this reader’s published contribution.
Gary Swenson, Yankton, S. Dak.

“This is just a handy hint. I have one car that’s very low to the ground so when I drive up on the ramps, the front end rubs on the ramps. So now I lay a piece of 2 by 12 in front of each ramp to gain a bit of height before the wheels go onto the ramps.

From the archive · Full text
Reader shop tip 3 of 3

Gary Swenson

Individual tip 3 of 3 from this reader’s published contribution.
Gary Swenson, Yankton, S. Dak.

“I don’t like using a creeper to change oil on vehicles. They get caught in cracks and tangled up in extension cords. Instead, I use large pieces of heavy cardboard from refrigerator or stove packing boxes. It’s easy to slide around on them and they keep oil off the concrete. When I’m finished and pull the cardboard out, the oil pan and tools come out with it. I can fold the cardboard up easily and tuck it away.”

From the archive · Full text
Reader shop tip

Steve Mead

Steve Mead, Hesston, Kan.

“We installed a service pit 5 ft. deep about 20 years ago. It’s covered by aluminum boards. We use it for changing oil and other repairs. The first oil change cost about $1,000. The second was $500. Eventually, it was paid for.”

From the archive · Full text
Reader shop tip 1 of 2

Eugene Mitchell

Individual tip 1 of 2 from this reader’s published contribution.
Eugene Mitchell, Gladys, Va.

“I save time by color coding wrenches with color tape, using the same color on all wrenches and sockets of the same size. For instance, I use yellow tape an all 1/2-wrenches, and other colors on other sizes.

From the archive · Full text
Reader shop tip 2 of 2

Eugene Mitchell

Individual tip 2 of 2 from this reader’s published contribution.
Eugene Mitchell, Gladys, Va.

“Here’s a way to always get about 40 miles to the gallon running errands into town. Plan your trips! If you drive half as many miles to get the same amount of work done, you go from 20 mpg to 40 mpg.”

From the archive · Full text
Reader shop tip

Doug McAlexander

Doug McAlexander, Cedar Grove, Tenn.

“I have a riding mower with 12 by 8.5 rear wheels that fit tightly on the axle and are held on by keys that keep the axle from turning inside the wheel. One of the wheels got loose when the keyway was worn down so the only thing holding it on was a snap ring at the end of the axle. There wasn’t enough room to tap a set screw in the 2 or 3-in. space between the rim and hub, so I removed the tubeless tire from the rim. Then, with the aid of a large vise to hold the wheel, I drilled a 5/16-in. hole through the rim and hub, 180 degrees from the keyway. I drilled the hole as far out as possible on the hub.

“I put a nut on a 5/16-in. bolt and inserted it through the holes in the wheel and hub. Then I braze welded the nut to the hub and welded the hole shut to make the rim airtight so it could be used as a tubeless tire again.

“I spray painted the wheel, then put the tire back on, removed the bolt and put the wheel back on the axle. Then I inserted the bolt through the hole in the hub and into the welded-on nut. Then I tightened the bolt down tight to hold the wheel against the axle.

“Loose wheel problem solved.”

From the archive · Full text
Reader shop tip

John Cooper

John Cooper, Oxford, Miss.

“If I accidentally cut a small underground cable, I repair it on the cheap using a short length of pvc pipe and a tube of outdoor sealant. I slide a length of 3/4 or 1-in. dia. pvc pipe over the wire just beyond the area that was cut, use new wire to make a splice, and then tape it up. I then slide the pipe back over the splice and use a caulking gun to squirt rubberized outdoor sealant as far as possible into both ends of the pipe. The pipe should be long enough so both ends extend at least 6 to 8 in. beyond the splice.

“The sealant keeps water from getting inside the pipe and possibly shorting out the wires. This technique works great on any small underground wire such as phone, cable and fiber optic wire.”

From the archive · Full text
Reader shop tip

Glenn Wilson

Glenn Wilson, Crittenden, Ky.

“I store my log chains in 5-gal. buckets by setting the hooks on the edge of the bucket. Makes chains easy to carry and their ends are readily accessible.”

From the archive · Full text
Reader shop tip 1 of 2

Raymond Rodriguez

Individual tip 1 of 2 from this reader’s published contribution.
Raymond Rodriguez, Waxahachie, Texas

“If I need to drill a hole just deep enough so I don’t hit a water line or an electrical wire, I slide a short piece of pipe over the drill bit to keep the bit from going down too far. A regular socket or a deepwell socket would also work.

From the archive · Full text
Reader shop tip 2 of 2

Raymond Rodriguez

Individual tip 2 of 2 from this reader’s published contribution.
Raymond Rodriguez, Waxahachie, Texas

“At one time in my life I was making daily deliveries for a furniture store and often had to set up bunk beds. It took almost 20 bolts to put one bed together so the job took a long time.

“An impact wrench would have greatly speeded things up but I didn’t want to spend the money. Instead, I took a socket extension and used a cutting torch to cut off the end that normally would have fit onto a ratchet wrench. Then I put the extension in my drill like a bit and used the socket size that I needed on the other end of the extension.”

From the archive · Full text
Reader shop tip

Gene Boehler

Gene Boehler, Farmersville, Ill.

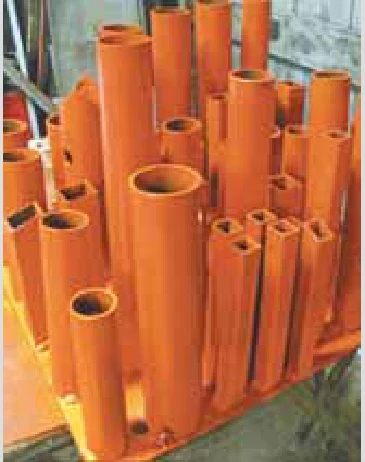
“I needed a better way to store tools while at the same time keeping them readily accessible, so I put several short pieces of steel pipe and tubing to good use. They’re in various sizes and measure from 6 to 12 in. long. I placed the pipes and tubing in rows about 1 1/2 in. apart. Then I welded them to an 18 by 20-in. base made from 1/8-in. thick steel plate that forms a base, then painted everything bright orange.

I could have used heavier plate for the base, but I wouldn’t want it any thinner because it would be too flimsy.

“ My tool storage idea works great for storing pipe clamps, pry bars, brooms, shovels, and so forth. The brightly-colored pipes and tubes are highly visible and tall enough to keep the tools from falling over. They also take up less space than barrels and are more user friendly.”

From the archive · Full text
Reader shop tip

Daniel Considine

Daniel Considine, Northwind Tools LLC (www.northwindtools.com; ph 208 215-4090)

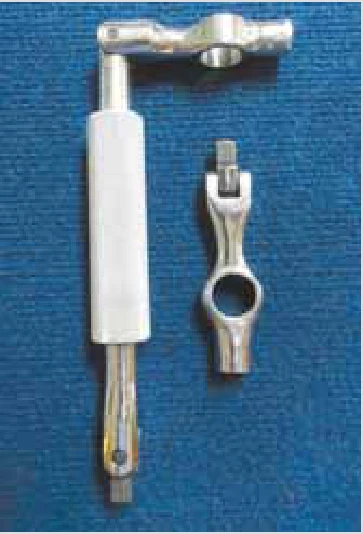
Considine designed and built a tool that takes the place of five tools. The Spin Breaker works as an extension, breaker bar, high spinner, crank and power driver.

“We’ve had master mechanics testing them, and they don’t want to give them back.” Considine, a retired Air Force maintenance crew chief, has built several tools over the years. His Pinch-A-Log firewood handler was featured in FARM SHOW (Vol. 37, Issue 6). The Spin Breaker loosens bolts and instantly turns into a crank if the bolt is difficult to turn. When loose, the crank becomes a high-speed spinner by putting your finger in a loop to turn. An extension accesses deep reaches, and a cordless drill on the end turns it into a power driver.

“You’re not running to the toolbox for other tools. You save time and money. People understand it’s really fast when they see the video for the spin breaker.” (see video at www.farmshow.com) The Idaho inventor hopes to connect with investors or a manufacturer to get his tool on the market soon.

Shop feature stories

From the archive · Full text
Feature story

Reinforcement For Sprayer Mounting Arms

Featured source: Russ Dormire

“I bought a 40-gal. capacity, 3-pt. hitch sprayer for my utility tractor and where the pins connected to the hitch the metal didn’t seem very strong. I made a simple reinforcement that solved the problem,” says Illinois farmer Russ Dormire. Dormire’s solution was to support the connecting pins on both sides of the hitch with old pieces of no. 55 roller chain. Says Dormire, “I cut 2 pieces of chain to wrap around the mounting pins and the frame of the 3-pt., allowing about 8 extra lengths on each one. Then I bolted the chain together with a 3/8-in. bolt with washers on both ends. When I tightened the nut, the chain snugged up and supported the mounting pin so there wasn’t so much pressure on the sprayer arms. I’ve filled the tank several times since then and used it around my yard and along field edges and in the grove and it seems to hold real well.”

Contact: FARM SHOW Followup, Ross Dormire, 971 895 E Street, Mt. Sterling, Ill. 62353 (ph 217 773-3574).

From the archive · Full text
Feature story

Customized Wiring Harness

Featured source: Steve Barbato

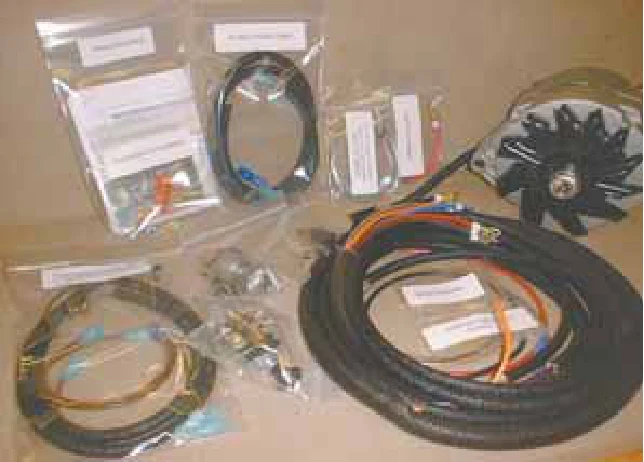
Steve Barbato puts nearly 50 years of gas/diesel engine experience into building customized wiring harnesses and rebuilding carburetors, magnetos and more. A big fan of Allis Chalmers tractors, he offers ready to go, complete wiring harness kits for a number of models.

“I offer complete kits so customers don’t have to go looking for every little nut and screw needed,” he says.

“That goes over real big, and people tell me they’ve never seen anything like it. I provide complete instructions on how to install.” Although his full-time job is with a local power company, B&B Custom Circuits keeps him busy on the side.

“I was on the internet chatting with a guy from Iowa about an Allis Chalmers B and the wiring harness I made for it,” he says.

“The next day I came into the shop and I had all these emails wanting to know how much I would charge for one.” Realizing there was a market, Barbato made up a few kits for Allis Chalmers B, C and A tractors and went to a Gathering of the Orange in Michigan.

“I had people 3 deep around me all weekend,” he says.

“By the end, I was so hoarse I couldn’t talk.” Since then he has expanded his kits to include the Farmall H and Super H. He also does custom harnesses for other tractors.

“If I can get an original wiring harness, I can use it for a pattern,” says Barbato.

“I can build a harness for almost any tractor. However, the Allis Chalmers people keep me pretty busy.” In fact, they keep him so busy that he warns prospective customers there could be delays. That is true even for tractors with kits.

“I always ask about tractor components, such as shape of headlight and working lights if any,” says Barbato.

“Every system is adapted specifically for the customer’s tractor, so they don’t have to splice into a generic harness.” In addition to the wiring harnesses, Barbato also works on carburetors, distributors, magnetos, generators, starters and much more. A certified hydraulics technician, he can help customers out with hydraulic problems as well. He says he is always glad to field a question on electronics, engines or hydraulics.

“My wife and I do all the work, and I get to talk to tractor people at shows and online,” he says.

“Tractor people are such nice people, and it’s just a lot of fun. I’m on the Allis Chalmers web page almost every day under my handle ‘Steve from New Jersey’. I’m glad to share my 45 years as a gearhead and mechanic.” Contact: FARM SHOW Followup, B&B Custom Circuits, 11 Woodfield Rd., Andover, N. J. 07821 (ph 973 632-5596; [email protected]; www.bb-customcircuits.com).

From the archive · Full text
Feature story

“Mini Jackhammer” Dresses Corn Grinding Stones

Featured source: Wayne Beggs

“I own a William’s 18-in. grist mill for corn. At the end of the milling season in November, I break the mill in half to dress the millstones by hand. The stones have to be rough to grind properly and they get smooth as they work,” says Wayne Beggs, Lincolnton, Ga.

“I work on the stones with two hammers. One is a facing hammer with rough points on it which is made at a special tool shop in Elberton, Ga. The other one is a Tampo rock pick with carbide tips which I purchased from Meadow’s Mill in North Carolina.

“I got the idea of mounting the Tampo rock pick tip on a Snap-On air chisel (I cut off the chisel). I had to heat them first in order to weld them together due to their hardness. The result was a small jack hammer that makes it a lot easier to dress the stones when they get dull.

“It’s important to wear a face shield and having protectors and the air hammer has to be turned very low to do the job. I wear a heavy glove to hold the chisel in place to keep it from rotating.” Contact: FARM SHOW Followup, Wayne Beggs, 3378 Augusta Hwy., Lincolnton, Ga. 30817 (ph 706 359-1240).

From the archive · Full text
Feature story

Business Is Booming For “Cub” Website

Featured source: Richard Batstone

Since more than a quarter million Farmall and International Cub tractors were built between the years 1947 and 1981, there’s a big market for parts. Ten years ago Richard Batstone tapped into that market with his website, www.farmallcubforever.com. He operates from his home in Berlin, Mass.

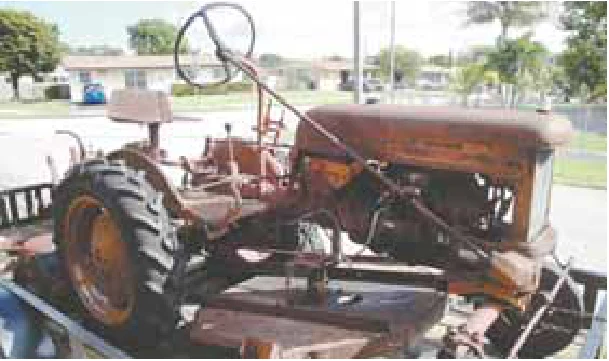
“I love Cub tractors and I always wanted to have a mail order business, so it grew out of that,” says Batstone. In the past decade the site has attracted thousands of viewers who are looking for manuals, OEM parts, videos, or just have questions. Cub afficionados from across the U.S., Canada and even foreign countries use the site. Gary Knowles of Miami, Florida used the website to network and locate parts for the 1952 Cub restoration that took him almost 6 mo. and 1,000 hrs. to complete. The rusted relic he acquired needed an engine, tranny and rear end overhaul. Knowles says the website gave him great service and the parts he needed, making his job much easier. His like-new 1952 Cub, which he says might be the only one in Miami, now sports a shiny red and white paint job along with new tires. Scott Swope of Jessup, Maryland restored a Cub as a tribute to his dad who passed away in 1984. Swope says he remembers plowing with the old tractor when he was 9 as his father taught him the “ropes” of driving. The original Cub tractor was introduced in 1947 to help farmers with the transition from horsepower to mechanical power. The wheelbase was just over 69 in., the 4-cylinder C-60 gas engine had a displacement of 59 1/2 cubic in., producing about 9 1/4 hp. on a belt and 8 on the drawbar. In the 1960’s the engines had higher rpm’s and produced 15 hp. The 184 and 185 Lo-Boys had 18 hp. Early Cub models were painted red, those built in the ‘60s were Federal Yellow, with red as an option, and other models had red with white trim. Black striping was added to the Lo-Boys. IH also built Cubs in France starting in 1955 and called them the Super Cub. Batstone says that thousands of Cubs are still used by vegetable farmers because they’re easy to operate, have good visibility, and have the power to pull a small plow, cultivate, push snow and mow grass. They can be equipped with 3-pt. hitches and loaders. The Restoration page on the Batstone’s Cub website has extensive information and photos on how to repair engines, transmissions and rear ends. There’s even a heading devoted to “Ask Charley”, who’s the walking encyclopedia of information on Cub tractors. Charley is a friend of Batstone who was a Case dealer for many years. Batstone says “if Charley doesn’t know it, chances are nobody does.” The website also has a “for sale” section where tractors and equipment are sold on consignment. Contact: FARM SHOW Followup, Farmall Cub Forever, P.O. Box 296, Berlin, Mass. 01503 (www.farmallcubforever.com).

From the archive · Full text
Feature story

“Broken Ladder” Toolbox

Featured source: Dave Bernella

“I drive a 1-ton dump truck and often take my chainsaws, gas and tools with me. I hate when the saws and tools bounce around in the truck bed so I used a broken ladder to make a toolbox to hold them,” says Dave Bernella, Pepperell, Mass. He cut the aluminum ladder to fit the width of the truck box and built a box out of plywood on top of it. He made brackets for the sides of the box by cutting up the rest of the aluminum ladder. To suspend the box from the sides of the dump bed, he bent a couple sections of rebar to hook over the sides. The hooks can slide back and forth, depending on what else is in the truck. When it’s full of wood, Bernella slides the box all the way to the front. The toolbox is painted red to match the truck.

“An aluminum ladder makes a good frame for a big toolbox because it’s strong yet lightweight,” Bernella notes. Contact: FARM SHOW Followup, Dave Bernella, 157 Lowell Road, Pepperell, Mass. 01463 (ph 978 433-3969; [email protected]).

From the archive · Full text
Feature story

Riding Mower Converted Into Self-Propelled Air Compressor

Featured source: Shane Myrick

“I can drive it around anywhere on my farm where I need air, or drive it onto a trailer and operate air tools away from home,” says Shane Myrick, Pleasanton, Kan., who converted an old riding mower into a self-propelled air compressor. Myrick does custom welding out of his shop and uses a big air storage tank to power all the air tools inside the shop.

“I can roll the self-propelled compressor outside the shop, start it up and use it to fill the tank. The tank can hold enough air to run my air tools for two to three days,” says Myrick.

“By moving the compressor outside, I don’t have to listen to it run or breathe diesel fumes as I work inside.” He started with a Sears Craftsman riding mower equipped with a belt-driven transmission and stripped it down to the frame, keeping the transmission, steering system, wheels and axles. He remounted the steering wheel on the right side of the frame and mounted a small gearshift lever beside it. Then he attached a pulley to the starter motor off a Briggs & Stratton welder and bolted the motor under the frame. The push button-operated, battery-powered motor is used to belt-drive the transmission. A metal rod runs from the motor to the transmission and is used to make the machine go forward or backward. He bought a 2-cyl. compressor powered by a 13 hp. Kubota diesel engine and mounted them onto the frame, along with a hose reel.

“It works great and is easy to operate,” says Myrick.

“I push the button on the starter motor to engage it and put the transmission in gear. Then I walk alongside the compressor, keeping my left hand on the steering wheel and my right hand on the button. When I let go of the button, the machine stops moving.” Contact: FARM SHOW Followup, Shane Myrick, 17758 Vail Rd., Pleasanton, Kansas 66075 (ph 913 757-3309).

From the archive · Full text
Feature story

How “Not To Clean” Greasy Air Filters

Featured source: Tom Haller

Tom Haller of Palmyra, Neb., recently responded to a story in our last issue on how a reader cleans greasy air filters on his Bobcat skid loader. The reader explained how he sprays a can of starter fluid over the filter, inside and out. Then he soaks the filter in a small tub of water with Purple Power Degreaser cleaner added. The filter is submerged in water and left there overnight. The next day he shakes the filter out, rinses it, and puts it back into clean degreaser water. A day later he takes the filter out, rinses it off, and then uses compressed air on it, blowing from the inside out.

“I think washing air filter media this way will only lead to degrading of the media,” says Haller.

“As far as I know this practice isn’t recommended by any filter manufacturer, and they should know with all the millions of dollars they spend on research.

“I don’t think anyone should rinse an air filter with solvent and then reuse it. I’ve worked in the transportation business for more than 40 years. Where I work, we’ve made lots of money from people who think reusing or cleaning air filters is a good idea to save money.

“A Cat, Cummins or Detroit over-the-road engine might require a complete overhaul after only 15,000 to 20,000 miles, just because the operator thought he could save money by reusing air filters this way. As far as skid loaders and other equipment go, I could be wrong but I think breathing fresh air is very good for any engine. I don’t work for any filter manufacturer – I’m just talking common sense.” Contact: FARM SHOW Followup, Tom Haller, Lost Lane 66, Palmyra, Neb. 68418 (ph 402 780-6869).

From the archive · Full text
Feature story

He Uses Cutoff Wheel To Sharpen Chainsaw

Featured source: Matthias Wandel

Dull chainsaw chain? Worn files? No worries, says Matthias Wandel. Grab an angle grinder with a cutoff metal wheel. The Canadian blogger tried it when he needed to sharpen a chain. It worked so well he made a YouTube video in 2012 that has had nearly 300,000 views.

“It’s critical to get the right angle and to be careful not to cut the links,” Wandel notes, “and also to not hold the wheel on a chain tooth very long. You can mess the chain up fast with a grinding wheel if you make a mistake.” Despite some YouTube critics, others say they’ve used the grinding method successfully for a quick sharpening. Wandel says the cutoff wheel is faster on a chain that is really messed up. But for a quick touch up, a sharp file in the hands of an experienced sharpener is better. Wandel adds that the wheel can be quickly dressed by running the edge against a stone. A video of the method can be seen at www.

farmshow.com. Wandel shares a variety of woodworking projects, techniques and tips at his website. Contact: FARM SHOW Followup, Matthias Wandel, 82 Starwood Rd., Ottawa, Ontario Canada K2G 1Z5 (www.woodgears.ca; [email protected])

From the archive · Full text
Feature story

Brake Repair Kit For Deutz Tractors

Featured source: Dennis Burkholder

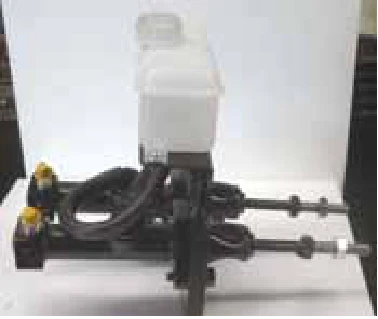
“My dad was a fulltime farmer and part time mechanic, and since Deutz tractors were popular around here, he repaired quite a few of them. I gravitated into the repair business myself and eventually he and I built a conversion kit to replace faulty master cylinders on older Deutz tractors,” says Dennis Burkholder of Hopkinsville, Kentucky. Burkholder says their kit is a replacement for Deutz tractors in the 80-06, 90-06, 100-06 and 130-06 series.

“When these tractors were new, they had good brakes, but the master cylinder was usually the first thing to go. It was costly for a dealer to rebuild at about $350 for parts alone, plus labor. My dad and I figured out how to fix the problem for less money and turned the metal work over to a local fab shop. We assemble the parts here and ship to customers all across the country.” Burkholder says a customer can install the replacement parts on his tractor in about an hour.

“First he has to clean the dirt from old lines, disconnect 2 fluid lines with screw-in fittings, unscrew the brake linkage, remove 2 allen head bolts and then the master cylinder can be removed. Our replacement drops right in, and reinstallation is the reverse of the removal process. After that, fill the reservoir with fluid and bleed out the air. You may have to balance both brakes and the job is finished.” The cost for Burkholder’s kit is $225, plus shipping. In addition to selling kits, the Burkholder business, which includes his dad and brother and another employee, repairs Deutz hydraulics, engines, transmissions and sells Bosch hydraulic pumps for about 50 to 60 percent of what Deutz charges. They also have synchronizer rings for TW90 series tranmissions.

“We’re a small business that specializes and we’ve done this since 1988, when my dad opened the shop,” Burkholder says.

“We’re a good source for parts and repairs, with just about anything available for Deutz, including OEM, aftermarket and salvage. With the Deutz Fahr parts network we’re also able to supply parts for SAME, Lamborghini, Hurlimann and Agco tractors built by SAME.” Contact: FARM SHOW Followup, Dennis Burkholder, 10970 Butler Road, Hopkinsville, Kentucky 42240 (ph 270 886-0850).

From the archive · Full text
Feature story

Pastor’s Son Devoted To Deere Tractor Parts

Featured source: Darwin Gingerich

Darwin Gingerich grew up as a pastor’s son in a small Kansas community. At a young age his interests tended more toward Deere tractors than theology.

“I restored a 1948 Deere model ‘D’ in high school ag shop and just gravitated to mechanical things after that,” says Gingerich.

“One thing led to another, and pretty soon I was buying and selling 2-cylinder Deere tractors and parts for a living.” Now in his mid 40’s, Gingerich has 25 years of experience. His business has hundreds of used parts for Deere A, B, G, H, D, R, 50, 70LP and 520 to 820 series tractors. He also has new parts for L and LA Deere tractors.

“I have more than 200 tractors on the premises and can pull parts from any one of them for customers,” Gingerich says.

“I go to auctions and buy old tractors, pick them up through the internet, and hear about others by word-of-mouth. I also have people call me from all over the country looking for parts or offering me parts.” Although he carries parts for many different models, he says items for the Deere 720 and 730 are the most popular.

“People are looking for tin work, carburetors, complete engines, brakes, you name it,” Gingerich says. In a quarter century of business he’s shipped parts to customers in every state except Hawaii and Alaska, plus a few foreign countries.

“I guess one of the reasons I’ve been successful is that I’ve got a lot of inventory and it’s priced fair,” Gingerich says.

“My parts are in good shape and I rarely have a customer complain about getting something that won’t work.” Winter is usually a busier time for shipping parts, and other times of the year Gingerich is either locating tractors, pulling parts, doing repairs for local customers, or occasionally restoring a tractor of his own or for a customer. His father Jim, now retired from ministry and full-time work, goes to swap meets for him and does books for the business. He also looks after the Gingerich parts store on ebay (gingerichjohndeeres), which generates a nice amount of business. Asked who’s going to take over the business when he wants to move on, Gingerich is quick to point out “I’ve got a 5-year-old boy Gavin who follows me around everywhere and already wants to help. He might be the one to take it on.” Contact: FARM SHOW Followup, Darwin Gingerich, P.O. Box 48, Moundridge, Kansas 67107 (ph 620 386-0071; [email protected]).

From the archive · Full text
Feature story

“Tire Talk” Website Helps Explain New Ag Tire Trends

Featured source: James Tuschner

You can get the answers to any questions you have about ag tires at the website, www.agtiretalk.com. The new website can make you a better buyer and user of today’s high tech tires.

“There is a lot of confusion in the market with a lot of advice being given, and some of it is not correct,” says James Tuschner, founder of Ag Tire Talk.

“I saw a lot of conversations in forums on the web where questions were asked and the answers were really wrong. I saw an opportunity to help clear up misconceptions.” With more than 20 years in the ag tire business and a team that represents another 40 years, Tuschner feels he has some of the answers to most common questions and he knows where to go to get more.

“One premise for the website is to get questions answered by people in the industry,” says Tuschner.

“Another is to simplify engineering jargon. One of the hallmarks of my career has been to take highly technical information and explain it so it can be easily understood.” Tuschner notes that a common area of misunderstanding, and a catalyst for the website, was advances in low-pressure tires. If you don’t know the difference between Improved Flexion (IF) tires and Very High Flexion (VHF) tires, Tuschner explained it in a recent blog. IF tires can carry 20 percent more load at the same tire pressure as standard tires or the same load at 20 percent less pressure.

VHF tires carry 40 percent more load or the same at 40 percent less pressure. If less pressure, tires have a larger footprint, much less compaction, and offer better traction. Other recent blogs include Flat Plate & Flotation, Implement Tire Trends, Better Traction Ag Tire Basics, and more. The site includes an ag tire glossary as well as a place to post questions. Tuschner is quick to inform visitors to the site that they should check all information provided with their local certified ag tire dealers. However, they may find their dealers also checking the site. While Ag Tire Talk is for farmers, Tuschner also operates a site for tire dealers and another for ag equipment dealers. He notes that recent feedback on the tire dealer site thanked him for providing easy-to-understand information.

“That was from a dealer,” notes Tuschner.

“Even at the tire dealer level, there is a lot of confusion, and they may not understand basic concepts.” Tuschner says the website as it stands is just the beginning.

“We’re taking ad placements, but we will work to provide an unbiased site for information,” says Tuschner.

“Manufacturers we’ve spoken with have endorsed the site. They see it as a help to clear up misconceptions.” Contact: FARM SHOW Followup, Ag Tire Talk ([email protected]; www.agtiretalk.com).