Practical ideas from FARM SHOW MagazineSubscribe · Free issue · Send us your shop tip
Subscribe to FARM SHOW
Issues / Vol. 44, No. 2 (2020)

Vol. 44, No. 2 (2020)

Money-Saving Repairs & Maintenance Shortcuts · Printed section pp. 32–35

31 selected entries · Complete text of selected entries

This issue’s section includes reader tips and feature-length shop stories. Held items and editorial notices are not reproduced.

Archive text: prices, coupons, availability and contact details reflect the original publication, not current offers. Reader methods are not universal instructions; follow manufacturer guidance and proper safety practices.

Reader shop tips

From the archive · Full text
Reader shop tip

Charles Matthews

Charles Matthews, Petersburg, Tenn.

“Here’s a simple idea if you ever need a gasket to stop a minor leak that’s not caused by pressure on an odd-shaped housing. This will work if you can open the cover a fraction of an inch but don’t want to take the whole assembly apart. For example, I used this idea on a Case rear tractor axle and on a differential flange on a 1959 Ford.

“Coat a long thin piece of string with flexible permatex gasket sealer, then hang it up to dry. Once it’s dry, loosely coil it into a ziploc bag and keep it until needed.

“To use, separate the assembly just far enough to tuck the coated string into the gap using a thin flat screwdriver. Be careful not to damage the existing gasket. Overlap the ends on the string on either side of the leak. Retighten the assembly and you should be good to go.”

From the archive · Full text
Reader shop tip

Robert Moulder

Robert Moulder, Cheboygan, Mich.

“One of the leading causes of house fires is lint in dryers. You should clean out the lint after every use. One of the best ways I’ve found to get all the lint out is to use an old toothbrush. Really works well.”

From the archive · Full text
Reader shop tip

Joe Pietsch

Joe Pietsch, Warren, Mich.

“In your recent article about the 17-year-old boy who was restoring an antique tractor, he said he broke the heads off bolts and had to drill them out.

“Here’s a better way to remove bolts that break off flush. Drill a hole in the end of a piece of strap iron that’s a bit smaller in diameter than the bolt. Put the strap iron hole over the bolt and arc weld the strap iron to the bolt. Let the bolt cool and then turn it out.”

From the archive · Full text
Reader shop tip

Kevin C. Jones

Kevin C. Jones, Bradford, Ohio

“When you throw away an old dishwasher, keep the bottom rack. It’s great for organizing various sockets and wrenches

and has rollers so you can roll it under a workbench out of the way. Another benefit is that it’s made of wire so dirt and dust fall through.”

From the archive · Full text
Reader shop tip

Al Cavasin

Al Cavasin, Concord, Mich.

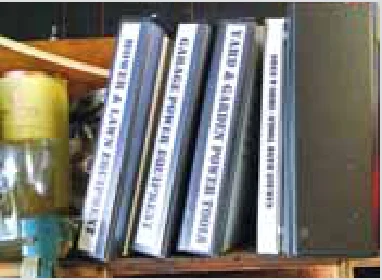
“Do you ever have trouble finding an equipment manual or parts list when you need it? Because I’ve kept every piece of literature that came with whatever I’ve bought over the past 40 years, I had drawers and cabinets filled with paper. When I needed something, I’d have to search through the pile, getting everything greasy in the process.

“So several years ago, I bought 20 3-ring binders and a heavy-duty 3-hole punch. I separated the manuals into groups that made sense like “MF235D & Implements” or “Garage Power Equipment” and “Stationary Power Tools”. In some cases I cut apart manila file folders to use as dividers, labeling the tabs.

“I made big labels for the front of each book that tell what’s in them, slipping them into the transparent plastic covers on the outside. Now I don’t have to search for hours. I just grab the book I need.”

From the archive · Full text
Reader shop tip 1 of 2

Henry Bergfelder

Individual tip 1 of 2 from this reader’s published contribution.
Henry Bergfelder, Harrington, Del.

“I always had trouble with female quick couplers leaking. I solved the problem by putting zip ties between the 2 cam locks. Works great.

From the archive · Full text
Reader shop tip 2 of 2

Henry Bergfelder

Individual tip 2 of 2 from this reader’s published contribution.
Henry Bergfelder, Harrington, Del.

“I’ve had trouble with the LockNLube grease coupler that other people seem to like. I found that it wouldn’t stay on the grease fitting and is useless in tight places.”

From the archive · Full text
Reader shop tip

Ron Mason

Ron Mason, Beaufort, N.C.

“I use Kiwi shoe polish on my table saw. I live in a very damp environment on the coast. If I put a coat of clear Kiwi on the cast iron saw table, it’s good to go for a year. Works good on shotgun barrels, too.”

From the archive · Full text
Reader shop tip

Tom Cogger

Tom Cogger, Washburn, Wis.

“I always used to have trouble with crimped wire connectors not holding. Inevitably, I’d crimp them and then they would fall off when I went to attach the wire. I came up with an easy fix. Take a needle nose pliers and pull off the plastic part of the wire connector. Cut a short length of electrical shrink tubing and slip it over the wire. Crimp the connector to the endpiece and then slide the shrink tube over the connector and shrink it with heat from a heat gun. The result is a tidy secure connector that works and looks great. I use the same idea when attaching alligator clips to wires to make electrical wire jumpers.”

From the archive · Full text
Reader shop tip

Glenn A. Haley

Glenn A. Haley, Andover, N.H.

“A quick and easy way to thoroughly shake a spray paint can is to attach it to the blade in a reciprocating saw. Just use a couple hose clamps to hold the can on the blade and insert the blade normally. Just be careful not to go too fast.”

From the archive · Full text
Reader shop tip

Paul Peyton

Paul Peyton, Ava, Mo.

“I used JB Weld to fill deep rust pits in a tractor 3-pt. hitch hydraulic cylinder. I honed it down until smooth, then polished with wet/dry sandpaper – 600 grit – 1000 grit – 1500 grit. Worked perfect.”

From the archive · Full text
Reader shop tip

Steve Schurman

Steve Schurman, Randolph, Neb.

“Recently I had to deal with 6 twisted-off manifold bolts in a John Deere cylinder head. I remembered some tricks I’d read about in FARM SHOW and decided to try them.

“When I heated the head with a torch and applied candle wax, it flared up and lit my beard on fire. Then I welded a washer to one of the bolts, applied more wax, and burned my eyebrows off. Finally, I welded a nut to the washer, applied more wax, and soon had to leave the shop to go get ‘first aid’.

“When I returned 20 min. later, I applied PB Blaster to the bolt. Started working the nut with a wrench and it came right out. The rest of the bolts came out the same way.

“If a moron like me can do this, anybody can. Thanks to all the guys who’ve sent in their ideas for dealing with this situation. A machine shop would have charged a fortune to extract the bolts. Next time, though, I’ll use 24-in. barbeque tongs to apply the candle wax.”

From the archive · Full text
Reader shop tip

David Smith

David Smith, Crystal Falls, Mich.

“On my old combine the belts are worn and slip when cold. I put just a little bit of Pine Tar adhesive on the belt. That solves the problem.”

From the archive · Full text
Reader shop tip

James Nicholson

James Nicholson, Lisbon, Ohio

“I work on small engines and had need of a puller to remove an exhaust valve seat. I had recently been to a local garage sale and I purchased some small gear puller legs. I decided I could make a puller out of one. I cut one leg in half and welded it into a 3/8-in. threaded bolt coupler. Now it screws onto my seal puller and works great.”

From the archive · Full text
Reader shop tip

Gene Weitzel

Gene Weitzel, Early, Iowa (ph 712 660-8447; [email protected])

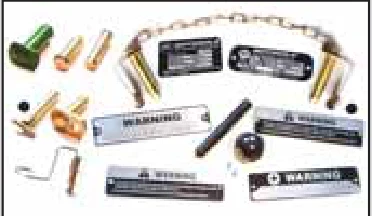
He makes and sells aluminum warning plates for 3-pt. quick hitches found on Deere 10 through 40 series tractors, which were built from the 1960’s through the early 1980’s.

“The plates remind the operator to secure the hitch latches when hooking up to an implement. Four different kinds of plates are available,” says Weitzel.

“I also restore quick hitches on these tractors and can supply parts for them.” He also sells hydraulic cylinder depth stop pins with chains, designed for old 2-way hydraulic cylinders.

From the archive · Full text
Reader shop tip

Landen Boes

Landen Boes, Fostoria, Ohio

“We prevent wrong hookups of hydraulic hoses on our tractor by color coding each pair of hoses, spray painting them red, white and blue to match the tractor’s number one, two, and three remote outlets. If we need to use a fourth outlet we paint those hoses green. We just paint an 8-in. long strip above each hose coupler. It’s an easy way to tell at a glance where to plug the hoses in.”

From the archive · Full text
Reader shop tip 1 of 3

Milan Hochstetler

Individual tip 1 of 3 from this reader’s published contribution.
Milan Hochstetler, Cumberland, Va.

“After accidentally breaking the spokes on one of the wheels on my Montgomery Ward 20-in. band saw, I made a new one using 2 pieces of 3/4-in. thick plywood. I used Tite Bond III wood glue (www.titebond.com; ph 800 669-4583) to fasten a rubber strip to the wood.

“I marked a circle on the plywood and cut it out, then bolted a pulley to it, rigged a shaft, and mounted it flat on my wood lathe’s bed. By using a sanding plate on the spindle, I was able to make a perfectly round wheel. I then used the pulley to fasten the wheel to the saw.

From the archive · Full text
Reader shop tip 2 of 3

Milan Hochstetler

Individual tip 2 of 3 from this reader’s published contribution.
Milan Hochstetler, Cumberland, Va.

“A friend helped me lengthen an old Deere lawn mower 5 in. to make this ‘donkey’ mainly so I can ride instead of walk at auctions. The cargo box on back and hood are made of oak. Very handy.

From the archive · Full text
Reader shop tip 3 of 3

Milan Hochstetler

Individual tip 3 of 3 from this reader’s published contribution.
Milan Hochstetler, Cumberland, Va.

“I’m 89 years old and started finding it difficult to lift my log splitter up for vertical splitting, so I made the job easier by using the splitter’s hydraulic cylinder to do the job. I use pulleys and steel cable. To lift to vertical, a cable runs from the extended cylinder over a pulley at the foot of the splitter and back up over a pulley to a bracket on the frame underneath. Retracting the cylinder raises the splitter up. To lay the splitter down, a cable hooks to the retracted cylinder and to the tongue. During both operations I stop about half way, unhook the cables, and ease it down by hand.”

From the archive · Full text
Reader shop tip

Mike Peterson

Mike Peterson, Bellingham, Wash.

“I welded a steel foot pad onto the bottom of the clutch lever on my 1953 John Deere 50 tractor. It lets me operate the clutch by just lightly pushing on the pad with my foot. I came up with the idea because while backing up to an implement it’s hard to operate the clutch by hand, and look back at the same time. The foot-controlled clutch also frees up my hand to operate the 3-pt. lever.”

Shop feature stories

From the archive · Full text
Feature story

30-Ft. Extension Ladder Tucks Under Shop Loft

Featured source: C.J. Bunce

C.J. Bunce needed a ladder to get up to the loft above his dad’s shop, but he didn’t want it to take up valuable floor space. So he converted a 30-ft. extension ladder into an “attic ladder” that’s easy to raise and lower when needed. The ladder is suspended horizontally just below the loft when not in use, and is hinged at one end allowing it to be lowered to the floor by releasing a rope tied to a boat cleat mounted on the shop wall. He bought the 30-ft. extension ladder at an auction for $10 and hinged the upper end by inserting a length of pipe through the top rung of the ladder and hanging the pipe between two of the shop’s rafters. The rope rides over a pair of pulleys bolted to the shop’s rafters, with one pulley located above the bottom of the ladder and the other above the wall cleat. Bunce releases the rope from the boat cleat to let the ladder down, and pulls on the rope to raise the ladder back up.

“It works great. I came up with the idea because my dad keeps sheets of plywood in a 12-ft. high loft for long term storage,” says Bunce.

“The only way to get up there was to drag out a big extension ladder which is cumbersome and heavy, especially if there’s much stuff inside the shop. Permanent stairs weren’t worth the cost or the wasted floor space.” Contact: FARM SHOW Followup, C.J. Bunce, 14961 U.S. Hwy. 24, Perry, Kansas 66073 (ph 785 393-3933; [email protected]).

From the archive · Full text
Feature story

New Way To Repair Tubeless Tractor Tires

Featured source: Dave Auble

“Our new external tire patch for tubeless tires eliminates the need to remove the wheel from the rim to patch punctures or slices in tractor tires and other off-road tires, even if it’s a tear in the sidewall. Our patch kit is a great tool to keep on your tractor or ATV in case of an emergency,” says Dave Auble, Glue Tread LLC, Hiram, Ohio. FARM SHOW readers might remember that Auble and his son, Andrew, are the guys who came up with “glue on” tractor treads used to boost traction on older tractors with worn treads (Vol. 42, No. 6). Now they’re offering a kit that includes 1/8-in. thick pieces of a tough but flexible rubber along with a special adhesive that bonds the piece permanently to the tire.

“This kit uses a thinner piece of rubber than our glue-on treads. It’s more pliable and bends with the tire but holds up to the air pressure inside the tire,” says Auble.

“Other external ‘tire plug’ kits on the market can fix punctures between the lugs, but they can’t fix a puncture or a slice in the sidewall.” To apply the patch you deflate the tire and glue the puncture or slice back together, then apply the patch over the damaged portion of the tire. The adhesive should be allowed to cure for about an hour.

“The repair can be completed in the field, and the patch can hold up to 30 to 40 psi depending on the severity of the puncture,” says Auble.

“We worked with a manufacturer to develop a rubber that combines flexibility and toughness. It’s able to stretch as the tire is pumped up, and flexes as the tire goes over rocks and rough terrain.” The patch is 1 1/2 in. wide and available in 1 1/2, 2, and 3-in. lengths.

“If you need a smaller piece, you can trim the rubber using a heavy-duty scissors or a sharp knife,” notes Auble. He notes, however, that the new kit should not be used on any kind of highway vehicle. The kit includes 4 patches and a bottle of adhesive. It sells for $15, or you can get 3 kits for $35, including shipping anywhere in the U.S. It can be ordered online, by phone, or via email. Contact: FARM SHOW Followup, Dave Auble, GlueTread LLC, 11684 Hayden St., P.O. Box 357, Hiram, Ohio 44234 (ph 800 238-9791; [email protected]; www.GlueTread.com).

From the archive · Full text
Feature story

Vise Mounts On Pickup Bumper

Featured source: Mike Peters

“I recently read a story in FARM SHOW about a portable bench vise that attached at hitch level to a pickup bumper. The operator had to lean over to use it. It prompted me to put together a portable bench vise that I can use while standing upright, which is much handier to use,” says Mike Peters, Harmony, Minn. The portable vise consists of an L-shaped length of square tubing with a round flat steel plate on top. The plate has holes in it to bolt on the vise. By pulling a pin from the receiver hitch, Peters can quickly move the vise to another vehicle. It can be stored behind the pickup seat or in a toolbox.

“I already had the vise, which was originally designed to rotate on a round metal base,” says Peters.

“I had a local welding shop put the square tubing and round plate together. Then I painted the tubing and vise yellow so that other motorists will see it whenever the pickup is parked.” Contact: FARM SHOW Followup, Mike Peters, P.O. Box 53, Harmony, Minn. 55939 (ph 507 381-6874; [email protected]).

From the archive · Full text
Feature story

They Specialize In Combine Auger Tube Liners

Featured source: Mike and Brian Ihle

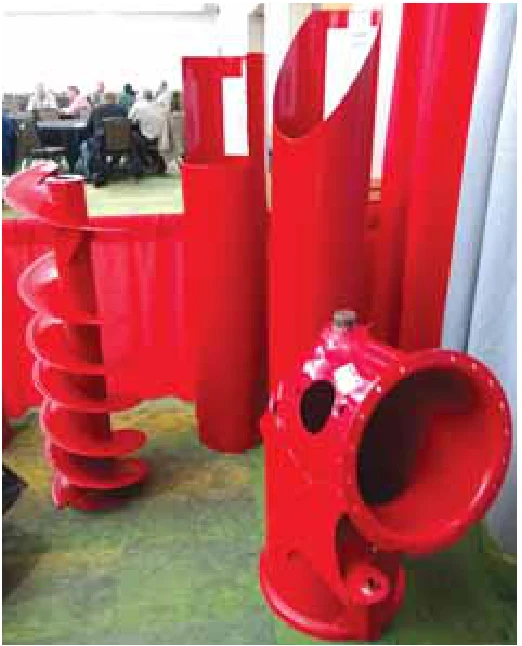
When Mike and Brian Ihle needed new auger tube liners for their combines, they couldn’t find what they wanted on the market. So they decided to make their own liners out of 10-ga. steel. The liners generated so much interest that they decided to form a company to market them.

IHLE Fabrications, LLC, Polk City, Iowa, offers steel vertical unload auger liners and bubble-up auger tube liners, and stainless steel clean grain and return liners. They fit a wide variety of combine models from Case IH, New Holland, Deere, Cat Lexion, Claas, and Gleaner, with more being added all the time.

“We’ve always farmed with Case IH combines, so we began with liners for combines that we’re familiar with,” says Mike.

“We’ve since expanded to a variety of combine brands, and are now selling to dealers with the intent to save farmers money in labor and parts.”

The vertical unloading auger tube liner is a pre-fit tube that lines the combine’s existing tube before it wears thin and the grain tank has to be replaced. The kit includes a top repair ring and a 4-piece sump kit that you weld into the grain tank, due to holes in the grain tank and in the vertical tube. The clean grain and return auger liner kit consists of 2 weld-in stainless steel liners that are pre-rolled, pre-cut, and pre-fit for easy installation.

All liners are made of 10 to 12-gauge steel and are fabricated on the Ihle’s farm.

“Our liners can save farmers thousands of dollars compared to buying new OEM parts,” says Mike.

“An example is our bubble-up auger tube liner for Case IH combines. A new OEM auger tube from Case IH sells for $2,800 and takes 1 1/2 to 2 days to install, which comes to about $2,000 in labor. That’s a total cost of about $5,000, whereas our bubble-up auger liner sells for $620 plus shipping and requires far less time to install. Another example is our vertical unload liner for Case IH combines. It sells for $670 plus shipping, whereas a new grain tank, including the cost of labor to install it, costs about $20,000.”

Mike says plastic auger liners on the market work fine if they’re installed when the combine is new.

“However, if your combine’s auger tube is already worn out we think steel is the only way to go, because it will last much longer and is easier to install. Also, a steel tube will provide the strength needed to push grain through your combine.”

Contact: FARM SHOW Followup, Mike Ihle Fabrications, LLC, 16192 NW 44th St., Polk City, Iowa 50226 (ph 515 249-3877; [email protected]; www.ihlefabrications.com).

From the archive · Full text
Feature story

MoJack Simplifies Mower Maintenance

Featured source: Dan Drake

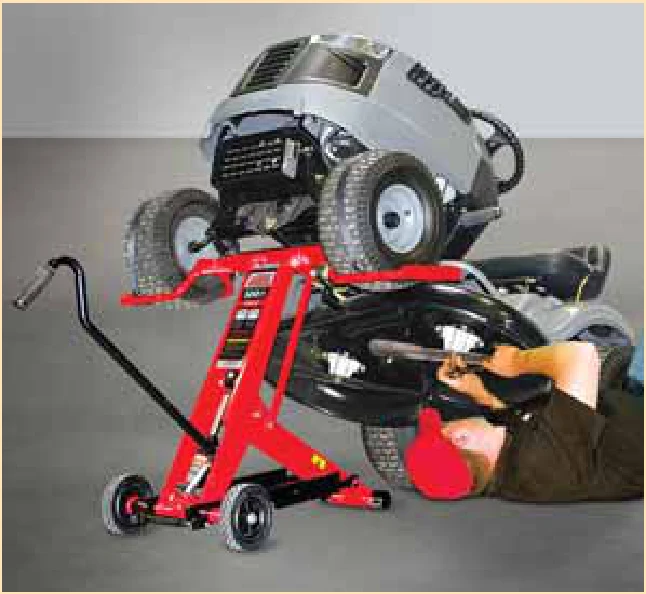
Ten years ago Dan Drake saw a jack for riding mowers built in a southeast Kansas welding shop. He saw its potential right away and purchased the rights to commercialize production. Now, MoJack® can be found all over the country in large farm supply and home improvement stores as well as smaller businesses.

Some report they sell more jacks than mowers, Drake notes.

“The patented design is the first of its kind,” he explains.

“MoJack lifts the mower by the wheels so it gets high enough to get your whole body under it.”

That makes it safer and easier to remove and replace blades and do other maintenance under the deck. MoJack cranks up easily so anyone can use it, from consumers to businesses with fleets of mowers.

“It’s adjustable for everything from small garden tractors to giant zero-turn mowers,” Drake says.

Built with sturdy steel, MoJack holds the mower on a solid metal base and has an automatic locking pin to prevent the lift from coming down. When not needed it folds up and rolls on wheels to store under a bench, on a shelf, or against a wall.

MoJack is available in six sizes from the base model that lifts 300 lbs. ($179 retail) to the PRO model for ZTR mowers with decks 65-in. and bigger ($499 retail). The company also private labels the jacks for Cub Cadet, Troy-Bilt and Craftsman.

The website provides dealer locations. The lifts are also available on Amazon.

Contact: FARM SHOW Followup, MoJack, 3535 N. Rock Rd., Wichita, Kan. 67226 (ph 877 466-5225; www.themojack.com; [email protected]).

From the archive · Full text
Feature story

Overhead Crane Pivots 360 Degrees

Featured source: Gordon Mariner

“I recently built an overhead crane that’s one of the handiest tools in my 30 by 60-ft. home-built shop,” says Gordon Mariner, Goodlettsville, Tenn.

“An electric trolley and electric hoist run on a track made from a 15-ft. long, 4-in. I-beam, which pivots 360 degrees.”

The crane is located in the center of Mariner’s shop, which has a pair of big doors spaced 30 ft. apart on one side and overhead storage shelves on the other side. Mariner can pivot the crane out to the center of both doors to unload trailers or trucks parked inside.

“To move the crane around I just pull on the electric hoist cable and swing it in either direction. It rotates very easily with a big load. Even my 8-year-old granddaughter can handle it,” says Mariner.

“It can lift up to 1,600 lbs.

“I didn’t want a single I-beam equipped with manual chain hoists, because I didn’t want any limitations when creative lifting problems arose. So when I decided to build a new shop, I built the lift system first and then built the shop around it.”

The crane is supported by a 5-in. dia. steel pipe, with its bottom welded shut, that goes 4 ft. deep into the ground and is encased in cement. Mariner put nine 1 1/4-in. dia. steel balls inside the pipe and also a half gal. of 90-weight used transmission oil. He then dropped a 4-in. dia. steel pipe, with its bottom welded shut, inside the 5-in. pipe. The last step was to pour in the concrete.

“The steel balls act like bearings, and the transmission oil keeps them lubricated,” says Mariner.

“It really comes in handy. I often use it to lift my zero-turn riding mower so I can change the blades or the oil. When I’m done I lift the mower up out of the way onto one of the overhead shelves. I also use the crane to pick up stuff and set it on an overhead loft,” says Mariner.

He notes that he installed a cable connected to a turnbuckle on top of the track to help keep it level.

Contact: FARM SHOW Followup, Gordon Mariner, 1102 Cartwright Cr N., Goodlettsville, Tenn. 37072 (ph 615 477-8099).

From the archive · Full text
Feature story

Quick -Change Torch Cart

Featured source: Gary Houdek

Gary Houdek can push his propane/oxy torch kit around the shop floor or tow it to the field behind an ATV. Equipped with car wheels, the cart is just as stable either way, and adding the tongue for towing is fast and easy.

“The standard torch cart with its small wheels can be hard to move around a shop with cords and hoses on the floor,” says Houdek.

“With its larger wheels and balanced design, my cart is easy to move in the shop. When I add the tongue, it tips the tanks horizontal, and it is stable when towed over rough ground.”

Houdek used mostly 1/4-in. steel for the cart, simply because that’s what he had available. The cart frame is a combination of pipes, steel strap and rectangular tubing of various sizes.

The oxygen tank and propane tank are balanced within the cart’s framework. Wheels and spindles attached to the lower supports were salvaged from a Chrysler Neon. Tabs on the platform help to secure the rear-mounted oxygen tank when it lies down in the towing position. An over-center, spring-loaded chain holds it in place in the vertical position. To change out a bottle, Houdek pulls a pin and flips the over-center latch back, releasing the chain.

When he wants to take the cart to the field or into the farmyard, Houdek connects the tongue assembly. The clevis hitch tongue is a length of 2 by 2-in. square tubing with an upper crossbar made from 1 by 2-in. channel iron. Two pair of clevis-style ears at either end of the crossbar slide over and get pinned to steel straps that run around either side of the oxygen tank. At the same time, two steel rods with stops on them attached by a crossbar to the end of the tongue, slide into 1 by 1 square tubing beside each wheel, further securing the cart to the tongue.

“When it is tipped into towing position, the tongue helps to lock the oxygen tank into position, while the propane tank above it adds weight for greater stability,” explains Houdek.

Houdek added several items to make torch work easier, including a 50-ft. hose reel and a toolbox. Sleeves to hold the torch and rods to hang the striker and safety glasses are attached to each side of the cart.

“The reel can swing to either side for easy hose release,” says Houdek.

“It’s my favorite part of the cart; it’s so easy to access.”

A spring-loaded T-bar in a slot on the reel hinge plate holds it in place. However, in the towing position, Houdek releases the reel and uses bungee cords to tie it down.

“The weight of a bouncing reel would be too much for the spring-loaded lock,” says Houdek.

Contact: FARM SHOW Followup, Gary Houdek, 1055 4th Rd., Chapman, Neb. 68827 (ph 308 986-2491; [email protected]).

From the archive · Full text
Feature story

Handy “4-In-1 Tool” Built For New Holland Haybine

Featured source: Edward Fett

Edward Fett, Lennox, S. Dak., says the “4-in-1” tool he made for his New Holland 499 swing tongue haybine saves him a lot of time and trouble.

“It has 2 different size sockets, a punch, and a 16-in. long retractable handle that I use like a slide hammer to strike the punch. Extending the handle also increases the leverage when using the sockets,” says Fett.

“I came up with the idea because whenever I needed to change broken mower sections in the field, I always had to bring three different tools with me – a wrench to remove the guards, a socket to remove the mower sections, and a punch and hammer to remove any sheared-off section bolts. I spent a lot of time walking back to my tractor to get the tool I needed. If I laid any of the tools down they could easily get lost in the hay, and then I spent even more time searching for them. Now I have one tool that can do all of those jobs.”

The tool measures 18 in. long with the handle extended and 9 1/2 in. long retracted, small enough to fit into Fett’s toolbox. To make the retractable handle, he bought a new sliding T-handle breaker bar and threw the handle away, keeping only the square socket drive. He then cut 5/8 ID bushing stock to the right length and welded one end shut. It hits a 5/8-in. dia. steel rod that rides inside the bushing, which is used to drive out section bolts.

Fett tapped a small hole in the middle of the rod and threaded a cap screw into it. He also cut a long slot into the bushing, which the cap screw slides back and forth in.

He used a lathe to grind the top end of the rod down to form a punch.

To attach the sockets Fett removed the handle from a short 1/2-in. drive breaker bar, then welded a large socket on one end of the bar and a small stepped-down socket on the other end. The 5/8-in. rod runs through the short breaker bar in place of the handle. A roll pin, inserted into a hole drilled into the rod, keeps the welded-on sockets in place.

Contact: FARM SHOW Followup, Edward Fett, 46656 275th St., Lennox, S. Dak. 57039 (ph 605 647-2399).

From the archive · Full text
Feature story

2-Post Lift Used As Workbench

Featured source: C.J. Bunce

“I work on commercial grade push mowers, sod cutters, rear tine rototillers, generators, and so forth that are too heavy to lift by myself onto a work bench. It’s uncomfortable to work on these machines while kneeling or laying on the floor, so I made a wooden platform that rides up or down on a 2-post electric-hydraulic car lift. It lifts the machines to a comfortable work height,” says C.J. Bunce, Perry, Kansas.

He bolted a 4 by 8 sheet of 3/4-in. thick plywood to a pair of 2 by 4’s on edge. He attached 2 push mower wheels to one end of the plywood, and a couple of fold-down metal handles purchased at Home Depot to the other end so he can easily move the platform around.

“I just wheel it over and set it on the lift’s arms, which are about 4 in. off the floor,” says Bunce.

“A pair of small wooden blocks serve as a drive-on ramp. I use a remote control to raise the lift to a comfortable standing work height.”

Contact: FARM SHOW Followup, C.J. Bunce, 14961 U.S. Hwy. 24, Perry, Kansas 66073 (ph 785 393-3933; [email protected]).

From the archive · Full text
Feature story

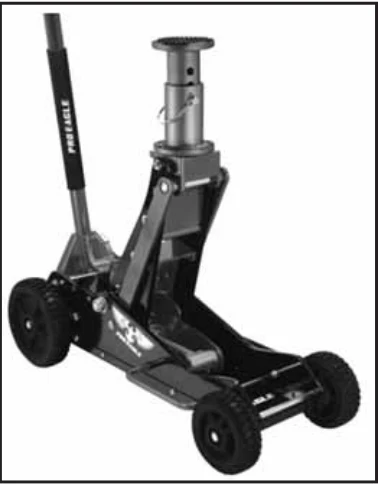
“Big Wheel” Floor Jack

Featured source: Pro Eagle

This new “big wheel” off-road floor jack from Pro Eagle is equipped with a pair of large diameter wheels on back, making it much easier to maneuver on uneven ground than a jack with 4 smaller wheels. The solid composite wheels also make it easier to run over small obstacles in your shop, such as extension cords, rocks, and other debris.

The company sells 2 “bigwheel” floor jack models: a 2-ton model called “The Beast”; and a 3-ton named “Kratos”. Both are made of aluminum and have solid steel axles. Their weights range from 46 to 60 lbs., and they come with an 8-in. adjustable extension with rubber grip pad that can be used to lift high clearance off road vehicles.

The Kratos model sells for $469.99 plus S&H; the Beast for $409.99 plus S&H.

Contact: FARM SHOW Followup, Pro Eagle (ph 310 513-8222; www.proeagle.com).