Practical ideas from FARM SHOW MagazineSubscribe · Free issue · Send us your shop tip
Subscribe to FARM SHOW
Issues / Vol. 24, No. 5 (2000)

Vol. 24, No. 5 (2000)

Money-Saving Repairs & Maintenance Shortcuts · Printed section pp. 38–41

34 selected entries · Complete text of selected entries

This issue’s section includes reader tips and feature-length shop stories. Held items and editorial notices are not reproduced.

Archive text: prices, coupons, availability and contact details reflect the original publication, not current offers. Reader methods are not universal instructions; follow manufacturer guidance and proper safety practices.

Reader shop tips

From the archive · Full text
Reader shop tip 1 of 3

Bruce Ogram

Individual tip 1 of 3 from this reader’s published contribution.
Bruce Ogram, Elmira, Ontario

“Here’s how I made a simple fuel gauge for my antique 1961 Fordson Major diesel tractor. I used a piece of clear plastic-type tubing meant for immersion in gasoline or diesel fuel which I got at a hardware store. This tube is 3/8-in. dia. and is tee’d into the metal fuel line below the fuel tank, close to the shut-off valve. I ran the tubing up over the tank and down under the other side of the tank. I stuffed some rolled-up fabric inside the open end of the tube to keep out bugs and dirt. The fuel in the tube simple rises to the same level as in the tank, making it easy to tell at a glance how much fuel is left. Very handy.

From the archive · Full text
Reader shop tip 2 of 3

Bruce Ogram

Individual tip 2 of 3 from this reader’s published contribution.
Bruce Ogram, Elmira, Ontario

“When the rectangular tip on the rotating cable on the hour meter on my 1961 Fordson Super Major lost its drive inside the matching female connection in the gear drive, I just cut off a piece of old panty hose about 3/8 by 2 in. long and wrapped it in reverse around the inside cable. Then I intered this built-up inner rotating cable to the female drive and snugged up the hold-down nut. Problem solved and the hourmeter works great again. You just have to be sure not to use too much nylon which would put too much pressure on the rotating cable.

From the archive · Full text
Reader shop tip 3 of 3

Bruce Ogram

Individual tip 3 of 3 from this reader’s published contribution.
Bruce Ogram, Elmira, Ontario

“The gear drive that drives the hour meter cable is no longer available from Ford. It took me three years to find a used one. Since lack of lubrication is what ruins these cables, I removed the two pressed caps on the unit, which are like frost plugs, and immersed the entire drive assembly in oil for a few days, occasionally turning the shafts while they were submerged.”

From the archive · Full text
Reader shop tip

Gary Holtman

Gary Holtman, Columbus, Miss.

“When doing an in-frame engine overhaul, I find it helpful to put a little clean motor oil inside a rod before installing the bearing insert. This keeps the bearing from falling out while installing pistons.”

From the archive · Full text
Reader shop tip

Albert Stier

Albert Stier, Petersburg, Ill.

Albert made an indestructible shop table by mounting a huge gas tank cap on top of a length of heavy 12-in.

“H” beam.

“The table top is 2 in. thick by 30 in. in dia. It came off a compressed gas-hauling truck. I found it at a shop of a repairman. I welded it to the top of the H beam and attached anti-tipping wings to the base.”

From the archive · Full text
Reader shop tip

Clifford Brandenberger

Clifford Brandenberger, Beecher City, Ill.

Clifford is known for having a well-organized shop. He gets more use of his specialty shop tools by using portable rolling stands. He makes them out of oak for stur-diness. Wheels are also made out of oak. The handles make it easy to pick up and roll around. The stands let him store the tools away when not needed and give them more room when they’re in use.

He uses these kinds of stands for a bandsaw, belt sander, chop saw, and other similar tools.

From the archive · Full text
Reader shop tip

Edwin Mattix

Edwin Mattix, Saint Elmo, Ill.

“I use two different colors of spray paint to spray a spot on hoses so that when hooking up hydraulic hoses you have no problem knowing which hose connects to which opening.”

From the archive · Full text
Reader shop tip

Barry Laybourne

Barry Laybourne, Tugaske, Sask.

“In a recent issue, a reader complained that the air conditioners on his Deere 7400 and 7800 tractors were no good. If your compressor pressures are okay on the low side – say 15 to 20 lbs. – then it’s probably an air restriction. Deere hid the air filters behind the seat – two 6 by 8-in. filters that are under grills. They get dirty and restrict air flow so there’s no air going through the evaporator and comes out the vents. The solution is to clean or replace the filters. You should also check the condenser for dirt or other foreign material.”

From the archive · Full text
Reader shop tip

Donald Bunch

Donald Bunch, Aberdeen, Miss.

“Here’s a tool I made to remove and replace bearings in the packer wheels on Deere planters. It consists of two pieces of pipe, one slightly larger than the bearing but smaller than the sleeve, and the other slightly larger than the sleeve. The smaller pipe slips inside the larger pipe and you weld it in place. When you slide the bearing sleeve into the end of the pipe, it catches on the smaller pipe and you can then hammer out the bearing, or hammer in a new one. Sure beats trying to do it in a vise.”

From the archive · Full text
Reader shop tip 1 of 3

Glen Teel

Individual tip 1 of 3 from this reader’s published contribution.
Glen Teel, Hays, Kan.

“The clutch slave cylinder on my 1988 Chevy S-10 pickup was leaking. Chevy wanted $90 for parts to re-pair it. I put an O-ring over the plunger to seal the cut in the rubber. I made the repair over a year ago and it’s still holding. Cost me only 50 cents.

From the archive · Full text
Reader shop tip 2 of 3

Glen Teel

Individual tip 2 of 3 from this reader’s published contribution.
Glen Teel, Hays, Kan.

“Another idea that works well for me is using a shop vac to clear out clogged drains. It’s quicker and more effective than using a snake or chemicals.

From the archive · Full text
Reader shop tip 3 of 3

Glen Teel

Individual tip 3 of 3 from this reader’s published contribution.
Glen Teel, Hays, Kan.

“I keep some imitation vanilla in my shop. When applied immediately to a burn, it will prevent the burn from blistering and stops the sting.”

From the archive · Full text
Reader shop tip

George Pot

George Pot, Smithville, Ont.

“I had trouble breaking the drive chain on the 2-row cornhead on my New Idea Uni-System. The chain was 10 ft. long. I finally replaced it with an orbit motor mounted near the pit- man gearbox on the bottom of the head. I control it with one of the hydraulic outlets on the Uni-System. It works great now and I can vary my cornhead speed and I can stop it on headlands, or any time I need to.”

From the archive · Full text
Reader shop tip

Bill Randall

Bill Randall, Toledo, Wash.

“Galvanized water tanks will last 20 years or more without any sign of rust if you set them on a simple wood frame made out of treated wood, rather than just setting them on the bare ground. I did this 20 years ago on some tanks and they still look like new.”

From the archive · Full text
Reader shop tip

Dan Grewe

Dan Grewe, Arlington, Wash.

“I had an old tractor that sat for 20 years without running. All the pistons were stuck. I used a solvent from Kano Laboratory, pouring it into the plug holes. It took two years but they finally loosened up. I ground down the valves and seats and now it’s running fine.”

From the archive · Full text
Reader shop tip

Wilbur J. Black

Wilbur J. Black, Plum City, Wis.

“The drinking cups in our stanchion barn are mounted on rigid pipe. They would often break off when cows rubbed on them. I replaced the rigid pipe with flexible 3/4-in. hydraulic hose. It doesn’t break and should last a lifetime.”

From the archive · Full text
Reader shop tip

Glenn Sethre

Glenn Sethre, Longview, Wash

“Putting motion detector lights in shops and around the farm adds both safety and convenience. You can put them anywhere – in the house, garage, shop, or whatever. That way you never have to turn on lights outside or in the shop.”

From the archive · Full text
Reader shop tip

Bill Fisher

Bill Fisher, Bourbon, Ind.

“I use a scoop shovel a lot on concrete so it seemed like I’d wear one out every year. To solve the problem, I riveted a 1 1/2-in. strip of stainless steel on the leading edge of the scoop to take the wear. After one year of use my shovel is almost like new.”

From the archive · Full text
Reader shop tip

Kent Dinwiddie

Kent Dinwiddie, Jeffersonville, Ohio

“To make sealed bearings last 2 to 3 times longer on combines and other equipment, drill a small hole in the side of the bearing. Inject grease with a needle attachment on a grease gun. Then wipe excess grease off and plug the hole with a small amount of silicone pushed into hole.”

From the archive · Full text
Reader shop tip

Charles Wochley

Charles Wochley, Mt. Pleasant Mills, Penn.

“I’ve found that older gas-powered tractors tend to foul the plugs. I solved the problem by putting 1 gal. of diesel fuel to 25 to 35 gal. of gas. Adding diesel fuel also lubes the engine.”

From the archive · Full text
Reader shop tip

Matthew Lebold

Matthew Lebold, Kennbeek, Ontario

“In our shop, we have worked on a number of stuck priority valves. To remove them, we slip a 4-in. length of plastic fuel line onto a piece of 1/4-in. threaded rod. Next we put a nut on each end of the rod and slip the assembly inside the priority valve. Then we simply tighten the lower nut so that it pushes on the tube and expands it. Then you just pull and the valve comes out.”

From the archive · Full text
Reader shop tip

Ken Smith

Ken Smith, Marshalltown, Iowa

“The strainer screen on the hydraulic reservoir on my IH 300 utility tractor plugged up twice, resulting in major overhauls. To keep the problem from happening again, the internal screen was removed and a high capacity screw-on type cartridge filter was installed in the return line at the rear of the pump.”

From the archive · Full text
Reader shop tip

Leonard Seltzer

Leonard Seltzer, Manhattan, Ill.

“The sliding double doors on my Morton machine shed open from the middle and would rattle around in the wind. To hold the doors in place I tried using a truck tire filled with concrete, but it weighed about 850 lbs. and was a hassle to move.

“To solve the problem I bought a used ammunition box at a gun show, filled it with concrete, and set it on a two-wheeled hand truck. To hold the doors shut I place the box against the inside of the doors. It weighs about 230 lbs.

“The wooden box measures 1 ft. wide, 44 in. long and about 8 in. high. After filling the box with concrete I put a 3/4 in. dia. loop of rebar into the center of the concrete before it hardened. A nylon ratchet strap runs from the loop about 3 ft. up to the onside door handles. This strap will help keep the doors from flopping around in windy conditions.

“I nailed a small chunk of 3/4-in. thick plywood under each end of the box so that the box sits off the ground far enough for me to get the hand truck under it.. I leave the hand truck with the weight most of the time. Whenever I want to open the doors, I simply unhook the strap from the door handles and hand truck to move the weight away. You can buy these old ammunition boxes at gun shows for only about $5 apiece.”

From the archive · Full text
Reader shop tip

Leonard Olson

Leonard Olson, Terog Mfg. Co., 387 Atlantic Ave., Stephen, Minn. 56757 ph 800 423-3918 or 218 478-3395; fax 3622

“Our new Track Guards are designed to keep the tracks on Caterpillar Challenger tractors in line so they don’t come off to the inside.

“The Track Guards are designed to bolt on. Three holes have to be drilled into each side. The kit comes with a template for proper bolt hole location.

“The guards are a must if you’re using your Challenger for ditching or excavating work. Turning on an incline while pulling a heavy load can cause the track to come off toward the inside. If the tractor’s final drive drops on top of the track it can fray or even tear out cables embedded in the track. Eventually you’ll have to replace a costly track.

“The kit comes with instructions. Installation time is about one hour. Fits all Challeng-ers with 30-in. tracks. Other models are available.

“Sells for $495 plus S&H.”

Shop feature stories

From the archive · Full text
Feature story

Homemade Band Saw Blade Sharpener

Featured source:

“Everyone who has a bandsaw sawmill needs one of these,” says Harold Witulski, Beatrice, Neb., who recently sent FARM SHOW photos of a “band saw blade sharpener” that he designed and built.

The blade sharpener uses a small grinder wheel that runs off a 12-volt motor. A windshield wiper motor, with a small crank attached to it, pushes the blade ahead and also brings a grinder down at the same time. The grinder mounts at one end of a steel arm, which has a counter weight at the opposite end to balance the grinder’s weight. The grinder comes down to sharpen the front side of the teeth to a 10-degree slope. The grinder pivots on a bolt which can be adjusted to move the grinder forward or backward. A turnbuckle is used to adjust the up-and-down travel of the grinder. A small metal arm is used to push the blade ahead. A small ball bearing is positioned so that the arm rests on it and raises up when the grinder comes down.

The entire setup mounts on a 15-in. long, 8-in. high piece of channel iron. The blade slides between the channel iron and a length of 2-in. wide strap iron. A pair of small wooden wheels are used to hold the blade down as it slides along on two 1/4-in. bolts, which can be adjusted to just let the blade slide easily.

“I bought the grinder at a local hardware store and ground it down to fit the teeth on my saw,” notes Witulski.

Contact: FARM SHOW Followup, Harold W. Witulski, 8558 W. Lilac Rd., Beatrice, Neb. 68310 (ph 402 228-0633).

From the archive · Full text
Feature story

Easy-To-Use Wall-Mounted Air Hose Reel

Featured source:

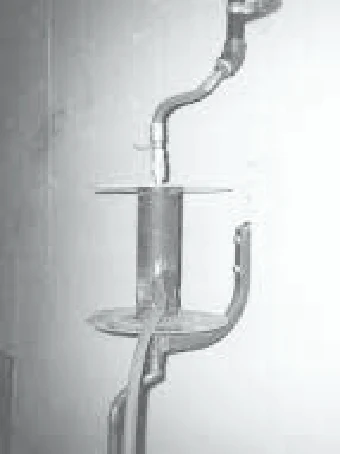
“Our wall-mounted air hose reel is easy to use and doesn’t take up a lot of space. It keeps the hose up off the floor so it always stays clean,” says Joel Waldner, Lethbridge, Alberta.

The reel is made from a short length of drill stem pipe with a circular steel plate welded onto its top and bottom. A steel arm made from 1-in. tubing is used to bolt it to the shop wall. A quick coupler mounts on top of the reel. A steel air line connects to the coupler with a short length of rubber air hose. The main air hose runs through a hole cut into the side of the pipe and up to the coupler equipped with a swivel fitting. To unwind the hose the operator simply turns a crank at the bottom of the unit and pulls out the hose.

“It works great for operating any air tool or compressor,” says Waldner.

“The reel has 60 ft. of hose on it which is long enough that we can open a shop door and use it outside. It really comes in handy for changing shovels on tillage implements. If we want we can reach through a second hole in the pipe, disconnect the coupler, and attach an even longer hose.”

Contact: FARM SHOW Followup, Joel Waldner, 67 Tudor Crescent, Lethbridge, Alberta, Canada T1K 5C7).

From the archive · Full text
Feature story

Rolling Engine Hoist Converted To 3-Pt. Mounted Crane

Featured source:

“It has more reach than the original engine hoist, and we can take it anywhere now,” say Kirk Unzelman and Mike Intlekofer of Bellevue, Wash., who recently came up with a simple, inexpensive way to convert a common rolling engine hoist into a versatile 3-pt. mounted crane. They use it on their Kubota tractor.

The men say the conversion takes just a few minutes and the crane can be easily changed back to a conventional engine hoist when needed.

They fabricated four new parts to make the crane – a pair of short legs that replace the longer legs that come with the hoist; a cross beam that fits into the bottom beam of the hoist and attaches to the two lower pins of the 3-pt. hitch; and a metal bracket that attaches to the column and serves as the connection point for the top link.

“We can lift large loads to a considerable height using either the cylinder on the crane or the 3-pt. hitch, or both,” says Unzelman.

Contact: FARM SHOW Followup, Kirk Unzelman, 4635 130th Ave. S.E., Bellevue, Wash. 98006 (ph 425 746-6520).

From the archive · Full text
Feature story

Fan Clutch Boosts Horsepower On Deere 8440

Featured source:

When Mitch Vanness rebuilt the water pump on his Deere 8440 last spring, he decided to try installing a clutch kit on the engine’s direct-drive cooling fan.

“I knew there was a clutch for the fan on other models, so I bought one of those and adapted it to fit my tractor,” says the Latimer, Iowa farmer.

“Originally, the fan bolted directly to the water pump drive pulley on the engine,” Vanness says.

“It didn’t take much to make the clutch work on this tractor. I had to drill out the holes in the clutch where the fan mounted, and I had to put some studs in the pulley to mount the fan clutch on the pulley. After that, it was just a simple matter of putting it back together. I also replaced the old fan with a newer style fan.”

When he had it all back together, the new fan stuck out too far to fit the fan shroud. The shroud is in two pieces. He put the front piece inside the back piece, which allowed him to slide the front piece forward enough to go around the fan.

“The engine warms up quicker now with the fan off and there’s less wear and tear on the fan belt, even when it’s running,” he says. He says there’s less fan noise, too.

But the best part is that the change increased both available horsepower and over-all fuel economy.

“Normally, power output from this tractor has been right at 210 pto hp,” he says.

“I checked it on a dynamometer after adding the clutch and found it was right at 235 hp.”

Besides farming, Vanness also runs a machinery repair service. The clutch he modified was designed for 50 series and newer Deere tractors. Now that he’s successfully added the fan clutch to his 8440, he says he’d be willing to make the modifications for others.

“I’ll be working on a conversion for 4640, 4840 and 8640 models,” he says.

“It would be best to do this conversion while rebuilding the water pump,” he says.

“I think I could probably rebuild the water pump and install the fan clutch and new fan for under $700.”

A lockout kit, which keeps the fan running full time, is also available for tractors with fan clutches installed. Vanness says these are only helpful in extreme conditions, though, and shouldn’t be needed if the radiator is kept clean and the cooling system is working properly.

For more information, contact: FARM SHOW Followup, Mitch Vanness, Vanness Repair, 1724 Finch Avenue, Latimer, Iowa 50452 (ph 641 579-6127; E-mail: [email protected]).

From the archive · Full text
Feature story

Restore Damaged Threads Without a Die

Featured source:

Damaged bolt threads no longer mean a trip to the store, not if you have the Universal Thread Restorer in your toolbox. Two hardened steel blades on the restorer head are guided by undamaged thread to regroove damaged areas.

“It works slick and can pay for itself in time saved alone,” says Fleming Lauridsen, owner of Flema Products Ltd., Kelowna, BC.“I had a customer with a special fitting on a race car that had been damaged. Without the Thread Restorer, it would have re-quired a special die,” recalls Lauridsen, who markets the tools.

“We fixed it in five minutes and saved him $500.”

The tool has three different head sizes for bolts ranging in size from 1/4 to 3/4 in., 1/16 to 1.5 in. and 11/4 to 5 in. Each tool has optional bits for fine or coarse threads, but otherwise works on metric, inch, right hand or left hand threads interchangeably. Lauridsen claims the tool with its three heads can replace about 1,000 dies.

Lauridsen demonstrates the Restorer’s ef-fectiveness by flattening thread on a bolt with a hammer and then applying the tool.

Two or three turns should return the bolt to proper shape and allow a nut to be screwed on by hand,” says Lauridsen.

“If the bolt is severely damaged or if safety is a concern, it should be replaced. You do lose some of the integrity of the thread once it has been damaged.”

Clogged internal threads can be just as frustrating as damaged external threads. The Internal Thread Cleaner, also offered by Flema, cleans and restores grooves in nuts, pipe couplings and threaded holes. It works great for removing burrs and cleaning out old sealer, adhesives, paint and rust. The Cleaner can be locked or allowed to rotate freely.

The Universal Thread Restorer sells as a kit with three heads, a set of spare blades and the Internal Thread Cleaner for $349. You can also buy the tools separately. The 1/4 to 3/4-in. tool and heads sell for $49. The Internal Thread Cleaner tool sells for $15.

Contact: FARM SHOW Followup, Flemmng Lauridsen, Flema Products Ltd., 324 Tilley Road, Kelowna, British Columbia, Canada V4V 2K5 (ph 250 766-1080).

From the archive · Full text
Feature story

Chop Saw Cutting Head Rotates 280º

Featured source:

James Wambeke can cut tubing within 1/8-in. of a wall and know the wall will go un-marred thanks to his Universal Chop Saw. Tired of nicking walls or not being able to get in and cut a pipe at all due to the tight space where he was working, Wambeke put together an extension for his DeWalt Chop Saw.

“It lets me rotate the cutter head back as far as my hands,” says the professional plumber.

“It only took me a couple of weeks to put it together, and then nearly 2 years to get a patent on it.”

Wambeke disconnected the chop saw head from the power shaft of the DeWalt and replaced it with a belt drive mounted a metal cover. The belt drive pulley on the drive shaft allows the arm to rotate 280o.

“The 10-in. long arm can also be used for mounting a drill,” suggests Wambeke.

“Simply remove the end cover head shield, take off the nut that holds the cutting wheel shaft, and slide it out. The shaft is then replaced with a chuck and tightened down.”

He says the drill has proven handy for hard to reach spots and angle drilling. While it could also be used as a sander with the appropriate bit adapter, it would be extremely high speed as the DeWalt operates at 10,000 rpm’s.

Contact: FARM SHOW Follow-up James R. Wambeke, 503 East 5th Street, Box 314, Minenota, Minn. 56264 (ph 507 872-5108).

From the archive · Full text
Feature story

Authentic Dash Decals For “New Generation” Deeres

Featured source:

Rebuilding a Deere 3020 or 4020? If so, you’ll want to get in touch with Roger Ballstadt. The Goodhue, Minnesota farmer has become a decal specialist, one whose work is more authentic than replacements ordered from John Deere itself. Decals have become a profitable sideline for the dairy farmer, one he discovered by accident two years ago.

“I was restoring a tractor that had burned up and couldn’t find the decals I needed for it,” he recalls.

“When John Deere changes models, they only continue to make one decal that fits all the models in a line over a 13-14 year period. As a result, a 3010 that had three reverses will only show two if you use the dash decal offered by John Deere.”

When he couldn’t find what he wanted, Ballstadt created his own decals, following the original design. They looked so good he made up additional ones and began selling them. Today, he specializes in the New Generation 1010 through 5020 series of tractors. He has 9 different decal sets. His dash decal set, consisting of two dash decals and one hydraulic lift decal, sells for $8/set.

Creating a decal is not a simple task. When Ballstadt identifies a decal that is in short supply, he contacts collectors to find an original. Based on the original, Ballstadt pains-takingly creates new artwork that he can take to a printer. The entire process can take six months or better. Little differences stand out between the decals, such as line and type variations. The John Deere generic has a dis-mounting warning on it that didn’t appear on the original.

“If I get a request for one I don’t have, I try to decide if it is one that will have much demand,” explains Ballstradt.

“If it’s a real low production model, such as a 2020 orchard where there were only 200 produced, it may be easier to help them find an original rather than develop a new one. In one case, a person wanted a particular decal, and I had two sets, so I sold him one.”

While Ballstadt enjoys his hobby and plans to expand eventually to include 1970’s vintage John Deere tractors, the real payoff is in the people he meets.

“I get to talk to people all over the country about tractors and farming,” he explains.

Contact: FARM SHOW Followup, Roger Ballstadt, 20325 410th St., Goodhue, Minn. 55027 (ph 651 923-4906)

From the archive · Full text
Feature story

Add-On Hydraulics Allow Small Tractor To Handle Big Twin Rake

By By Mick Lane
Featured source:

It doesn’t take a lot of horsepower to power a big hay rake but Bob Sell, Woodville, Wisconsin, says it can take quite a bit of hydraulic capacity.

For example, Sell points out that the manual for an R-23 Vermeer Twin Rake calls for an 18-gal. reservoir minimum.

“Not many tractors have that capacity until you get well over 100 hp,” he notes.

“Newer hydraulically-powered rakes, particularly twin rakes, need a hydraulic flow of 20 gal. per minute or more,” Sell says.

“Some of the older tractors we’ve normally thought of as ‘rake tractors’ just don’t have this kind of hydraulic capacity.”

Sell’s neighbor, Don Rodel, Woodville, Wis., wanted to use a Deere 4010 on his Vermeer Twin rake. When he did, though, the hydraulic system got red hot. There wasn’t enough oil in the reservoir and therefore, not enough cooling capacity for the rake. They double-checked the tractor’s hydraulic system to make sure it was operating properly. Then they put Rodel’s 4430 on the rake and its hydraulic system overheated, too.

Sell solved the problem by equipping the tractor with a pto-powered hydraulic pump and mounting a 20-gal. reservoir and cooler directly on the rake hitch. The existing rake hydraulics plug into this system, just like they plugged into the tractor’s hydraulic outlets.

“The 4010 has plenty of horsepower to pull the rake and run the PTO. This protects the 4010’s hydraulic system while providing plenty of hydraulic power to the rake,” Sells says.

Sell says the conversion was fairly inexpensive, especially when compared with the cost of having to split a tractor open to re-build a hydraulic pump worn out because of the intense heat build-up.

In addition to farming, Sell operates B-W Machine, a metalworking and machinery repair shop on his farm.

“This is the first conversion of this type I’ve made,” he says.

“If there’s interest, I could put together a kit, along with instructions for mounting it on the rake. There’s enough hydraulic capacity from this pump that we could also plumb it to handle the lift cylinder on the rake so there’d be no hoses to hook up to the tractor at all.”

Rodel now uses a David Brown 995 on the rake. He says there was never a time during the first two cuttings this year that the pump or reservoir got warm enough that you couldn’t touch them.

Contact: FARM SHOW Followup, Bob Sell, B-W Machine, 2439 County Road BB, Woodville, Wis. 54028 (ph 715 684-2286).

From the archive · Full text
Feature story

Build Your Own Iron-Melting Furnace

Featured source:

“I use it to make parts for restoring antique equipment,” says Steve Chastain about his home-built iron melting furnace that he built mostly from scrap materials.

Chastain says his 10-in. dia. furnace can melt as much as 330 lbs. of iron per hour, fired by gas and air from a shop vac. His basic design can be expanded to almost any size to increase capacity.

“Old engines fascinate me. I love to re-store old machines. Many engines and machines are scrapped because of broken castings. Parts are expensive or nonexistent. I had several machines that could be fixed if I could find a way to cast the parts.

“My first project was a set of pistons for an antique 4-cyl. generator set. After that I made manifolds, water pumps, magnetos, and cylinder sleeves. When my friends found out I could pour iron, they started bringing me their projects. Along the way I learned that pouring iron is not as difficult as most people think.”

Chastain’s home-built furnace worked so well he has put together a detailed do-it-your-self book designed to help anyone do what he did. Chastain used to run an electrical component manufacturing firm until he decided to go back to school. He’s now back in college studying engineering.

His 125-page book explains in detail how he built the furnace, the theory behind it, what parts you should use, and how to operate it. He also explains in detail how to increase capacity of the furnace by building a higher capacity blower.

The book sells for $19.95 plus $3.20 S&H. You can buy direct from Chastain or from Lindsay Publications, which is a great pub-lisher of a wide range of do-it-yourself books (ph 815 935-5353 or www.lindsaybks.com).

Contact: FARM SHOW Followup, Steve Chastain, 2925 Mandarin Meadows Dr., Jacksonville, Fla. 32223; E-mail: [email protected]).

From the archive · Full text
Feature story

Old Pressure Tank Makes Adding Gearbox Oil A Breeze

Featured source:

One of the chores that comes with center pivot irrigation is maintaining the gearboxes on each individual tower. That means routinely checking the heavy oil in each drive unit and refilling as needed.

Tired of carrying a bucket of oil and a funnel to each of his center pivots, Greg Frey, Stapleton, Neb., decided there had to be a better way.

He devised a way to use air pressure to pump the oil.

He started with a 15-gal. water pressure tank, which has a 1 1/2-in. dia. hole on each end.

“I added a length of hydraulic hose, a brass ball valve and handle, with a short gooseneck of 1/4-in. copper tubing on one end,” he says. The other hole is used as both the filler hole and to pressurize the tank. He screwed in a cap with an air pressure valve. To fill the tank with oil, he simply screws out this assembly and pours in up to two full 5-gal. containers of oil. To make it mobile, he welded a length of sq. tubing to the legs and then welded hard steel bolts in the ends of the tube to make an axle for two 8-in. used lawn mower wheels. On the other end of the tank, he welded a handle.

“It looks sort of like a big upright vacuum,” he says.

In addition to filling irrigation pivot gear-boxes, Frey also uses it in his shop to service machinery.

“This same type of system would work for engine oil or transmission fluid, too,” he says.

The oil rack is constructed of used pipe and set on wheels. On the rac, he mounted four 70-gal. heavy duty square plastic tanks. The tanks he used are stackable so he can add more without adding to the size of the rack. And because of their size, he can dump in an entire 55-gal. drum of oil.

On the rack, he stores transmission fluid and engine oil for the various diesel and gasoline engines used around the farm. The rack is high enough that oil flows by gravity into any machine he can get into the shop.

“Since it’s on wheels, it’s easy to move it around the shop where we need it or out of the way when we don’t,” he says.

He also modified an old bulk gasoline tank - the kind that fits in the back of a pickup - for catching used engine oil.

“I just cut a hole in the top of the tank and added a tray on the side to hold filters and tools,” he says.

Contact FARM SHOW Followup, Greg Frey, Box 234, Stapleton, Neb. 69163 (ph/fax 308-636-2976).