Practical ideas from FARM SHOW MagazineSubscribe · Free issue · Send us your shop tip
Subscribe to FARM SHOW
Issues / Vol. 45, No. 2 (2021)

Vol. 45, No. 2 (2021)

Money-Saving Repairs & Maintenance Shortcuts · Printed section pp. 32–35

30 selected entries · Complete text of selected entries

This issue’s section includes reader tips and feature-length shop stories. Held items and editorial notices are not reproduced.

Archive text: prices, coupons, availability and contact details reflect the original publication, not current offers. Reader methods are not universal instructions; follow manufacturer guidance and proper safety practices.

Reader shop tips

From the archive · Full text
Reader shop tip

Leete Etheridge

Leete Etheridge, Columbus, Texas

“I had a big cut on the face of a tractor tire, located between the treads. Local tire repair places said there was nothing to be done. So, I figured I had nothing to lose. I squirted carb cleaner into the gouge to clean it out and then put a glob of FiberFix Extreme Gel by J-B Weld into it. Then I wrapped a come-along around the tire, placing a 2 by 6-in. brass pin across the gouge to compress the edges of the cut together as I tightened it up. I had to keep pounding on the pin because it rolled while I tightened. I let that sit for 24 hrs. Since I made the repair, I’ve used the tractor to haul 30 cords of wood and to do other work. I looked at the cut the other day and you can hardly see where it was. Problem solved.”

From the archive · Full text
Reader shop tip

Tom Dufrense

Tom Dufrense, Grant, Minn.

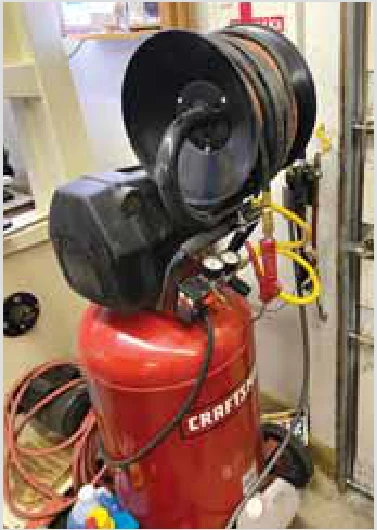
“I got tired of having coiled air hose getting tangled up around my portable shop air compressor. So I bolted a heavy-duty air hose reel on top of the compressor’s pull handle. It was relatively easy to attach with a bracket attached to the bottom of the hose reel. Keeps my shop neat and I’ve got a lot more hose available.”

From the archive · Full text
Reader shop tip 1 of 2

Johnny Lawrence

Individual tip 1 of 2 from this reader’s published contribution.
Johnny Lawrence, Abbeville, S.C.

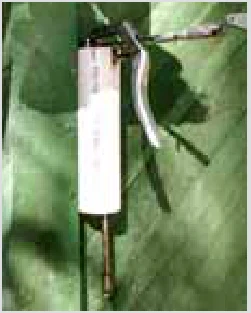
“The old tubeless tire on my mower deck kept going flat overnight, making me think there was a nail in it. I removed the wheel to inflate it and put soapy water on it to find the leak. To my surprise, I discovered many small leaks on the sidewalls due to dry rot. Instead of replacing it, I went on YouTube to look for a fix. A video there showed a guy putting used motor oil into a tire with an oil squirt gun after deflating and removing the valve core. He rotated the tire to evenly spread the oil inside the tire. I tried the same thing on my tire and after I reinflated it, the leaks stopped. It’s been holding air for over a month with no leaks.

From the archive · Full text
Reader shop tip 2 of 2

Johnny Lawrence

Individual tip 2 of 2 from this reader’s published contribution.
Johnny Lawrence, Abbeville, S.C.

“Here’s another idea: If you ever have to make gaskets out of paper, cork, or thin rubber, a spent pistol cartridge shell can be used to punch the bolt holes if no hole punch is available. Place the gasket material over a wood board and select the caliber that matches the hole size needed. Pound on it with a hammer to punch the hole.”

From the archive · Full text
Reader shop tip

Steve Faber

Steve Faber, Tiffin, Ohio

“Hitch pins are sometimes hard to pull so I made a hitch pin puller using an old screwdriver handle. I removed the screwdriver shank and drilled a hole all the way through the handle. Then I drove a heavy #9 wire into the handle and bent a hook into one end. I flattened the other end so it can’t pull out of the handle. I keep one of these in my tractor toolbox and one in my shop. Very handy.”

From the archive · Full text
Reader shop tip

Donald Jaster

Donald Jaster, Bruce, Wis.

“A reader in the last issue said he had problems mounting thin cut-off wheels on his angle grinder. I have had 2 angle grinders and both had the same problem. The boss on the driveshaft and the nut are meant to center the wheel but the gap between them is too big for thin cutting wheels. The fix is to just turn over the nut so the boss is on the outside. That idea might not work on all grinders if the nut is flush on both sides. That might have been the case with the reader’s Makita.”

From the archive · Full text
Reader shop tip

Bill Derrick

Bill Derrick, Crossville, Tenn.

“I recently noticed that the bottom of my loader bucket was starting to rust. I remembered I had an old tractor tire lying in the grass so I set the bucket on it. Problem solved. Why did I have an old tire lying around? Because my Dad was a hoarder. He spent his life keeping stuff and I’ll spend the rest of mine cleaning it all up. He’s probably up in heaven right now saying, ‘See, you needed that!’”

From the archive · Full text
Reader shop tip

John Dodge

John Dodge, North Port, Fla.

“I bought a used wood jointer and had to rewire it from a 3-phase motor to a single phase, which required a different switch. I didn’t want the machine starting up by me bumping it with my knee so I decided to make my own safety switch.

“A friend happened to be tossing out some drawer handles. I mounted 2 of them on either side of a metal switch plate so I could only turn on the switch with my finger. It worked. The handles just have to extend out further than the toggle switch. It’s handy because I can turn the switch off from either side or the middle.”

From the archive · Full text
Reader shop tip

Gus Pachta

Gus Pachta, Cuba, Kan.

“I cast my own aluminum row cleaning planter parts by setting up my own mini foundry using methods I learned by following YouTube videos. I’ve also cast gearboxes using the same methods. The parts are as good as buying new, although you have to smooth out some of the rough edges. The original parts wear out fast, though, so I saved a lot of money and learned a new skill. The videos I followed explain everything in detail, including how to set up the propane heat source and use a barrel lined with a heat resistant blanket and filled with sand. I make the molds out of foam, which melts away when you pour in the liquid metal. Here are links to the videos which explain the process: www.youtube.com/watch?v=eO8NwseRxSA www.youtube.com/watch?v=XAo5o1Y0h9o www.youtube.com/watch?v=tH-PaNugz9w

From the archive · Full text
Reader shop tip

Steve Faber

Steve Faber, Tiffin, Ohio

“I use a heavy steel plate with pins in it to bend wire into special shapes. I drill the pinholes with a drill press to keep them perpendicular to the plate.

Various sizes of pins are used for different radiuses of bends. It’s particularly handy to make hitch pins. The photo shows a hitch pin made to have an extra long leg. I used it to make a retainer pin for a freezer paper roll holder that I’m making. We do home butchering with family and friends so we buy freezer paper in 1,500 sq. ft. rolls.”

From the archive · Full text
Reader shop tip

Tom Chaney

Tom Chaney, Chrisman, Ill.

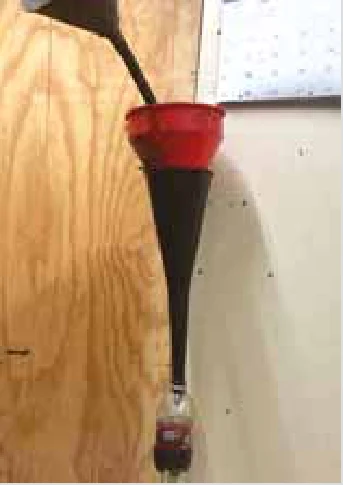
“I didn’t like wall-mounted oil funnels dripping oil down my shop wall and making a mess, so I shoved the neck of an empty plastic soda bottle up onto the bottom end of a transmission oil funnel. I place my other funnels inside the top of the transmission oil funnel, so any oil that drips out of them will run down into the bottle. Once the bottle is full I just pull it off and empty it out.”

From the archive · Full text
Reader shop tip

Tom Wessman

Tom Wessman, Albert City, Iowa

“I had an old wooden 40-ft. extension ladder that was almost impossible for one man to handle, so I cut it up into various lengths to make several shorter ladders. They really come in handy around my farm.”

From the archive · Full text
Reader shop tip

Michael Heron

Michael Heron, Lloydminster, Sask.

“Here’s what I do when I need to replace a drive belt and want to measure it without cutting it. I tape one end of a fabric measuring tape onto the belt, and then rotate the belt pulley until the tape winds back around to its starting point. If you want to try this idea but don’t have a fabric measuring tape, you can use an old, longer belt that’s already cut. Rotate the belt around the pulleys and mark it, then remove the belt and measure it. If none of these methods work, just make equidistant marks at convenient lengths on the belt and tally up the total length.”

From the archive · Full text
Reader shop tip

Trouble Free Lighting

Trouble Free Lighting, Allegan, Mich. ph 616 994-9970; www.troublefreelighting. com

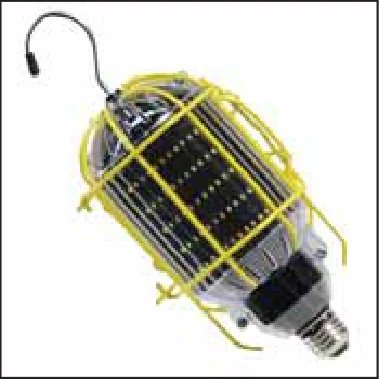
Their Trouble Free LED work light is said to be the brightest handheld directional worklight on the market. It consists of a long 35,000-hr. lamp inside a shock-absorbent protective cage – a no-glass shell that’s designed to handle bumps and drops. The lamp operates cool, with no excess heat, and is sealed so it can be safely used around fluids.

The light retrofits to your existing cord handle. Just remove the reflector from your cord and install a metal clamp (provided) around it. Then slide a provided rubber washer over the screw base of the light and screw it into the cord.

Sells for $55 with a safe-attaching magnet and no cord.

From the archive · Full text
Reader shop tip

Peter Crabbs

Peter Crabbs, Redfield, Iowa

“Our chicken yard always seems to be muddy, so 3 years ago I got permission from local new house construction work sites to salvage material from their dumpsters. I laid down some scrap plywood and particle board to make a ‘sidewalk’. It works great and the smooth surface makes it easy to scoop up snow. The particle board is in bad shape now and needs to be replaced, but the plywood is still holding up great. However, it does get slick so I need to be careful when walking on it.”

From the archive · Full text
Reader shop tip 1 of 2

Gary L. Ahlbrecht

Individual tip 1 of 2 from this reader’s published contribution.
Gary L. Ahlbrecht, Brownton, Minn.

“When storing coolers or insulated boxes, it’s a good idea to keep the lid open slightly in order to prevent mold. To hold the lid open, I cut foam pipe insulation designed for 3/4-in. copper pipe into 2 to 3-in. wide strips and space them evenly along the top edge of the cooler. The strips will hold the lid open about 1/2 in. to allow air flow.

From the archive · Full text
Reader shop tip 2 of 2

Gary L. Ahlbrecht

Individual tip 2 of 2 from this reader’s published contribution.
Gary L. Ahlbrecht, Brownton, Minn.

“Every year I use a remote-controlled plug-in module to turn my outdoor Christmas lights on and off. I use the same unit the rest of the winter to remote-start the block heater on my diesel lawn tractor, which I use to blow snow. It saves making an extra trip outside in cold weather. I’ve also used this idea with my pickup. Just remember when you’re done working to plug the heater back in for the next time.”

Shop feature stories

From the archive · Full text
Feature story

“Wrap-On” Hydraulic Hose Markers

Featured source: Outback Wrap

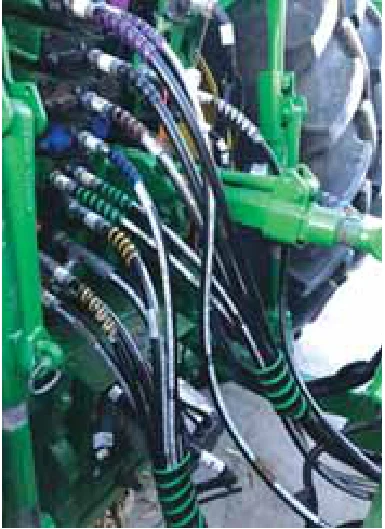
Here’s a handy, low-cost way to make sure there are no mistakes when hooking up multiple hydraulic hose connections.

Molded from high density polyethylene, Outback Wrap hydraulic hose markers fit hoses from 1/4 to 1 1/2 in. in dia. and can be used on any hydraulic hose or pipe. The markers come in different colors and are coil-shaped to wrap around the hose and grip the surface. You just open out the first coil and loop it over the hose, then “roll” the remaining coils onto the hose.

The markers use the official ISO color system for agricultural hydraulics and are numbered 1 to 6 to indicate which port to plug into.

“Between the colors, numbers and letters, the hose markers are universal to all tractor makes and models,” says the company. The number 1 stands for green; 2 for blue; 3 for brown; 4 for black; 5 for purple, and 6 for grey. In addition, the letters A & B are lasered into each wrap to indicate left or right, and there’s an “above” and “below” indicator when hooking up. A & B wraps are cut to different lengths, providing an additional visual aid when looking at hoses.

According to the company, the wraps always remain in place, yet are easy to take on or off. Unlike zip ties, they won’t break or fall off and they’re smooth, to keep you from cutting your hands and fingers. And unlike zip ties, they’re clearly labeled using the official ISO color system for agricultural hydraulics.

Four pairs of Outback Wrap hydraulic hose markers sell for $19.99 plus S&H; 2 pairs for $9.99 plus S&H.

Contact: FARM SHOW Followup, Outback Wrap, P.O. Box 111, 600 Main St., Unit no. 7, Faulkton, S. Dak. 57438 (ph 605 695-7123; [email protected]; www.outbackwrap.com).

From the archive · Full text
Feature story

Air Tools Modified For Easy Access

Featured source: John Lubinski

John Lubinski, Plainview, Minn., often uses air tools on his farm to clean dust off everything from riding mowers to hydraulic couplers, air conditioner coils, radiators, and so forth. He recently sent FARM SHOW photos of how he set up his shop to make it easy to use those tools.

He installed a wall-mounted air tool rack, and nearby is a big air compressor equipped with a 50-gal. tank and a 50-ft. flexible hose. The compressor is operated by an AC electric motor that plugs into a nearby wall outlet.

“Everything I need to use my air tools is in one place, neatly organized and easily accessible,” says Lubinski.

To store the tools, he bought a 1-ft. long tool rack and mounted it on the wall by the air compressor. He pop riveted a 3 by 5-in. piece of sheet metal onto the rack to make a friction bracket that holds a 30-in. curved blow gun, as well as a dual tire inflator, a 1-ft. long blow gun, a 2-ft. long straight blow gun, and a 30-in. straight blow gun with the end cut at a 45-degree angle. All blow guns are fitted with 1/4-in. steel brake lines and can be quickly connected to the 175 psi stationary air compressor, which is set up next to the wall-mounted rack. The 50-ft. hose is stored on a garden hose rack mounted to the motor base of the compressor.

“The rack and hose are easily accessible as I move between the shop and shed, or go outside through a nearby sliding door on the shed,” says Lubinski.

A metal pipe runs down from the tank and is fitted with a moisture collector equipped with a small petcock at the bottom to drain off water. A 1/2-in. ball valve with a quick connector is used to release air pressure, in order to disconnect Lubinski’s 3/4-in. air impact wrench.

Contact: FARM SHOW Followup, John Lubinski; [email protected]).

From the archive · Full text
Feature story

ATV Snowplow Uses “Reindeer Hydraulics”

Featured source: George Collins

George Collins can change the blade angle on his 2000 Arctic Cat 4-wheeler without ever having to get off the machine, thanks to a homemade system of ropes that he operates from the 4-wheeler’s seat.

“I call it my ‘reindeer hydraulics’ system because it uses one long, continuous rope to control everything,” says Collins.

“The ropes are fitted with red, green, and silver handlebars that create a colorful effect.”

One portion of the rope runs over a small pulley at the center of the blade and attaches to the blade’s spring-loaded rotation lock. The other 2 ropes attach to the blade’s corners.

“Pulling on the center rope releases the blade lock, which allows the blade to rotate. Pulling on the other 2 ropes causes the blade to angle left or right, and when I let go of the center rope the blade locks back into position,” says Collins.

The center rope extends over the machine’s handlebars, while the left and right ropes go through small pulleys mounted on the front wheel fenders and up to the gas tank.

“The beauty of using one continuous rope is that it can’t fall down onto the ground,” notes Collins.

Contact: FARM SHOW Followup, George A. Collins, II, 1700 Buckskin Dr., Gillette, Wyo. 82716 (ph 307 299-0322; 2collins. [email protected]).

From the archive · Full text
Feature story

Tractor-Mounted Toolbox Carries Firewood Tools

Featured source: Mike Frantz

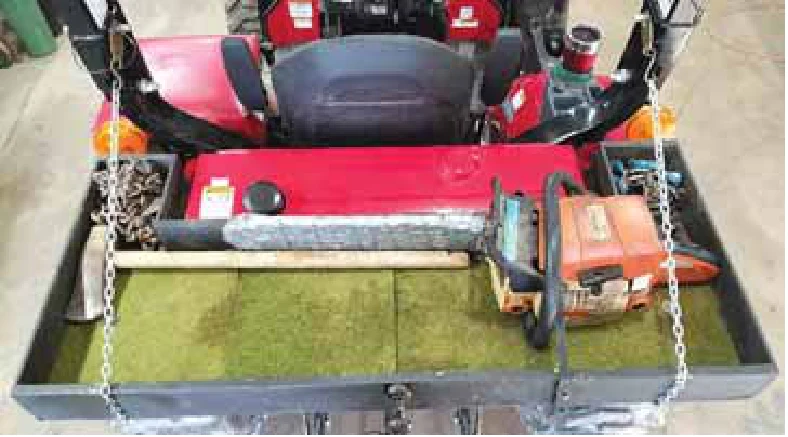
“The large toolbox I bolted on back of my Mahindra 2638 compact tractor really comes in handy for carrying tools such as chainsaws, axes, and log chains. Everything was done using existing bolts and holes, with no welding,” says Mike Frantz, Seymour, Mo.

He uses the tractor primarily to haul firewood and to drag logs.

“The nice thing about my toolbox is that it’s big enough to hold all my firewood tools. Also, it’s located right behind the seat where everything is easily accessible,” says Frantz.

The toolbox measures 4 ft. long by 14 in. wide and 3 1/2 in. high, with a pair of cut-outs around both ends of the tractor’s gas tank.

The sides are made from 3/4-in. pine and the floor from 3/4-in. exterior grade plywood.

A pair of 20-in. long, 1/4-in. thick steel plates support the toolbox, and attach to a pair of pre-existing bolts that secure the gas tank to the rear fenders. The back side of the toolbox is supported by a pair of light chains that hook onto screws underneath the toolbox, then run up and over it and attach to pre-existing pins on the tractor’s rollbar.

Contact: FARM SHOW Followup, Mike Frantz, 215 Forest Grove Dr., Seymour, Mo. 65746 (ph 417 225-8787; [email protected]).

From the archive · Full text
Feature story

PVC Pipe Tool Holders

Featured source: Jim Larson

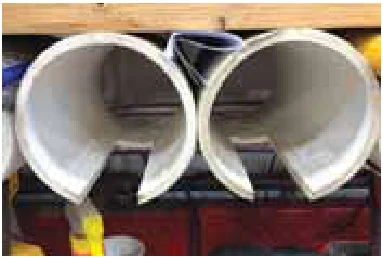
“PVC pipes fastened to the bottom of a wood shelf above the workbench in our shop keep our battery-powered tools out of the way and within easy reach,” says Jim Larson of Slayton, Minn.

Larson and his son Jason made the simple holders by cutting a narrow slots in pieces of 4-in. dia. by 8-in. long pvc pipe. Two wood screws hold each piece of pipe to a wooden shelf and the tools slide easily inside, with or without batteries.

“We cut different width slots in the holders to fit different size tool handles,” Jim says.

“It’s an easy way to get the power tools off the bench, especially when we’re working with a lot of different parts and pieces. Even the small triangular space between the adjoining pipes is nice for holding pencils, markers, a small flashlight or other things that get lost in drawers or on a shelf.”

Contact: FARM SHOW Followup, Jim Larson, 1692 101st St., Slayton, Minn. 56172.

From the archive · Full text
Feature story

Pallet Fork Mounted To 3-Pt. Hitch

Featured source: LeRoy Momper

“I wanted to use my Cub Cadet Yanmar 45 hp. loader tractor to haul loaded pallets of bricks weighing about 3,000 lbs., but the loader didn’t have enough capacity. However, the tractor’s 3-pt. hitch did. So I decided to quick-attach the pallet fork to the 3-pt. hitch,” says LeRoy Momper, Fredonia, Wis.

He bought “blank” left and right quick-attach assemblies that include only the handle, spring, and hinge, then welded them to a homemade mounting bracket. The bracket consists of a horizontal length of rectangular tubing and 2 vertical lengths of welded together angle iron, with a spacer between them for strength. The 3-pt.’s top link pins onto the angle iron, while the quick-attach assemblies hook up to the 3-pt.’s lower lift arms.

“It works great. I have a better view of the pallet fork on back of the tractor than I ever would on front,” says Momper.

“I can use the system with anything equipped with a quick-attach, including a loader bucket.”

Contact: FARM SHOW Followup, LeRoy Momper, 215 Lawrence St., Fredonia, Wis. 53021 (ph 414 331-2093; [email protected]).

From the archive · Full text
Feature story

“Spring-Tightened” Tire Chains

Featured source: John Middaugh

“I always had trouble keeping my tire chains tight, so I used some springs from my kids’ old trampoline to solve the problem,” says John Middaugh, Cooks, Mich.

“I installed the tire chains as I normally do, and then used a smaller chain - which I connected together at the ends - to make a smaller diameter circle at the center of the tire. I then connected the springs between the two sets of chains. I did the same thing on the inside of the tire, wrapping the chain around the axle before hooking up the springs. My tire chains have never been so tight.”

Contact: FARM SHOW Followup, John Middaugh, Cooks, Mich. ([email protected]).

From the archive · Full text
Feature story

Modified Air Cleaner Filter Stops Plug-Ups

Featured source: Gene Williams

“In your last issue a reader complained that the air cleaner filter on his Country Clipper Challenger zero-turn mower constantly filled with grass.

“I had the same problem on my Country Clipper. After only a couple hours of mowing, the air cleaner filter clogged up so bad that it slowed the engine rpm’s down. I was mowing on high, sandy ground which resulted in a tremendous amount of dust, dirt and grass clippings on the machine and driver. Here’s how I solved the problem.

“I removed the filter cover and filter, then removed the bolt that holds the filter in place. I then stacked 4 new filters on top of each other and anchored them in place with a much longer bolt. I sprayed Endust dusting aid very lightly onto a large hand towel, then wrapped the towel all the way around the filters and secured it with a wire or cord. I made sure to spray only the outside of the towel in order to reduce the chance of getting oil on the filters.

“I wrapped 2 layers of towels around the filters to capture more dust and dirt. As long as the filters stay dry, you can blow or vacuum the dust off them and reuse them many times. I’ve used the same filters for 8 or 9 years.

“You can wash the towel with your work clothes, or hand wash it, and reuse the towel many times. I change the towel frequently, so I always keep a couple of extra clean towels on hand in my shed.”

Contact: FARM SHOW Followup, Gene Williams, Vincennes, Ind. (ph 812 890-1530; [email protected]).

From the archive · Full text
Feature story

Mobile Workbenches Make Work Easier

Featured source: Don Campbell

Don Campbell maximizes every square inch of his relatively small shop by putting his 3 amazing workbenches on wheels so he can move them around the shop, into his adjoining garage, or to an outside pad to work on equipment.

“I installed pairs of 4 by 12-in. wheels on each corner,” says Campbell.

“The ones on front are mounted to a trailer-type pivot with a T-handle for steering. I can hitch it to a garden tractor and pull it around the lawn.”

His first welding workbench started out as a simple steel table purchased at Home Depot. Initially he set his stick welder on a shelf that he added. Soon other items were incorporated, like a multi-drawer toolbox and 1-ft. extensions to either end to provide room for a plasma cutter to the left and a wire welder to the right. He mounted a vise and a drill press, an air hose reel and reels for electric cords and a light. A charging station was added for batteries and outlets for plugging in tools.

“I added chrome wheels and chrome strips on the tool cabinet drawers just to dress it up,” says Campbell.

“It also has 12 electric outlets.”

The table is about 40 in. high, which is Campbell’s preferred working height. Total length runs 7 ft. with a depth front to back of 26 in.

“I probably spent about $1,000 on it,” says Campbell.

“A friend of mine bought a toolbox on wheels and spent $20,000.”

Campbell is a builder extraordinaire who has been featured in FARM SHOW 10 times over the past 20 years, starting with a project in Vol. 25, No. 1. His work includes 1/4-size working tractors and implements, bulldozers, front-end loaders and more. He has documented his projects with 240 videos on YouTube.com.

When he needed a second welding workbench, he found a steel table on Amazon.com and added similar extensions and dual wheel sets. Toolboxes for nuts, bolts and other supplies were added as well as a vise and racks for hand tools. The extensions serve mainly as scrap metal holders.

“Workbench number 2 was for small welding projects on the tabletop,” says Campbell.

“I added a 22-in.-tall splatter shield on the sides and to the rear of the table.”

Workbench number 3 started with a similar steel table. This time Campbell went with 4 by 10-in. duals. He also loaded it down with 2 toolboxes under the worktable and several on top. It is used for miscellaneous small projects.

Steel tables have proven to be useful for creating workspaces. He has several to which he attached kitchen countertops. In one case he attached 2 by 4’s for a frame to hold 2 tables together and mounted a 10-ft. long countertop to it.

“On December 27th I hit a million views on my YouTube channel after just 5 months of putting up videos,” he says.

“I like to share tips on things I’ve built. I ask nothing more than viewers leave with a smile. If FARM SHOW readers have questions about the videos, I will be glad to answer them on my blog.”

Contact: FARM SHOW Followup, Don Campbell ([email protected]; www.doncampbellmaker.com; https://www.facebook.com/doncampbellmaker).

From the archive · Full text
Feature story

Simple Tool Keeps Wire Fences Tight

Featured source: LeRoy Momper

LeRoy Momper, Fredonia, Wis., had a problem with sagging barbed fence wires, especially on line fences located in wooded areas.

“Branches fell on them, which caused the wires to stretch and sag,” he says.

“Removing wire clips from the fence posts so that I could retighten the wires would have been a lot of work. Instead, I made a simple fence tightener that eliminates the need to remove any clips.”

The tool is made from 1-in. square tubing and measures about 2 ft. long, with one end bent slightly upward. A short, rubber-covered steel rod is welded onto one end to serve as a handle. A pair of small steel dowels, spaced 3/4 in. apart, are welded onto the tool below the handle.

To tighten the wire, Momper grabs the handle with one hand and uses his other hand to place the wire between the dowels, then rotates the tool in a twisting motion.

“Each twist takes up about 1 1/2 in. of slack in the wire. Making one twist about 20 yards on each side of the sag will usually tighten the wire back to its original condition,” says Momper.

“The bend in the tool keeps me from rubbing my knuckles against the barbed wire as I twist it. The tool leaves a radius large enough so that it doesn’t break rusty wire.”

Contact: FARM SHOW Followup, LeRoy Momper, 215 Lawrence St., Fredonia, Wis. 53021 (ph 414 331-2093; [email protected]).

From the archive · Full text
Feature story

Quick & Easy Temporary Shed

Featured source: Dennis Althoff

If you need a quick shed to store equipment, firewood, or other stuff, here’s a good way to make a temporary one. The idea comes from Dennis Althoff, Superior, Mont.

“I use 10-ft. corral panels for the walls on either side and then bow 16-ft. stockade panels over the top to make the roof. You can finish it off with a tarp over the top. Heavy-duty zip ties work well to fasten everything together but you could also use baling wire.

“I used the shelter to keep firewood dry and it did a great job.”

Contact: FARM SHOW Followup, Dennis Althoff, 2364 Diamond Match Road, Superior, Mont. 59872 (ph 406 802-2356).