Practical ideas from FARM SHOW MagazineSubscribe · Free issue · Send us your shop tip
Subscribe to FARM SHOW
Issues / Vol. 43, No. 4 (2019)

Vol. 43, No. 4 (2019)

Money-Saving Repairs & Maintenance Shortcuts · Printed section pp. 32–35

32 selected entries · Complete text of selected entries

This issue’s section includes reader tips and feature-length shop stories. Held items and editorial notices are not reproduced.

Archive text: prices, coupons, availability and contact details reflect the original publication, not current offers. Reader methods are not universal instructions; follow manufacturer guidance and proper safety practices.

Reader shop tips

From the archive · Full text
Reader shop tip

Michael Mayer

Michael Mayer, Smithshire, Ill.

“I was having trouble pouring tire balancing beads through valve stems into tires. I couldn’t pour, push or blow them into the tire until I started holding the side of an electric hair clipper against the metal part of the valve stem to vibrate it. Worked great.”

From the archive · Full text
Reader shop tip 1 of 2

Richard Liberda

Individual tip 1 of 2 from this reader’s published contribution.
Richard Liberda, Mandan, N. Dak.

“The distributor on my Ford 8N tractor is hard to get at so my son Mike put a regular coil and condensor on the side of the block. He went right through the dead coil. Now, if the coil or condensor burn out, they are right out in the open.

From the archive · Full text
Reader shop tip 2 of 2

Richard Liberda

Individual tip 2 of 2 from this reader’s published contribution.
Richard Liberda, Mandan, N. Dak.

“Mike also fixed my wife’s wheelchair. The wiring was shot so I took it to two places in town but they wanted a lot of money to rewire the chair. Mike just cut off the ends of wires where the contacts were worn out and bought new plug ends designed for trailer hookups and put them on the wheelchair to connect the wires. Worked great and they’re out of sight.”

From the archive · Full text
Reader shop tip 1 of 2

Dale Schultz

Individual tip 1 of 2 from this reader’s published contribution.
Dale Schultz, Fremont, Ohio

“I got tired of the coolant in my metal cutoff saw freezing so I decided to give RV anti-freeze a try. The pink stuff really works great with no freezing, no mess, no rust, and not much cost.

From the archive · Full text
Reader shop tip 2 of 2

Dale Schultz

Individual tip 2 of 2 from this reader’s published contribution.
Dale Schultz, Fremont, Ohio

“Also, to remove aluminum buildup from an engine cylinder without filing or grinding, use some muriatic acid. Just dab it on with a Q-tip or eyedropper and it will dissolve the aluminum and not harm the sleeve.”

From the archive · Full text
Reader shop tip 1 of 2

Raymond Rodriguez

Individual tip 1 of 2 from this reader’s published contribution.
Raymond Rodriguez, Waxahachie, Texas

“To avoid hitting electrical wires when drilling into walls, I just slip a small piece of pipe over the drill bit to keep the bit from going in too deep. Just make the

pipe 1/2 to 3/4 in. shorter than the drill bit, depending on the thickness of the drywall. Works good.

From the archive · Full text
Reader shop tip 2 of 2

Raymond Rodriguez

Individual tip 2 of 2 from this reader’s published contribution.
Raymond Rodriguez, Waxahachie, Texas

“I also came up with a way to use a regular electric drill as an impact wrench. I take a short socket wrench extension and cut off the end that fits over the socket wrench. Then I slip the extension into the drill like a bit, add the right size socket, and I’m ready to go. Works great for light-duty work.”

From the archive · Full text
Reader shop tip

Warren Grant

Warren Grant, Albany, Ga.

“Using a small amount of caulking from a tube usually leaves you with a tube full of hard, worthless caulking next time you try to use it. I’ve tried everything to seal tubes from putting a nail or a screw into the end of the tube to wasting a bunch of tape trying to cover the end. Recently I got the idea of sealing the tube with Gorilla Glue. I made a small dent in the end of the caulking and then put in two drops. The glue immediately starts to expand and hardens within a short period of time, sealing the end completely. All you need to do is use a small pick to get the hardened glue out.”

From the archive · Full text
Reader shop tip

Gary Swensen

Gary Swensen, Yankton, S. Dak.

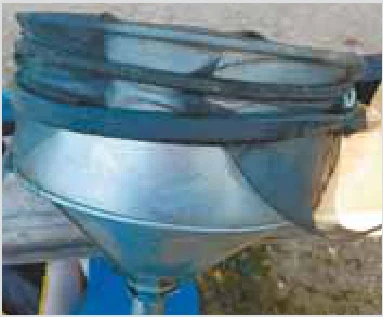
“The little screen in the bottom of a funnel came loose and ended up in the bottom of my fuel tank. Instead of throwing the funnel away, I made a big screen from some window screen and a tarp strap. It goes over the whole top of the funnel. It won’t win a beauty contest but it keeps my fuel clean and it won’t fall out of the funnel.”

From the archive · Full text
Reader shop tip

Joe Pietsch

Joe Pietsch, Warren, Mich.

“Here’s how to make a handy siphon. Get a 1/4-in. copper tee, three 1-in. segments of 1/4-in. copper pipe, a rubber squeeze bulb, and a few feet of 1/4-in. rubber hose. Solder the copper tube segments to the tee, attach a section of tube to either end of the tee, and put the rubber bulb on the part of the tee that goes off to the side. To use, put one end of the hose in the fluid, hold the tee and bulb down below the level of the fluid, hold your thumb over the other end of the tubing, and squeeze the bulb. As the bulb expands, it will draw fluid out of the container and it’ll keep flowing.”

From the archive · Full text
Reader shop tip

David S. Pepper

David S. Pepper, Kansas City, Kan.

“A small squirt of starting fluid into the air intake will help start small gas engines that have not been started for a long period of time. The fluid will get you one or two firings which will usually get the engine going.”

From the archive · Full text
Reader shop tip

Harold W. Allen

Harold W. Allen, Taswell, Ind.

“The 113-in. drive belt on my 60-in. Deere lawn mower deck stretched to the point that it was slipping. Rather than replace it, I installed a shorter tension spring on it and got 2 more years of use out of it.”

From the archive · Full text
Reader shop tip 1 of 2

Matthew B. Tollett

Individual tip 1 of 2 from this reader’s published contribution.
Matthew B. Tollett, Asherton, Texas

“A lot of lawn mowers are hard to start. An older and wiser cousin of mine suggested sanding down the flywheel, cleaning the coil, and resetting the coil a bit wider. Presto! It worked!

From the archive · Full text
Reader shop tip 2 of 2

Matthew B. Tollett

Individual tip 2 of 2 from this reader’s published contribution.
Matthew B. Tollett, Asherton, Texas

“My advice to make your shop more efficient is to put everything on wheels or skids so you can move things around easily.”

From the archive · Full text
Reader shop tip

Steve Shield

Steve Shield, West Liberty, Iowa

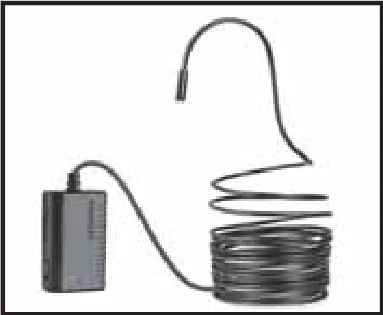
“I bought a Depstech endoscope on Amazon for $38 and can’t believe how useful it is. It’s a 33-ft. length of tubing with a camera on the end that I’ve used to inspect dryer vents, plugged drains (it’s waterproof), and inside motor cylinders. I’ve even taped it to the end of a pole and used it to inspect rain gutters without having to climb a ladder. It’s wireless and streams to an Android or IOS phone. I wish I would have had this years ago.”

From the archive · Full text
Reader shop tip

Ron Lankford

Ron Lankford, South Rockwood, Mich.

“Some farm equipment batteries are exposed to the elements, like on my IH 706 tractor. I cover them with rubber using an old tire tube to keep off dust, grease, and sunlight.”

From the archive · Full text
Reader shop tip

Dave Meiners

Dave Meiners, Edgerton, Minn.

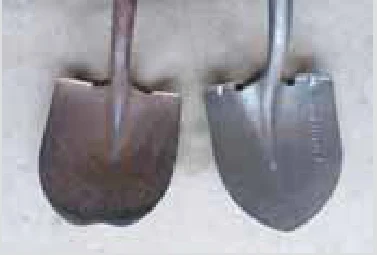
“I used a torch to cut a big notch in the pointed end of my shovel and then used an angle grinder to sharpen it. Makes the tough work of digging a little easier because the shovel can penetrate hard soil with less energy and more balance.”

From the archive · Full text
Reader shop tip

Quinton Parker

Quinton Parker, Fairbanks, Alaska

He’s a diesel mechanic at a shop that works with heavy diesel equipment such as loaders, bull dozers, and semi trucks.

“Many of these machines have 35 to 40 gal. of transmission oil capacity. Using a hand pump and a 5-gal. bucket to fill the transmission takes a long time, so I developed a system that uses a cordless impact wrench to do the job. I mounted the oil pump off a Chevrolet car on the bucket lid and run the pump’s pickup tube down into the bucket to pump the oil into the transmission.”

From the archive · Full text
Reader shop tip

John Grady

John Grady, Norwalk, Ohio ph 419 681-1233; [email protected]

“I sell a conversion kit that uses gear reduction starters to convert the 2-cyl. diesel engines on Deere tractors to electric start. It’s designed for Deere 70, 720, 730, 80, 820, and 830 models. Switching to a 12-volt system provides the starter and gear reduction starter with more torque and reduces the power requirement. A 24-volt electric start system is also available.

“I developed a 13-tooth gear reduction adapter that mounts in place of the original starter. A flange adapter attaches to the original starter’s mounting bracket, eliminating the need for any modification.”

From the archive · Full text
Reader shop tip

John Stuber

John Stuber, DeSoto, Mo.

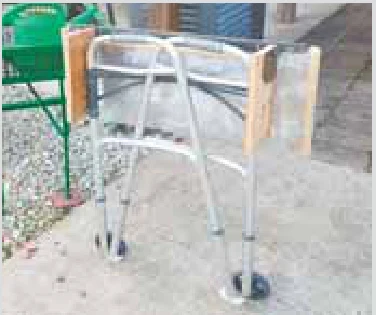
“I turned a rolling walker into a handy, portable workbench. It’s sturdy, lightweight, easy to maneuver, and quickly folds up for storage. I used a piece of scrap aluminum to make the 16 by 24-in. top and screwed wooden pieces onto 3 sides to contain the tools. A piano hinge off an old aluminum cabinet is screwed onto the back side, which allows the walker to fold.

“A pair of short 1 by 6 boards connect the piano hinge to the walker’s tubular frame. The boards attach to the piano hinge with hex head screws and to the walker with carriage bolts. A metal strip is screwed onto the piano hinge for extra strength.

“To fold the workbench I raise the top and then push down on factory buttons at the walker’s front corners, which releases the legs so I can fold them in.

“It’s tremendously handy and takes up much less room than my roll-around cart. All my tools are always right there where I need them and at a convenient working height so I don’t have to bend over. I use it in my wood shop, garage, and even my house.”

From the archive · Full text
Reader shop tip

Tom Hohl

Tom Hohl, Duluth, Minn.

“I tipped over a wheelbarrow full of wood going into my woodshed,” Hohl says.

“It was more an inconvenience than a big problem, but I thought of a way to keep it from happening again as I was picking up the pieces.” A 2-ft. long plank ramp leading into his woodshed had slipped off a narrow concrete ledge. The 5-in. drop stopped his wheelbarrow dead in its tracks and over the load went. Hohl’s solution was to bend a 3/4-in. lip at a 90-degree angle on one end of a 1/4-in. thick by 18-in. long piece of aluminum. Using heavy wood screws he attached the metal to the 2 by 10-in. ramp. The lip end extends about 4-in. beyond the end of the ramp, sliding over the wooden sill of Hohl’s woodshed entry door, holding the wood ramp securely on the concrete foundation ledge.

“It’s a simple idea that just required a big hammer and vise to bend the lip before I attached it to the ramp.”

From the archive · Full text
Reader shop tip

Gene Boehler

Gene Boehler, Farmersville, Ill.

“My 10-year-old Work Sharp knife sharpener does an excellent job (www.worksharptools.com; ph 800 597-6170). I can use it with 3 different sanding belts - an 80-grit to shape the blade and remove any knicks; a 220-grit to put a nice edge on the blade; and a very fine 6,000-grit to polish the blade edge. It works so well that I could probably get a knife sharp enough to shave with it.

“It was definitely worth the $75 I paid for it. My only complaint was that I could only sharpen one side of the blade at a time, which prompted me to build my own sharpener that sharpens both sides using 2 sets of sanding belts.” Boehler made the double-sided sharpener by using the electric motor and main bearing shaft and pulley off an old Sears Craftsman belt sander. The entire assembly sets on a rectangular steel plate, with the motor mounted on an 8 1/2-in. length of 2-in. square tubing attached to the plate. A pair of spring-loaded clamps are used to adjust belt tension.

“I had acquired a supply of small electric motor bearings in various lengths, and used various sizes of aluminum shaft to make shafts and pulleys,” says Boehler.

“I bought O-ring drive belts at a NAPA store and mounted them on grooves that I cut into the shafts. It’s designed to use the same sanding belts that Work Sharp uses on its sharpener.”

Shop feature stories

From the archive · Full text
Feature story

“Sawzall” Paint Can Shaker

Featured source: Gene Boehler

Gene Boehler made an aerosol paint can “shaker” that makes use of an old cordless Ridgid sawzall, attaching a homemade shaker to the sawzall in place of the blade. A hose clamp attaches the can to the shaker. The paint can sets inside a 4 1/2-in. length of 3-in. dia. exhaust pipe that Boehler cut in half and welded to a 6-in. long, 1 1/2-in. dia. square tube. A short length of small bar stock is welded on inside the tube and also welded to the sawzall’s blade-holding shank.

“It works fast and really shakes up the paint - my aerosol paint cans have never worked better,” says Boehler.

“I came up with the idea because I wanted to use Rust-Oleum epoxy appliance paint cans to re-finish my old kitchen cabinets, but couldn’t get my spray cans to work right without clogging or sputtering. I tried a couple different ways to shake the cans, but they were slow and didn’t work all that well.

“Before welding the exhaust pipe to the square tube, I made allowance for the hose clamp that’s used to attach the can to the shaker. I glued on some pieces of soft, thin rubber to help hold the can in place as it’s being shaken.” To keep the entire unit stable he welded a small metal plate to the foot of the sawzall. To keep it from shaking his work bench, he bolted it to a 10-in. I-beam that supports the overhead hoist in his shop and is set in 3-ft. deep concrete.

“All cans painted beautifully, with no clogs or sputters,” says Boehler. Contact: FARM SHOW Followup, Gene Boehler, 27299 W. Frontage Rd., Farmersville, Ill. 62533 (ph 217 227-3220).

From the archive · Full text
Feature story

Orderly Oil Change Setup

Featured source: Howard Ewen, Jr.

Overhead oil tanks, drip collectors and organized filters keep Howard Ewen’s shop clean and neat, making oil changes a lot easier. With 4 IH 4586 diesels, around 30 Olivers, 5 or 6 farm trucks, 3 pickups and several pieces of homemade equipment, he goes through a lot of oil and filters.

“I have five 75-gal. oil tanks mounted on a rack above my head with a fill cabinet for pitchers and 2 1/2-gal. jugs mounted at one end of the rack,” says Ewen.

“Rack space at the other end holds a case of transmission fluid, ether windshield washer fluid, and other liquids.” Like most farmers, Ewen used to keep his oil in barrels with a hand pump on each. When he had a chance to pick up an old service truck bed with the tanks on it, he grabbed it.

“I have 4 tanks filled with different types of oil and one filled with solvent,” explains Ewen. A 2-in. outlet on the bottom front corner of each tank has an elbow with a 1 1/2-in. reducer on it and pipes that lead to ball valves above a fill shelf. The shelf is expanded metal with a catch tray beneath to collect drips and spills.

“Any drips from ball valves or containers drain into a 5-gal. bucket and are used for oiling parts,” says Ewen.

“Even a few drops at a time count up, and it keeps the shop clean.” The fill cabinet doors are sealed with rubber foam to keep dust from collecting on the pitchers and jugs. A large steel cabinet nearly 7 ft. tall and the width of the rack does double duty as filter storage and as a walkway for filling the oil tanks. A ladder on one end gives Ewen easy access. When one of the tanks runs out, he retrieves a barrel from nearby storage and lifts it into position above the tanks with his shop hoist.

“I made a harness for the barrel so it tips it forward,” says Ewen.

“Each tank has a 2-in. inlet on it at the rear. I lower the barrel’s faucet end into the inlet pipe and open it up. Once I loosen the bung, it empties out quickly.” Ewen’s wife Pat maintains inventory on the filters. When a filter is used, a slip of paper is filled out with the filter number and the date and dropped in a box. When filters go on sale locally, Pat pulls the slips and determines how many filters of various types are needed.

“We usually keep around 100 on hand,” notes Ewen.

“Having a place for them and always having them on hand makes maintenance of equipment easier to do.” Contact: FARM SHOW Followup, Howard Ewen, Jr., 6997 W State Rd. 8, Lacrosse, Ind. 46348 (ph 219 754-2365).

From the archive · Full text
Feature story

Cordless Drill Powers Winch

Featured source: Warn Industries

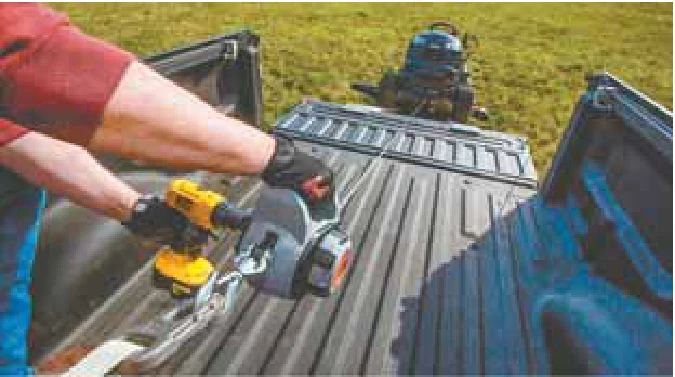
You can use a cordless drill to power this portable, lightweight winch that you can take anywhere. The Warn 500-lb. capacity winch comes with 30 ft. of wire rope with front and rear rigging hooks. A free spool clutch offers a quick, torque-based pull and makes rigging fast and easy. The clutch will stop and ratchet, letting you know when you’re reaching the limits of the winch. The winch is available on Amazon and at Northern Tool or Home Depot. It sells for anywhere from $135.38 to $179.99. Contact: FARM SHOW Followup, Warn Industries, Inc., 12900 SE Capps Road, Clackamas, Oregon 97015 (ph 800 543-9276; www.warn.com).

From the archive · Full text
Feature story

They Restore Windmill Gear Cases To Better Than New

Featured source: Paul Petrocchi

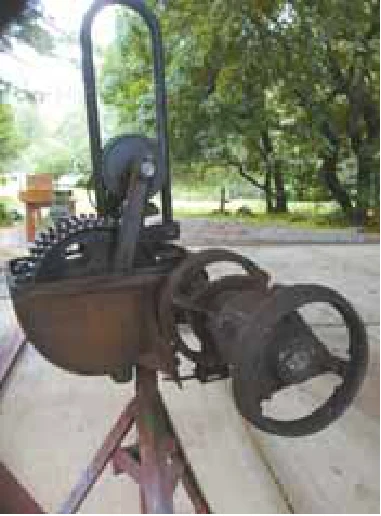
Paul Petrocchi at American Windmill restores gear cases to better than new with a special oil seal and roller bearings.

“One of the reasons we started installing roller bearings and oil seals was having to throw away the clothes I wore when working on windmills as oil from gear cases went everywhere,” says Petrocchi.

“I wanted to be able to go up the tower and have it be a clean and safe place to work.” Petrocchi and his wife Ellen Sattler do complete restorations of old windmills, as well as install new ones, mostly in western and southern states. They have worked on windmills for more than 35 years. Petrocchi began as a college intern in a windmill factory carving blades. While he works up on the towers, Sattler handles the business end, as well as building towers and operating cranes and trucks. She is also his main consultant.

“She can’t use a tool, but she can see how it should be used to resolve a problem and explain it to me,” says Petrocchi. Although their specialty is Aermotor, they work on all brands and models of windmills.

“We’ve worked on more than 100 different models from different manufacturers,” says Petrocchi.

“Most of the work I do is on the platform. We also do some in the shop. We’ll restore a gear case like it was just factory made.” Upgrading gear cases to prevent leaks is a unique specialty and spans all makes and models. He explains that with the exception of one made by Duplex, most machines were not sealed off or not sealed off well.

“Companies did all kinds of things to seal off the nose, while some just dumped in oil,” says Petrocchi.

“If you can seal it off, the oil stays in the tank and stays cleaner.” To seal off a gear case, Petrocchi often has to modify the nose of the main casting to accept the roller bearings and oil seal.

“We end up cutting off from 2 to 5 in. of the nose of the main gearbox. We then make a bell shape flange to fit inside the nose,” says Petrocchi.

“It expands when heated to seal tightly to the old case.” He explains that the flange has to be fabricated carefully. If it expands too much, it can shatter the old cast iron gearbox. Some rebuilders will put a needle roller bearing in, but not the hardened shaft and needle housing. The shaft is key and has to match the housing in hardness.

“We are fortunate to have an older machinist who is really into metallurgy,” says Petrocchi.

“You need to know what the metal will do. If you build it like the hub of a car wheel with a hardened shaft, a great set of bearings and an oil seal, you have it.” If a FARM SHOW reader has a windmill or gear case to be restored or upgraded, Petrocchi suggests sending him pictures, the make and model, as well as the diameter of the fan.

“We need pictures of the gearbox, any ID marks, the tail and the tower, as well as dimensions of cross members and the ladder.” Petrocchi recommends anyone interested in windmills and windmill restoration should subscribe to the Windmill Gazette. He also recommends attending the Windmill Technology Certification Workshop (Vol. 38, No. 6) at New Mexico State University. Sattler recommends readers contact them by phone or email as she and Petrocchi are often traveling for business. Contact: FARM SHOW Followup, American Windmill, 5981 Silver Ridge Lane, Placerville, Calif. 95667 (ph 530 644-3008; [email protected]).

From the archive · Full text
Feature story

Business Is Good For Baler Repair Experts

Featured source: Vernon Hershberger

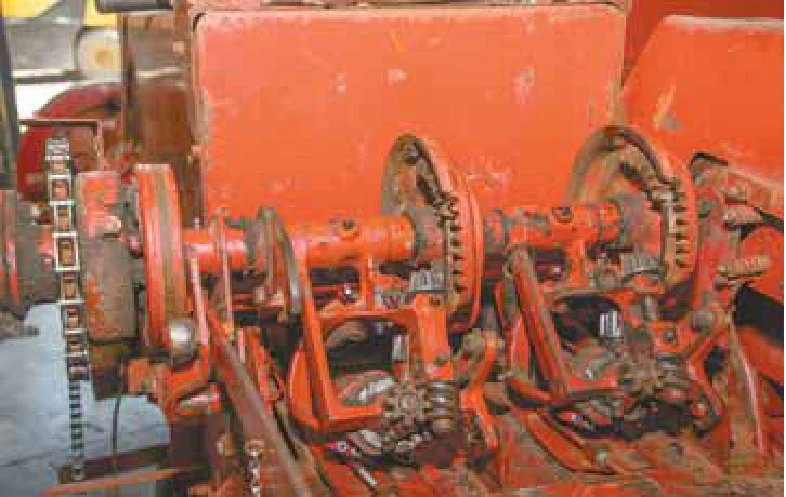
The older the baler, the more likely its owner will end up calling Vernon Hershberger for parts and repair, or at least advice. Fixing balers is a big part of Hershberger’s farm equipment repair business. If a customer is too far away for an economical visit, Hershberger or an employee will try to assist over the phone.

“We specialize in aftermarket parts,” says Hershberger.

“Increasingly, companies have stopped offering OEM parts for their older balers.” Either the part is interchangeable on a newer baler and the number gets changed, or the company just doesn’t want to support the older models. Sometimes they just can’t find a mechanic willing to work on older balers.

“Our customers often come to us simply to save money,” adds Hershberger.

“Our aftermarket parts can cost 25 to 75 percent less than what they would pay at a New Holland or Deere dealer.

“We can also supply parts for Case IH balers, but there aren’t a lot of them in our area,” says Hershberger.

“We carry a lot of parts for round balers, including belts, which we buy in bulk and make up to order.” While the bulk of business is done within 100 miles of the Baltic, Ohio, shop, the company has a growing reputation.

“We had one customer bring his Deere 214 square baler on a trailer from Ft. Wayne, Ind.,” says Hershberger.

“That’s close to a 4 hr. drive one way. His dealer had refused to work on it.” He recently shipped 2 New Holland square balers and a single bar mower to the Dominican Republic. He has sold parts to baler owners in most states in the U.S. and into Canada. When a call comes in for help, the biggest challenge involves the knotter.

“The farmer knows it doesn’t tie, but not why,” says Hershberger.

“We start by asking how the ends of the twines look. Are they splayed? Where are they in the knotter? It is very difficult to try to fix a baler over the phone.” If knotters are a challenge, perhaps an even bigger one for the repairmen is knowing when to advise against repair.

“You have to get to that happy medium between fixing the baler properly, yet not overspending for the customer,” says Hershberger.

“We have had people bring in a rusted out machine and want to fix it, but they would tie up more money than it is worth.” Recently Hershberger started cutting down older balers to make half size, decorator bales. The little bales are popular as yard decorations. Hershberger finds the baler market interesting. When he first purchased Farmer’s Equipment and Repair from the previous owner, Hershberger didn’t do any work on balers.

“I did some the second year and quickly discovered a big demand for a baler mechanic,” says Hershberger. Luckily for him he soon hired a young mechanic with a touch for balers. Hershberger gives Alvin Schlabach a lot of credit for the growing business. Hershberger notes that Schlabach shares his satisfaction with helping a customer resolve a problem.

“We both enjoy the challenge and excitement of fixing a problem under the pressure of the baler being in the field and the farmer trying to get the hay baled,” says Hershberger.

“There is a rewarding feeling to getting a baler fixed.” Contact: FARM SHOW Followup, Farmer’s Equipment and Repair, 3589 State Route 643, Baltic, Ohio 43804 (ph 330 897-1106).


From the archive · Full text
Feature story

“Quick Connect” Shop Vac Pump

Featured source: Ridgid

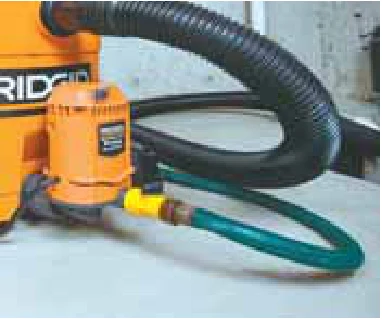
If you’ve ever used a shop vac to dry out a flooded basement, you’ll be interested in this “quick connect” vacuum pump that hooks up to Ridgid vacs that have a drain. It lets you use an ordinary garden hose to quickly pump the water outside, without having to haul the full vac up and down stairs. A standard 5/8-in. garden hose connects to the pump. The unit pumps water at 10 gpm up to 40 ft. high. Sells for $49.97 at Home Depot (ph 800 474-3443; www.homedepot.com).

From the archive · Full text
Feature story

Customized Air Compressor

Featured source: Mark Rinke

“The traditional ‘motor-on-the-top’ air compressor that I got from a friend had a rusty 80-gal. tank and bad seals, so I decided to fix it up rather than throw it away,” says Mark Rinke, Lakeville, Minn.

“It took me most of one winter to reconfigure the machine, adding features similar to those on expensive commercial models that I work with at my job. Now I’ve got something that really fits my needs.” Rinke’s primary goal was to turn the stationary, top-heavy machine into one that was portable, stable while it was operating, and produced the driest possible air. To do that he built a rectangular metal platform out of 3/8-in. C-channel steel and bolted the pressure tank and motor to it sitting side-by-side. The platform rides on two large caster wheels beneath the tank and two smaller casters under the motor. A screw jack mounted on the frame in front of the motor raises the platform off the smaller wheels to keep the platform stable when the compressor is running.

To produce dry air and keep moisture from collecting in the pressure tank, Rinke mounted an aftermarket air exhanger on the side of the compressor skid with an electric power fan cnclosed in a metal shroud.

“The compressor discharges air into a pre-cooler and from there into a forced-fan heat exchanger, which drops out most of the moisture,” says Rinke.

“This keeps water from collecting in the main storage tank.” As a career mechanical engineer who brings his job skills home, Rinke says, “Re-working this machine was never about the economics. It was more about the journey, an interesting hobby project that really suits my home shop needs with a commercial quality device.” His compressor has a 5 hp. motor and operates from a traditional pressure switch with safety controls configured much like larger commercial units. The motor starter contactor, fan control contacts and thermal overload/heater strip are housed in neatly designed and sealed box mounted between the motor and the tank. He also re-worked the compressor air passage ports to provide more efficient air flow.

“This unit serves my purpose for having a good and portable supply of the driest air possible, without using a commercial air dryer,” Rinke says. Contact: FARM SHOW Followup, Mark Rinke, 11175 225th St. E., Lakeville, Minn. 55044 ([email protected]).

From the archive · Full text
Feature story

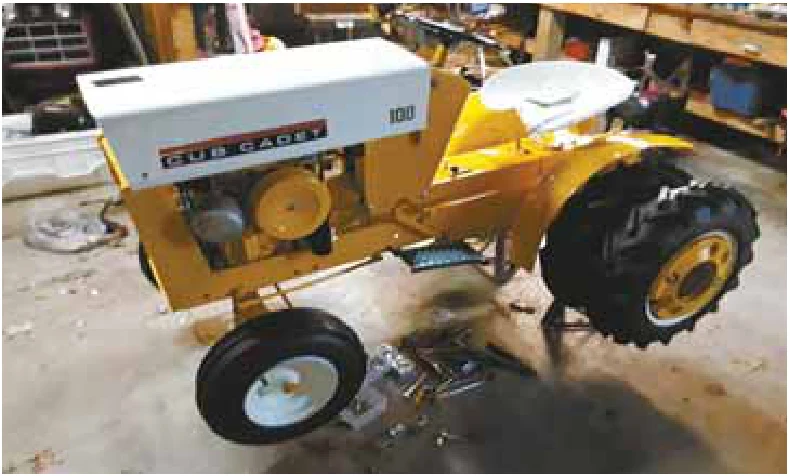
Cub Cadet Specialist Buys, Sells, Repairs, Restores

Featured source: Scott Urschel

Scott Urschel is a bonafide expert in the repair, restoration and general maintenance of Cub Cadet lawn and garden tractors. Urschel’s Cub Cadet Connection business carries a large supply of new, used and reproduction parts for virtually every Cub Cadet model ever made.

“I grew up with Cub Cadets because my dad and grandfather both worked in an IH dealership that sold them,” Urschel says.

“As a kid I started tinkering with them to see how they worked, also mowing lawns, tilling gardens and pulling trailers. After I went to school for machining, my dad and I started repairing and restoring them part time in 1997 as a hobby. I made it a fulltime business in 2016. I enjoy it because I meet a lot of different people who share the same interest I do.” Urschel says there’s a 3-part market for the thousands and thousands of Cub Cadets still out there.

“A lot of people are still using them so they need replacement parts which I carry or can locate. Collectors want rare models, and pullers need specific parts.” Urschel’s inventory includes about 100 complete tractors and parts that he’s removed from more than 1,000 tractors over the years. He does up to 10 full restorations a year, handling all the mechanical work himself and contracting out the paint and final finishing. He also contributes regular technical articles on Cub Cadets to Lawn and Garden Tractor Magazine (www.lagtmag.com). Urschel says that over the years he’s owned, repaired or restored at least one of every Cub Cadet model ever built since the brand originated in 1961. About 30 of his tractors were equipped with Danco, Johnson and Kwik Way Loaders, which were made specifically for Cadet tractors.

“The brand really has a good reputation because those first models from 1961 to 1981 used the transmission from a Farmall Cub tractor,” Urschel says.

“They were very durable and still work well today if they’re properly maintained. Quite a few people still look for them because they can keep it in a garage and use it for mowing, snow blowing, and yard work.” Urschel acquires and sells tractors and parts when he attends shows and finds more of the same through a network of acquaintances he’s made over the years. Contact: FARM SHOW Followup, Urschel’s Cub Cadet Connection, 854 E. Hwy. 224, Uniondale, Ind. 46791 (ph 260 715-3440; [email protected]).

From the archive · Full text
Feature story

“Lockdown” Platform Holds Ladder In Place

Featured source: Troy Kumprey

“Our new Ladder Lockdown saddle prevents almost all ladder movement to greatly reduce the possibility of accidental falls,” says inventor Troy Kumprey, Ladder Lockdown, El Segundo, Calif. Ladder Lockdown consists of an 8-lb., powder-coated steel saddle that serves as a traction pad for almost every surface, both indoors and outdoors. It can be used with extension ladders up to 32 ft. long and A-frame step ladders up to 8 ft. tall. The underside of the saddle comes with a pair of non-slip rubber grips for hard surface use. A pair of large soft ground staples or hard/frozen ground spikes can be used to hold the tray in place outdoors. The ladder is then placed inside the saddle on a pair of abrasive pads, with the legs set flush against the front side of the saddle to make sure the saddle stays flat on the ground. To further secure the ladder, a nylon strap is then hooked to the saddle and looped over the third rung of the ladder and down the back side of the rungs.

“It’s a simple invention that works really well. The ladder can’t slide forward or backward and lateral movement is greatly reduced as well,” says Kumprey.

“I came up with the idea because I own a construction company and have men working on ladders all the time. Every year I had to take someone to the hospital, usually because a ladder slipped and they lose their balance and fell.” He says the non-slip rubber grips on the bottom of the saddle and the staples provide a firm grip on hillsides, soft grass, and slippery surfaces. Kumprey recently started using sturdy, high resin plastic to make the saddle.

“The plastic saddle works better than steel because it’s super rigid but still flexes a little, which allows the saddle to hug the ground more closely. It also reduces the saddle’s weight to about 3 lbs. And because it costs less to manufacture, we’ve been able to drop the retail price to between $34.99 and $39.99 plus S&H.” Ladder Lockdown is available at many Ace hardware stores and online at Amazon, Home Depot, and Lowes. Contact: FARM SHOW Followup, Ladder Lockdown, 111 Penn St., El Segundo, Calif. 90245 (ph 855 862-7233; [email protected]; https://ladderlockdown.com/about-us).