Kylidge McNally
“The seal was worn out on the deep freeze in our house, causing the lid not to seal properly and the inside to frost up. I put a pair of toolbox latches on the lid, one on each side, now it seals up tight.”
Money-Saving Repairs & Maintenance Shortcuts · Printed section pp. 32–35
30 selected entries · Complete text of selected entries
This issue’s section includes reader tips and feature-length shop stories. Held items and editorial notices are not reproduced.
“The seal was worn out on the deep freeze in our house, causing the lid not to seal properly and the inside to frost up. I put a pair of toolbox latches on the lid, one on each side, now it seals up tight.”
“In the March issue (Vol. 45, No. 2) I see that Joe Strueder has trouble with the bar groove filling up with sawdust on his chainsaw. The bar oil sold in stores likes the warmth of a running chain in the bar and with the long bar he has on his saw my guess is that the oil is cooling too much and gumming up with sawdust. I would suggest he mix that bar oil in a ratio of 1:3 with 0W-20 motor oil which will thin it out and should help solve the problem.”
“I have a simple, economical repair for a reader in a recent issue whose Ford 600 tractor had leaky hydraulic lines where they run through the transmission housing.
“You need to split the tractor and remove the transmission, and then measure the diameter of the tube. Then go to an auto parts store and buy a brake line tube that will snuggly slide through the transmission from one end to the other. The tube we bought was flared at one end, so we cut the tube about 1/4 in. longer so that we could flare the other end as well. We put silicone on the ends and replaced the rubber doughnut gaskets at each end.
“Then we put the tractor back together. However, we didn’t try to start the tractor for 24 hrs. to make sure the silicone had dried. Worked like a charm.”
“I saw a tool in Vol. 43, No. 5 for releasing pressurized hydraulic couplers. I quit fighting with couplers some time ago when I realized that the pressure comes from the source – and I had control of that source. So if a coupler is pressurized, I shut off the tractor or skid steer, then turn the ignition back on and, as necessary, get the automatic locks to unlock by enabling the systems. Then I move the lever for that coupler back and forth, as if I were using that circuit. Then the coupler should not be pressurized any more.
“Sometimes, if I bump the hydraulic levers or switches when fittings are uncoupled, the fitting will be pressurized. Then I turn on the ignition, ‘enable’ the hydraulics and move the levers or activate the switches, and the pressure will bleed off.”
“I mounted an old pan-type tractor seat from an Allis WD onto the base of a discarded office chair. It rolls easily around the shop and is as comfortable as riding the Allis. It really works great.”
“I made a passive solar heat collector for my shop by using a section of salvaged sliding patio door. I cut air intakes into each end near the ground and cut a hole into my shop near the top corner of the collector. A small fan pulls air into the shop, at the same time drawing air into the solar collector through the air intakes. The fan came from a kitchen vent in an RV. Its speed is regulated by a light dimmer switch.
“I fill the bottom area with river rock to act as a heat sink. I painted the rocks and the interior of the collector black to store heat. This simple collector helps take the chill out on sunny winter days and it cost almost nothing.”
“After driving a metal tie-down stake into open ground, the stake usually ends up working itself loose as it’s pulled in the direction of the tie-down. You can solve the problem by putting a rock in the ground ahead of the stake. It braces the stake so it can’t be pulled forward as easy due to the larger blunt surface.
“I made a nifty temporary workbench that I can set at any height by clamping planks across bolt-on forks on a front-end loader bucket.
“When tightening wheel studs on truck or car tires, you can use a pry bar to hold the wheel in place. Just insert it across the wheel between the studs and rest the end on the ground.”
“Being from a tropical climate, a lot of engines experience vapor lock. A good long term solution is to paint the engine white and chrome the tank. The surface temp will drop an instant 20 degrees.
“I keep a sand bucket on my shop table that’s saturated with a 50:50 mix of both mineral and olive oil. Shoving small tools into the sand keeps them rust-free.”
“I had a leak where the carburetor screws onto the engine block, so I took it off and then used a paper plate and traced the gasket I needed and cut it out into the exact shape. It gave me a perfect template for cutting a new gastket.”
“I have an older Husqvarna 54-in. mower. I mow a lot of ditches which can be hard on a mower. The rear axle tore loose from the tractor and sheet metal tabs that bolt to the axle also broke loose.
“To repair the mower, I attached pieces of 3-in. angle iron to the mower body and then I fastened the axle to them.
“When I needed to align the axle and its support bracket on the angle iron, I couldn’t find a way to get a punch through the axle support holes to mark where I needed to drill.
“So I got a pencil with an eraser on one end. I put paint on the eraser, put the pencil up through the bolt holes, and made my marks to drill the 2 bolt holes. Then I bolted the axle back up. After this repair, the mower is now much more heavy duty. Using paint on the pencil eraser really helped get it done.”
“The drawbar on my Ford utility tractor spins freely in the hitch pins and was a constant annoyance when hooking up trailers or other equipment. So I came up with a pair of ‘stops’ to hold it in place.
“They consist of two 6-in. long pieces of 2-in. sq. angle iron. I drilled two holes into one side of each piece. One hole is used to bolt the stops to each arm of the hitch. When the drawbar is not being used, the stops pivot up and are held in place by zip ties.
“When installing the drawbar, I pivot each stop down and stick the drawbar pin through the hole in the stop before going through the hitch pin hole. The stops hold the drawbar firmly in place with no more spinning.”
David made a shop fan by salvaging the fan off the top of an old household AC unit. He wired the fan motor to a switch box he attached to the side of the unit and attached a length of power cord to the switch box to power it.
Blowing air out of garden hoses is a putzy job each fall for people who live in the north country. Gary made the job easier by attaching a garden hose valve to a length of steel pipe with an air hose fitting at the other end. To blow out a hose, he just hooks the hose up to the valve, snaps on an air hose, and shoots enough air through to clean it out.
“Hoyer patient lifts are used by hospitals, nursing homes, and home health agencies to move patients that cannot move themselves. They are built to handle very large people. Although quite expensive if purchased new, they can be found used online at reasonable prices. They’re relatively easy to rebuild, if necessary. I think of it as a mini engine hoist with legs that can be width-adjusted several degrees. I do a lot of small engine work and other tinkering so it’s very handy – such as for removing mower decks and holding them up for service.”
“Here’s an idea for a handy shop light you can make out of a regular small LED flashlight. Just zip tie a clothes pin to the light by running the zip tie through the spring on the clothes pin. Then you can just clip it to a hat when needed. It works great to free up your hands. You can pick up these lights for almost nothing and they really work great.”
“In a recent issue, a reader talked about drilling holes in an Echo weedeater exhaust screen because it was plugged up with carbon. I think the plugging problem was caused by using too much oil in the fuel mix or using cheap oil not rated for the equipment. If you have carbon buildup on the screen, you probably have carbon buildup inside the engine. I’d recommend using Echo’s oil, which burns clean.”
“When we have to add a hitch to the back of tillage equipment to tow finishing harrows or packers, I buy aftermarket 3-pt. hitch linkage replacement ends and weld them into the hitch frame to provide a slick swiveling hitch pin hole. The hardened ball doesn’t wear much and the swiveling action just about eliminates pin bind when crossing ditches and making sharp turns. It also saves time finding a suitable piece of heavy steel and drilling or torching a hole.”
A Norwegian company says it has developed a product that pulls water out of diesel fuel storage tanks. Developed for big diesel tanks at fuel stations, Aquafighter® is now available for agriculture, trucking, generators, and other uses.
“It’s the first product that removes and captures all water, including bound and emulsified water, from diesel fuel in the fuel tank before it can cause water accumulation, bacteria growth and damage to the tank, fuel system, filters, and engine,” Steve Schultz of DieselCare AS.
“If you clean the tank first and then use Aquafighter®, it will keep the fuel pure and the tank clear for a lifetime.”
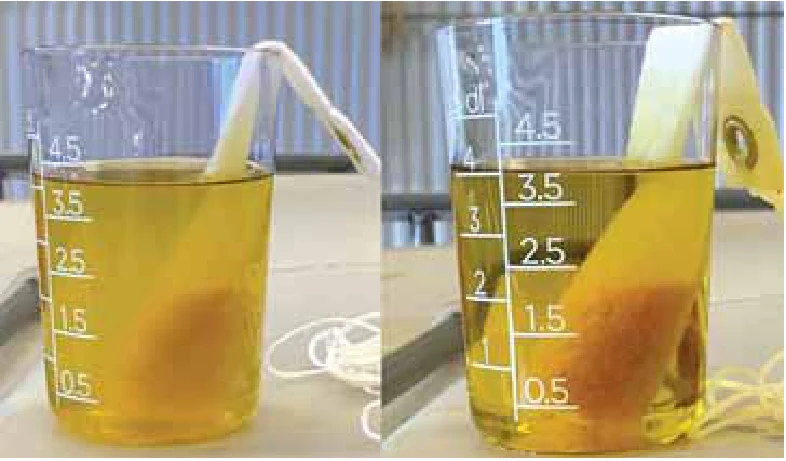
From a slim 3-in. width snake shape to a 6-ft. industrial pad, the products are made of a durable, fabric membrane that contains Aquafighter® powder to pull in the water and isolate it in a protective gel. To use it, slip the snake/pad into the tank, and secure the end of the string under the cap or on the outside of the opening. Aquafighter® rests on the bottom of the tank and can be pulled up and checked periodically. It should be replaced when full to assure that it is actively protecting your fuel and tank at all times.
For example, the $70 snake model, is designed for tanks with 1 1/2-in. or larger openings. It’s capable of capturing a 1/2-liter of water, which is considered a lot in a 300 gal. tank.
By removing all water from diesel and biodiesel, there is no need for most additives and fuel polishing and there is far less need for filter replacements, Schultz says, even during frigid winters.
Aquafighter® is not designed to be used on diesel pickups, because the pipe leading to the fuel tank is too small.
“The most important place to protect the fuel is at the storage tank when you take control of the supply,” Schultz emphasizes. Beyond that, Aquafighter® products can be used in tanks with openings as small as 1 1/2-in. The company is setting up distribution in N.A. Contact Schultz for information about dealers near you.
Contact: FARM SHOW Followup, Steve Schultz, Aquafighter® from DieselCare AS (ph: 407 564-2411; WhatsApp: +47 484-08-240; www.aquafighter.com; [email protected]).
“I run a lawn mower repair shop and last summer I installed a Harbor Freight 23 hp. horizontal shaft Predator engine into a Wheel Horse 520H garden tractor. The customer was happy because the Predator sells for about $1,000 less than a new Kohler engine,” says Steven Reining, Mt. Zion, Ill.
In the past Reining has installed several 2-cyl. engines in Wheel Horse tractors, but this was his first Predator.
“The conversion I made can be easily and affordably done to any Wheel Horse tractor, and possibly other garden tractor brands, too,” says Reining.
“When I was done the tractor ran great, and the customer used it all year with no problems. Most people don’t even notice that the engine isn’t original.”
He was able to install the engine by using the tractor’s original Onan engine to build and install a “locator frame.”
“The locator frame’s purpose was to make sure the original belts would fit,” says Reining.
“I drilled a hole approximately in the center of a 14-in. long, 1-in. wide, 1/4-in. thick steel bar, which fit onto the existing bolt in the end of the Onan engine’s crankshaft,” says Reining.
“I then ran two steel supports from the bar back to a random bolting point on the tractor’s frame and welded them to the bar. With the Onan engine removed and with the locator frame bolted to the tractor, I knew exactly where the Predator engine needed to go - side to side, front to back, and height so the crankshaft would line up to the hole in the locator frame.”
He used a 3-in. long bushing with a 1-in. ID and a 1 1/8-in. OD to adapt the crankshaft to the Wheel Horse components.
“The engines on most Wheel Horse tractors come with a 1 1/8-in. dia. crankshaft, whereas the Predator has a 1-in. dia. crankshaft so I also had to cut a key slot in the bushing,” says Reining.
The customer wanted to save money by rewiring the tractor and engine himself, including the safety switch wiring. To make the job easier, Reining disassembled the Predator’s speed and choke controls. He also installed longer wires and relocated the Predator ignition switch to the original Wheel Horse key switch position.
“The customer was then able to rewire the safety switches at his convenience, which wasn’t a difficult job,” says Reining.
With a little cutting and welding, he also modified the engine’s exhaust pipe so it fit under the tractor’s hood.
“I cut the flanges off the Onan engine’s muffler and welded the flanges off the Predator muffler to the Onan muffler,” he says.
Contact: FARM SHOW Followup, Steven L. Reining, 120 W. Main St., Mt. Zion, Ill. 62549 (ph 217 864-4664; [email protected]).
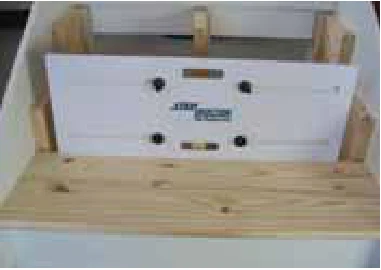
With the Step Doctor jig, each stair tread and riser you cut fits perfectly. Plus it’s simple to use and moderately priced.
Retired telephone worker George Ireson came up with the design 14 years ago to help a neighbor install hardwood stairs.
“It articulates up to about 3/8 in. on each corner,” Ireson explains, so pieces fit, even when the space isn’t perfectly square.
The front and 2 back pieces spread like wings and are held secure with wingnuts. Videos on the Step Doctor website show exactly how to set up the jig, mark the board, and place it on the table saw to cut correctly.
The basic model works for stairs up to 49 in. wide and sells for $90. The deluxe model has longer wings that extend to 61 in. and sells for $100. Shipping is additional.
Ireson also invented and sells the 3n12 to cut risers. The simple square is easier to read than a traditional square to mark step risers and roof rafter pitches. It sells for $50 including shipping.
Ireson notes he has a couple more projects he is working on, and welcomes inquiries from anyone interested in making and selling the Step Doctor and square tools.
“Engineers have told me the Step Doctor is so simple and so good. It’s a simple tool for complicated jobs,” Ireson says.
Contact: FARM SHOW Followup, George Ireson, 336 Rollingwood Ct., Troutville, Va. 24175 (ph 540 529-1572; www.stepdoctor.com; [email protected]).
Henry Daugherty turned a worn-out pickup truck bed into a rugged flat bed equipped with a crane, storage and more. It has a rebuilt cab and an 80 by 108-in. treated lumber bed with internal 1 3/4 by 3 3/4-in. (I.D) stake pockets. The stake pockets are used to hold side and backend boards, as well as a portable vise.
“I do excavating, trucking, snow removal, and equipment sales,” says Daugherty.
“The factory bed on the pickup was rusted out. I disposed of it and built a replacement. It has hand grabs and tie-down rails, as well as bump posts on the headboard for holding pipe, ladders, and other long material.”
Daugherty added cargo lights, under body tool storage, and a 1/2-ton crane with a 5-ft. reach boom powered by a 12-volt electric winch.
“I added a grab bar on the side of the crane and a ladder under the bed so I can climb onto the bed easily,” says Daugherty.
“I also installed a 6,000-watt inverter in the cab behind the passenger seat to provide 115-volt AC power to power outlets on the side of the bed.”
For added longevity, Daugherty added two coats of used motor oil to the surface of the 2 by 6-in. floorboard bed. The sideboards are treated 1 by 6-in. decking. The headboard is 2 by 4-in. tubing.
“I built the bed for my own use and didn’t keep track of materials or labor,” says Daugherty.
“If I did it over, the only change I would make is to go with standard 2 by 4-in. stake pockets.”
He says he is not interested in going into the custom truck bed business, at least in the short term.
“I am building a retirement shop and will probably be busy with it for the next 2 years,” says Daugherty. Contact: FARM SHOW Followup, Henry Industries, 107 Sierra Heights Rd., Dubois, Penn. 15801 (ph 814 371-8010; mobile 814 603-0788; [email protected]).
“We offer diagnostic solutions for commercial vehicles, agricultural vehicles, off-highway (construction) equipment, and marine equipment,” says Isidro Flores, Cojali USA.
“We started in Spain 20 years ago and are now active in 115 countries. Our diagnostics are used by owner/operators, fleet managers and repair shops, including some OEM service technicians.”
Based in Spain, the company brings knowledge from diagnostic systems in Europe and elsewhere to the U.S. and Canada. Now you can bypass corporate firewalls on fault codes and other information needed to fix electronic control unit-based systems.
Some North American OEMs continue to resist Right to Repair laws. Fault code information or the diagnostic tools needed to find and troubleshoot faults is not available to users in the U.S. and Canada. However, these same companies have been required to share or sell access to this information elsewhere.
“We have been able to take advantage of multiple communication protocols to talk to a vehicle’s electronic control unit (ECU) and develop our own language,” says Christian Palomanes, Ag Diagnostic Sales, Cojali.
“In some cases, we have been able to use experience from working with European and Asian vehicles.”
As a result, Cojali can provide electronic sensor information and access for more than 80 brands of tractors and other agricultural equipment.
“Our customers can do complete diagnostics of error codes, actuation of components and calibrations, parameter settings, and system scans,” says Flores.
All an operator needs are a laptop and a Jaltest kit specific to the preferred market segment. Each kit consists of cables, a Jaltest Link interface module and the designated system software.
From set up to utilization, use of the kit is extremely intuitive, and diagnostic information is easily accessed. Once the software is installed on the laptop, the operator selects the brand and model. The rest is easy.
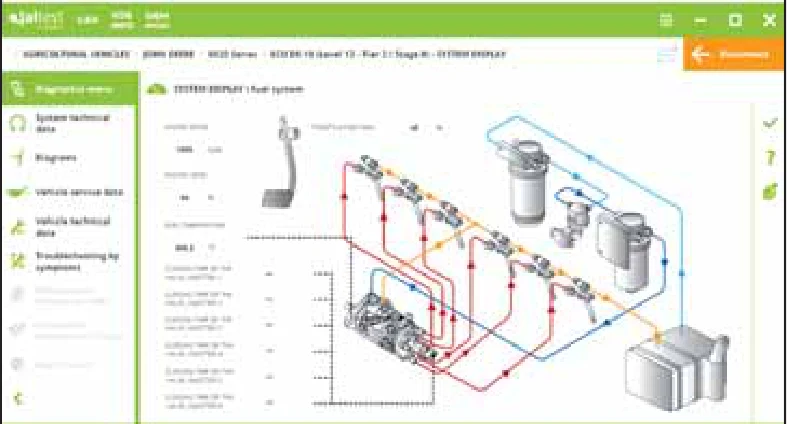
“The screen displays all the different control modules on that specific model, where the ECU is located, and which pin connector cable is required,” says Palomanes.
At that point, the operator can view any recorded fault codes, troubleshoot them, fix and clear the fault code.
“Troubleshooting is a step-by-step guide to fixing the fault code,” explains Palomanes.
“It takes the operator through schematics to images hyperlinked to detailed points.”
He adds that troubleshooting and accessing vehicle technical data does require internet connection. Throughout the process, the system makes it easy to grab images of the screen. Using the internet connection, these images, as well as any reports generated, can be uploaded to the cloud or to co-workers/employers or designated others, such as fleet managers.
The diagnostic system may be as effective at avoiding faults as it is at fixing them. Engine load profile provides useful information about the life of the tractor, rpm’s, compression, miles, and hours it has run.
“While running the engine, you can check all the specifications, such as engine and crankshaft speeds, or look at operating pressure, temperature, volumes, and time,” says Palomanes.
“Data can be displayed in multiple ways from schematics to graphic images. You can see on the screen how the fuel system works and actuate components like the fuel pump and alter the fuel supply to different cylinders.”
Palomanes adds that staying on top of new components and models is a challenge.
The company releases 3 software updates each year to update Jaltest users to new innovations in the market.
“It can take us from 6 to 9 mos. to analyze material needed on a new model,” he says.
Palomanes notes that some OEM dealerships use the Jaltest system to complement their own OEM licensed diagnostics.
“CNH dealers have access to only one diagnostic unit under their OEM system,” he explains.
“Our tool allows them to cover a wider range of vehicles and systems. A single license can be used on up to 3 different laptops and be taken to the field.” Another benefit comes with brands that use an engine from a second brand and a transmission or other system from a third brand.
“Dealers may have diagnostics for the engine, but not for the transmission,” says Palomanes.
“They come to us, because we have both.”
The Jaltest system consists of hardware, software and a use license. Initial setup for AGV diagnostics is around $3,900 for all 3 components. Pricing for other units vary, and reduced pricing is available when purchasing multiple packages.
Contact: FARM SHOW Followup, Cojali USA, 2200 N.W. 102nd Ave., # 4B, Doral, Fla. 33172 (ph 305 960-7651; toll free 800 975-1865; [email protected]; www.cojaliusa.com).

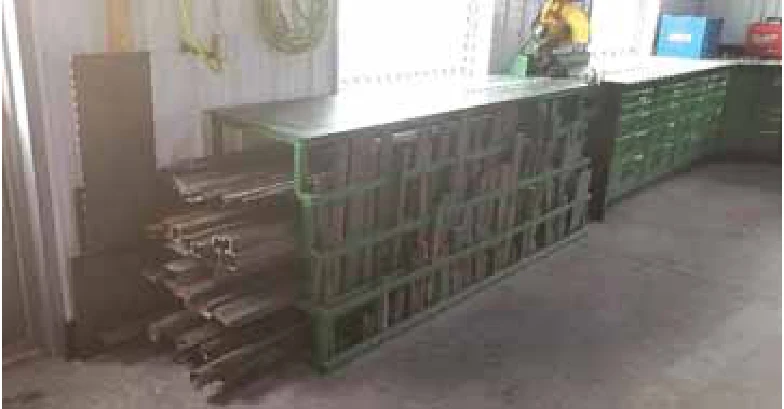
Kurt Madsen, Theodore, Saskatchewan was tired of storing metal for projects in barrels.
“It seemed like I could never find the right piece of metal when I needed it. Leftover pieces went into a barrel and got buried. I often ended up grabbing a new piece when I could not find a scrap that I needed,” says Madsen.
He came up with the idea of building a metal rack for storage and putting a welding table on top. The two tables are made from 36 by 96-in. 3/8-in. steel plate. Madsen mounted a cut-off saw between the two tables.
“The tables make it easy to slide metal on top for cutting,” says Madsen.
He built the tables 4 years ago and the design has proven to be a good one. The front of the table has 3 different size slots: 36, 24 and 12 in. apart. The rack under the table holds 10-ft. lengths. Madsen cuts 20-ft. pieces in half to fit in the table.
Madsen spent about $1,000 on his tables using all new materials. Build time was about 20 hrs., with much of that time spent figuring out the best layout.
“Like anything, it would take half the time to build another one,” says Madsen.
“I painted them to match the rest of the benches in the shop. If I were to do it again, I would put a few more dividers on the front to keep small pieces from falling sideways. I thought about adding wheels to move it around but the metal would be too much weight.”
Contact: FARM SHOW Followup, Kurt Madsen, Box 41, Theodore, SK, Canada. S0A 4C0; ph (306-521-0097, [email protected]).
No filters are needed with Air Cleaning Blowers (ACB). The revolutionary technology cleans the air as it blows it into an enclosed space. Particles fall out as the air comes in.
“I have another business that makes air conditioning systems for difficult environments, such as steel plants and military installations and such, but they require filters,” says Ed Roston, Air Cleaning Blowers.
“I developed and patented this technology. It eliminates the need for filters, slows the spread of pathogens and protects the health of people and animals.”
Roston’s blowers work like any fan, pulling dirty air in, but the unique design of the impeller and the housing creates airflow pressure that spins particles off to the side. Depending on the situation, particles, such as dust from grain systems, can be fed back into the material. In other cases, such as livestock facilities or equipment cabs, the particles are ejected outside the enclosure.
Filtration systems catch and hold the particles. Eventually this decreases the effectiveness of the fan, increases power consumption and requires replacement or cleaning. ACB eliminates all of that.
Independent testing found the ACBs remove 98 percent of the mass of dust and dust particles in the air. This removes virtually all particles large than 10 microns, such as pollen and spores from plants, and about 40 percent of particles down to 3 microns, such as grain dust (5 microns and larger) and molds (3 to 12 microns).
“Our ACBs also remove rain, mist and snow,” says Roston.
“This eliminates wet or frozen filters blocking airflow, shedding water in the building and encouraging mold growth. It also reduces the load on dehumidification systems.”
“The slight positive pressure created with our blowers helps keep dust out of the cab or modular building being ventilated,” says Roston.
“Pressurization helps reduce dust around electrical components, which can be a big issue.”
ACBs can be designed to move from 50 to 3,500 cubic feet per minute of airflow needed for anything from a computer to a large factory. Roston says the model recommended depends on the size of the enclosure, changes per hour and whether the customer simply needs fresh clean air or wishes to pressurize the area. If the latter, leakage must also be considered. He notes that other factors in designing a system include whether dissipating heat, or actively ventilating to cool the area.
Roston estimates his filterless, clean air system costs about 30 percent more than a standard fan without filtration. He is actively looking for distributors and dealers. At this point, all sales are direct from the company with customized solutions.
“FARM SHOW subscribers with a clean air need should give me a call to discuss the situation,” says Roston.
“Once we figure out what is needed, we can price it.”
Contact: FARM SHOW Followup, Air Cleaning Blowers, P.O. Box 503, Clintondale, N.Y. 12515 (ph 845 244-3091; [email protected]; www.aircleaningblowers.com).
Roy Albertson keeps his drill bits sharp with an adjustable jig. A chuck threaded to a 1/2-in. bolt with a lock nut rides on the jig and holds the bit against the flat side of a grinding stone. Sliding components allow for minute adjustment, as well as simply flipping the bit over to sharpen the opposing side.
“I designed it to be easier to use than others I have seen or used,” says Albertson.
“The sharpening can be monitored and adjustments made on the jig without loosening or moving the bit.”
The jig consists of a base with a sliding center panel with two 1 1/2-in. wide uprights to hold the chuck and bit parallel to the work surface. Once the panel is in the desired position, holes drilled through the base allow it to be screwed to the work surface. Albertson used 3/16-in. thick steel for all the parts.
The working end of the 3-in. wide base is cut at a 30-degree angle with a long edge of 13 1/2 in. Two 3/4-in. strips attached to the sides of the base plate form shoulders for the sliding panel. A hole drilled and threaded in the center of the base houses a lock knob to secure the sliding panel.
The 1 1/2-in. by 8-in. sliding panel has a long center slot that rides over the threaded hole. The upright at the leading edge of the panel serves as a rest for the chuck cradle. It has a threaded hold for a locking knob. The rear upright is slotted to cradle the 1/2-in. bolt.
The chuck cradle is designed to pivot on the upright. A curved slot on the vertical face of the cradle allows it to pivot when the threaded knob is loose. The cradle has a half circle cut out for the chuck to rest in with right angle 1 1/4 long by 1/2-in high chuck stops to either side. The chuck has a roll pin in it that rests against the chuck stops. To switch bit sides for sharpening, simply rotate the roll pin 180o.
“Other sharpeners require removing the bit and repositioning it,” says Albertson.
“This jig lets you monitor and adjust the bit on the jig.”
To sharpen a bit, Albertson sets a 2 by 4 against the grinding wheel and marks the edge with a pencil line. The angled edge of the base plate is placed against the line and secured to the work surface. The bit is placed in the chuck with one of the cutting edges aligned with the punch mark on the face of the chuck. The bit is then tightened in place, and the chuck/bolt assembly is set on the jig rests. The lock nut against the chuck is loosened and the length of the bolt adjusted so the bolt head rides against the rest and the chuck sits in its cradle. With the cutting edge of the bit against the grinding wheel, the locking nut on the slide is tightened down. The design of the chuck will provide about a 1/4-in. play.
“Once I start the grinder, I can slide the chuck-bolt assembly forward and into the wheel, pull it back and flip the pin over to sharpen the other cutting edge of the bit,” says Albertson.
“To remove more metal, I loosen the lock nut and lengthen the bolt a quarter of a turn, snug down the nut and repeat.”
“My personal situation makes it difficult to respond to requests for information,” says Albertson.
“I hope FARM SHOW readers will be able to use this information to fashion their own drill bit sharpener.”
Contact: FARM SHOW Followup, Roy Albertson, 731 Hwy 3, Armstrong, Mo. 65230.
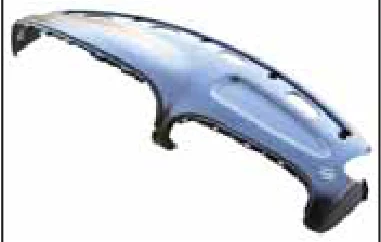
Back in 2016, Geno’s Garage of Cumming, Ga., needed to find a dashboard replacement for their 1999 Dodge truck. They soon found out they weren’t the only ones in need of a new dash.
“At one time, Dodge trucks were notorious for dash failures,” says Brandon Jacobs, who works in product development for Geno’s Garage.
“That was especially true with the 1998 to 2002 models.
“If your dash weren’t shattered, cracked, or otherwise falling apart, it was only a matter of time before it would be,” he adds.
Geno’s started getting a lot of requests for replacement Dodge dashboards. Jacobs says they’d tried using replacements supplied by other companies but weren’t satisfied with them.
“We met with a small plastics company that told us they could make one, and off we went,” he says.
The process was a little easier because they didn’t want to modify the dashboard, only find materials that would make it stronger.
“We just reverse-engineered the original,” he says.
“We use an ABS plastic in forming the new dash, which will hold up better under sunlight and won’t warp,” he says.
They also doubled the plastic on the new dashboards at the mounting points to make them more robust.
The replacement dashboard sells for $259.95.
Contact: FARM SHOW Followup, Brandon Jacobs, Geno’s Garage, 1150 Samples Drive, Cumming, Ga. 30041 (ph 800- 755-1715; www.genosgarage.com).
“After hurting my back lifting the loading ramps on our flatbed trailer, I decided I had to do something to make the job easier,” says Chester Kimber, Amistad, N. Mexico.
“So I attached a hand-cranked winch to a 5-ft. long pipe and put a pulley at the top. Then I ran the winch cable up to the pulley and down to the end of the ramp. Makes it easy to lift the ramp off the trailer or ground.
“I can mount the apparatus on either side of the trailer to lift each ramp. The pipe just slides into a slot on each side of the trailer. There’s a hook to attach to on the side of each ramp.”
Contact: FARM SHOW Followup, Chester Kimber, Amistad, N.M. 88410 (ph 575 633-2016).