Practical ideas from FARM SHOW MagazineSubscribe · Free issue · Send us your shop tip
Subscribe to FARM SHOW
Issues / Vol. 28, No. 1 (2004)

Vol. 28, No. 1 (2004)

Money-Saving Repairs & Maintenance Shortcuts · Printed section pp. 36–39

43 selected entries · Complete text of selected entries

This issue’s section includes reader tips and feature-length shop stories. Held items and editorial notices are not reproduced.

Archive text: prices, coupons, availability and contact details reflect the original publication, not current offers. Reader methods are not universal instructions; follow manufacturer guidance and proper safety practices.

Reader shop tips

From the archive · Full text
Reader shop tip

E.H. Underwood

E.H. Underwood, Belleview, Mo.

“The article by Donald Woehl of Morrison, Ill., in the last issue about a problem with the Deere 720 he converted over to electronic ignition, sounded like a problem I had with a tractor I converted from 6 to 12 volts.

“I talked with a local parts dealer who suggested I check the ignition system for the original resistor that was in the 6-volt system. I did not locate an original type resis-tor. One was ordered and installed and I have not had any more ignition problems since then. Maybe installing a resistor will solve the problem for Mr. Woehl as well.”

From the archive · Full text
Reader shop tip 1 of 2

Walter Brenner

Individual tip 1 of 2 from this reader’s published contribution.
Walter Brenner, Bredenbury, Sask.

“The wheel rims on my 1990 GMC 1/2-ton pickup fit very tight on the hubs. They are difficult to remove when you need a tire change. If I have to change a tire, I loosen all the wheel nuts first. Then I get in the truck and drive it a few feet. This loosens the rim. Once it’s loose, I put the jack under, raise the vehicle and change the tire.

From the archive · Full text
Reader shop tip 2 of 2

Walter Brenner

Individual tip 2 of 2 from this reader’s published contribution.
Walter Brenner, Bredenbury, Sask.

“I also have trouble with the brake light staying on in this GMC. To solve the problem, I simply unhook the battery cable for a few minutes and then hook it up again. This allows the computer to reprogram itself and everything will work fine again. Some of my neighbors have had the same trouble and were able to correct it using this method.”

From the archive · Full text
Reader shop tip 1 of 2

Cary Urka

Individual tip 1 of 2 from this reader’s published contribution.
Cary Urka, Brethren, Mich.

“I made a handy message area in my shop by mounting a “foreman’s desk” and cabinet along one of the walls. The desk is equipped with a phone answering machine and a speaker phone which lets me talk without using my hands. This setup often eliminates the need to go into my office. The answering machine is equipped with caller I.D. and a flashing light so I can see right away if someone has called and who it is.

From the archive · Full text
Reader shop tip 2 of 2

Cary Urka

Individual tip 2 of 2 from this reader’s published contribution.
Cary Urka, Brethren, Mich.

“We have a bathroom in our shop as well as two wash-up sinks. I installed a urinal that I made out of a 5-gal. bucket next to one of the sinks. A sink drain fixture attaches to the bottom of the bucket, and a shower head mounts at the top to flush it out. I use a valve handle attached to the shower head to re-lease a shot of water.”

From the archive · Full text
Reader shop tip

Gary McJunkin

Gary McJunkin, Burdett, Kansas

“Whenever you’re greasing U-joints or tie rod ends, keep pumping until clean grease pushes past the seals. This has the same effect as changing the oil in an engine. You want to get rid of contaminated grease.”

From the archive · Full text
Reader shop tip

John Orth

John Orth, Greeley, Colo.

“I own a Bush Hog 60-in. Razor Back mower and had trouble with the trailing wheel shearing off just above the yoke that the wheel pivots on. To solve the problem, I welded two metal wings to the top of the yoke which are used to support a new pivot plate. The pivot plate is positioned about 5 in. higher up on the pivot shaft and reinforces the shaft joint at the top of the yoke. Then I adjusted the deck’s height to compensate for the extra lift. No more problems.”

From the archive · Full text
Reader shop tip

Steven Turner

Steven Turner, Ft. Worth, Texas

“The wooden-handled tools made today for small home gardens often seem too weak. I’ve found the best way to make these tools more durable is to sand the handles lightly and then apply several coats of a marine varnish.”

From the archive · Full text
Reader shop tip

Claude W. Reeson

Claude W. Reeson, Spring Grove, Va.

“The simplest yet handiest modification I’ve made to my farm equipment was to add a hydraulic top link to my tractor’s 3-pt. hitch. I’d never purchase a tractor that didn’t have at least one extra remote to operate a hydraulic top link.”

From the archive · Full text
Reader shop tip

Bill and C.F. Marley

Bill and C.F. Marley, Nokomis, Ill.

“A set of ready-made concrete house steps serves a double purpose as a platform for a lightweight ramp and a nice work surface for jobs just outside our shop. The ramp is 12 ft. long and is made from double sheets of plywood mounted on top of 2 by 4 rails. There’s a supporting bridge midway up the ramp.”

From the archive · Full text
Reader shop tip

Chris Gilbert

Chris Gilbert, Waterford, Mich.

“I had a shaft with threads damaged so badly that I couldn’t put a new nut back on. I tried using my trusty re-thread files with no luck. Then I thought about how I fix the problem when I cut a piece of threaded rod by putting the nut on first and then screwing it off after cutting to push the threads back into place. So I did just that. I cut a nut in half from point to point and then used a locking pliers to hold the nut together around the threaded part that’s still good. Then I unscrewed over the damaged threads. I’ve used this idea on many different kinds of shafts and bolts.”

From the archive · Full text
Reader shop tip

Bron Wentzel

Bron Wentzel, Pivot Point, Box 488, Hustisford, Wis. 53034 ph 800 222-2231 or 920 349-3251; fax 920 349-3253; website

www.pivotpins.com): “Our company offers a wide variety of non-threaded fasteners including clevis pins, detent clevis pins, lynch pins, wire lock pins, tab lock pins, detent ring pins, positive lock pins, pull pins, ball plung-ers, ring pins, bent arm pins, and headless pins. We also offer steel and nylon lanyards, bulk cable, bulk terminals, cable cutters and crimp tools, press lock rivets, bow-tie locking cotters, rue ring locking cotters, hair pin cotters, and infinity S-hooks. We sell to some catalog sources and many OEM’s and are continually researching and developing new fastener solutions.

“Most of our products have been developed to solve a customer’s needs and then they become standard products for us. We specialize in custom fastener solutions, often in smaller quantity, and in specially engineered situations. Our products hold extremely tight tolerances where necessary and are ISO 9001 certified.

“

From the archive · Full text
Reader shop tip

Ken Armstrong

Ken Armstrong, Box 340, Point, Texas 75472 (ph 903 598-2855)

“Several years ago I knocked out the gearbox on my old Vermeer 605E round baler. My dealer said the company no longer made that gearbox and that I’d have to adapt a new gearbox designed for Deere balers which would’ve cost about $500. I didn’t want to spend that much money so I took the rear end out of a 1972 Ford car and welded it up solid to convert it into a gearbox, which I mounted in place of the original gearbox. Then I bought a sprocket and mounted it on the end of the axle. The sprocket was sized to keep the speed the same as the baler speed. Then I hooked the tractor’s pto shaft to the gearbox. My total cost was about $125. I made the change nine years ago and haven’t had any problems at all.”

From the archive · Full text
Reader shop tip

Robert Friesen

Robert Friesen, Crooked Creek, Alberta

“I used to be in the fencing business and helped put up fences on game farms. To make it easier to do the job, I came up with this ‘wire twister’ that’s powered by a standard DeWalt 18-volt cordless drill. It grabs one end of the wire and twists it around itself a few times. You manually put all the wires around the post and then give them a half turn. Then you use my invention to fin- ish twisting the wire.

“It consists of the gearbox out of a Black & Decker angle grinder head, with the gears from a boat winch added to it. The gears extend the angle drive and have a slot cut into them. I used 3/4-in. sq. tubing to make straps that connect the gearbox to the drill’s handle and to the top of the drill.”

From the archive · Full text
Reader shop tip

Dakota Riggers

Dakota Riggers, 704 East Benson, Sioux Falls, S. Dak. 57104 (ph 800 888-1612; website

www.dakotariggers.com): This company offers a wide variety of wire rope assemblies and also nylon tie-down straps for hauling big bales, etc. They also sell winch lines and overhead hoist cables for shops.

“Most of our business is directed toward contractors and utility companies, but we also sell direct to farmers,” says a company spokesman.

From the archive · Full text
Reader shop tip

John Liska

John Liska, Raymond, Alberta

“When the hydraulic pump went out on my Cockshutt 1250 tractor, I no longer could raise or lower the 3-pt. However, I still wanted to use the tractor to pull my 5-ft., 3-pt. mounted, pto-driven mower. To keep the lower lift arms - and the mower - from drag-ging on the ground, I placed a 2-ft. long, 4 by 4 wooden block on top of the drawbar and under the lift arms.

“The block keeps the mower in a fixed position at the proper working height. The mower is supported on back by a single wheel. Anyone could use this idea. The thickness of the block depends on the height of the drawbar and on the type of 3-pt. implement you’re using.”

From the archive · Full text
Reader shop tip

Paul Miller

Paul Miller, Belmond, Iowa

“Whenever the greaseless bearings go out on a roller on my round baler, I buy steel tubing from my steel supplier and press in new bearings. It costs less than 1/4 the cost of a new roller from the company.”

From the archive · Full text
Reader shop tip

Brent Norton

Brent Norton, Lodi, Ohio

“I’ve found that WD-40 penetrating oil works great as a hand cleaner. I cut deep into a paper towel tube and slip the can inside it. That way, whenever I spray my hands I have a rag right there to use.”

From the archive · Full text
Reader shop tip

Richard D. Norman

Richard D. Norman, Akron, Ind.

“In your last issue Edward B. Edelen, Jr., of Bryantown, Md., said that when the diesel fuel injection pump on his Deere 3010 tractor failed, he was able to get it working again by rigging up a system to relieve pressure on the fuel return line from the injector. Using two ‘T’ fittings, he plumbed in another line from the return line to the supply line and then to the fuel tank. I think he needs to get that injection pump removed right away. The governor weight retainer ring inside has failed, causing the return line to plug up. What he did is only a temporary fix. He will find that the engine will either run away after the weight retainer pins break off, or the broken pins will lock up the hydraulic head, also breaking the driveshaft, and his pump will then be totally ruined. I know because I used to work at a diesel pump shop and still take on some older pumps to repair at home.”

From the archive · Full text
Reader shop tip

David Huppert

David Huppert, Ellsworth, Wis.

“I find that a length of 3 or 4-in. dia. PVC pipe makes a handy place to put my arc welding rod whenever my welder is running. It leaves my hands free to do anything. I cut the pipe to whatever length, then tie it to one of the legs on my welding table. It’s a simple, low cost idea.”

From the archive · Full text
Reader shop tip

Leo L. Stancel

Leo L. Stancel, Marion, Iowa

“I’m re-storing my 1938 Deere G tractor and wanted to sand blast and repaint it outside my shop.

So I built this 4-wheeled dolly that lets me use my garden tractor to pull the tractor - with the wheels off - outside the shop. It pulls real easy. I used 4-in. sq. tubing to build it. Four bolts hold the dolly to the tractor, using existing tractor bolt holes. The dolly also fits Deere A and B tractors with the same bolt holes.”

From the archive · Full text
Reader shop tip

Guy Ramsey

Guy Ramsey, Nenana, Alaska

“I just paid $411 to have a fuel pump replaced in my 1990 Chevrolet 4-WD pickup, plus $240 to have it hauled 60 miles to Fairbanks. Can anyone tell me how GM came up with the absurd idea of putting a pump inside the gas tank so the whole tank has to be drained and removed just to replace a simple pump? Is there any way I can put a pump in the line?”

From the archive · Full text
Reader shop tip

Daniel Krenzel

Daniel Krenzel, Cullman, Alabama

“In your last issue I read the article by David Sheffield on carbonized rods. I remember as a young boy my dad welded up the worn drawbar holes on our tractor using hard surface welding rods and keeping the holes open using a carbon rod. The rod came from the center anode from our telephone batteries.

“The rod was 1 in. in diameter and 6 in. long, and made from very dense carbon/graphite. He would reduce the rod to the size he needed with a grindstone to fit the intended size of the hitch hole. He then just fill-welded the hole from bottom to top. He would cut the carbon rod away from the bottom with a hacksaw, leaving the weld locked piece in the hole and put the remainder into our welding supply box for the next time. The piece welded in place was then pulverized with a punch and we were ready to hook up and go.”

From the archive · Full text
Reader shop tip

Bruce Graham

Bruce Graham, Tyler, Texas

“I stripped out a thread where the flywheel bolts onto the crankshaft of an engine which was already assembled. I certainly didn’t want to have to pull out the engine again in order to fix the (Continued on next page) (continued from previous page) threads, but I was concerned about tapping a thread insert into the hub without a proper alignment tool. I tried to tap it by freehand but wasn’t able to get the tap to start properly.

“To solve the problem, I took a piece of wood from a 2 by 4 and made a guide bushing out of it by drilling it to the tap drill size on my drill press. I also located and put two additional holes in it to bolt it to the hub. I drilled the stripped hole with the proper tap drill for the insert, using the wood block to guide it. Then I tapped it with the wood block in place, which guided and propelled the tap forward to make a perfectly tapped hole in the hub. This method can be used for any stripped out hole where a piece of wood can be bolted or clamped over it.”

From the archive · Full text
Reader shop tip

J.B. Gingrich

J.B. Gingrich, Inc., 169 Katherine St. N., RR 2, West Montrose, Ontario, Canada N0B 2V0 ph 519 664-3826)

“Our new angle rings are made from 10-ga. steel and have a seamless design. They’re available with or without holes and in black or galvanized steel. They can be used for ductwork or spouting.

They’re slightly oversized for ease of installation when slight angles are anticipated.

“We also recently introduced new angle ring clamps to complement our angle rings for a true 360-degree grip. You can use them to make stronger joints than bolting rings together. Speeds up installation and allows fast removal of segments. The clamps are made from 10-ga. galvanized steel and come in complete sets of two, with bolts included.”

From the archive · Full text
Reader shop tip

Steve Rea

Steve Rea, Salem, Ohio

“I’ve had problems breaking axle bolts on my Case 1845 Uni-Loader. Replacing the bolts is tough because I can’t get my hand into the holes to install them. I called the dealer and was told to pull the axle housing off. However, after studying the situation I came up with a better way. I welded a small nut on the end of an axle bolt. The nut is smaller than the diameter of the bolt and sits on its side. I used low temperature when welding the nut to avoid damaging the bolt. Then I took a piece of mechanic’s wire and fished it through the axle bolt hole and up through the axle chain inspection hole. I run the wire through the small nut and pull the bolt through the hole and put the nut on. This procedure saved me hours of downtime and a lot of work. I always keep at least one axle bolt - with a nut attached to it - on hand in case of an emergency.”

From the archive · Full text
Reader shop tip 1 of 2

Roger Wessels

Individual tip 1 of 2 from this reader’s published contribution.
Roger Wessels, Fairbury, Ill.

“The under-the-hood air cleaner on my Deere 4520 tractor was hard to get at so I replaced it with a big air cleaner off an old Allis Chalmers tractor. It consists of a big metal cylinder that I mounted on a steel I-beam which I bolted lengthwise to one side of the tractor. I inserted a piece of 4-in. dia. PVC pipe into the top of the tank. It puts the air cleaner out in the open where it’s much easier to service.

From the archive · Full text
Reader shop tip 2 of 2

Roger Wessels

Individual tip 2 of 2 from this reader’s published contribution.
Roger Wessels, Fairbury, Ill.

“To make it easier to get on the tractor, I added a wooden ‘stepping plank’ that reaches from one side of the tractor to the other and extends out about 3 ft. on each side.”

Shop feature stories

From the archive · Full text
Feature story

Simple Repair Kit Solves Case IH Combine Problem

Featured source:

As a mechanic for more than 20 years, Gor-don Enner, Jr., of Ross, N. Dak., has spent many hours working inside, under and on top of Case-IH combines. He concluded that several cleaning system problems on Case IH’s long sieve combines could be reduced or eliminated with a relatively inexpensive and simple modification. He perfected the idea and recently decided to market a do-it-your-self kit.

His Cleaning System Repair Kit is designed for the Case IH 1680, 1688, 2188, and 2388 long sieve combine models, which were introduced in 1990.

“The kit eliminates problems with broken sieves, failed bearing supports, failed bushings, broken drive shafts, and damage to the tailing auger trough. The only way to assess the extent of any damage is to disassemble and inspect all cleaning system components,” says Enner.

The basic problem with the cleaning system on these Case IH models, says Enner, is that the gap between the shoe and the rear steering axle isn’t big enough for the shoe. As a result, on its backstroke the shoe comes into contact with the top of the steering axle support and the sides of the chaffer rail hit the auger bed corners. On its forward stroke, the shoe hits the tailings auger cover.

“This internal contact is causing all the problems with these cleaning systems,” says Enner.

“The cost to replace the chaffer is about $1,000.”

The kit includes spacers that move the axle back 3/4 of an inch, making the gap big enough for installation of a rubber flap which is another component of the kit.

“It will lower your repair costs and reduce downtime during harvest. It takes about 8 hours to install the components, and there’s no need for any special tools.”

The kit sells for $270 plus S&H. Contact: FARM SHOW Followup, Gordon Enner, Jr., Heartland Repair Service, Box 22, Ross, N. Dak. 58766 (ph/fax 701 755-3326).

From the archive · Full text
Feature story

Rotating “Tool Caddy”

Featured source:

Arvin De Cook needed a tool storage rack that would carry the most commonly used tools in his shop and could be easily pulled outside over uneven surfaces. He couldn’t find any commercially-built units, so he built his own 4-wheeled tool caddy that can be easily pulled by one person, or towed with a garden tractor or 4-wheeler.

“It pulls and steers like a wagon and is a great time-saving addition to our shop,” says De Cook.

The caddy chassis is made from discarded riding mower axles and rides on large pneumatic tires. A handle attaches to the front axle and tie rods. The axle and hub from a 2-ton truck mount vertically at the center of the chassis and support a six-sided sheet metal body, with hooks welded to it to hold various tools. The caddy’s body rotates on the truck axle bearings and hub, allowing easy access to any tool.

“It can hold up to 100 different tools, and each tool has a specific spot so I can see where it goes and which tool is missing,” says De Cook.

“The large pneumatic tires allow the caddy to roll easily over rough surfaces, so I can take my tools right to the repair job whether it’s across the shop or outside the shop. My out-of-pocket cost to build it was about $60.”

Contact: FARM SHOW Followup, Arvin De Cook, 9658 Hwy. F 62 E, Sully, Iowa 50251 (ph 641 594-3438).

From the archive · Full text
Feature story

Dolly-Mounted Toolbox Easy To Roll Around

Featured source:

James Vroman, Monett, Mo., wanted a toolbox that he could easily move around. So he removed the back caster wheels from a Waterloo 3-drawer roll-around toolbox and attached a 2-wheel dolly to the back.

“I use it for my job at a hospital where I do a lot of maintenance work. It’s really handy,” says Vroman.

“When I need to go to a different building, I tilt back on the handle and use just the dolly wheels. The big wheels spread the weight nicely, and the toolbox is only 2 ft. wide so it fits through doors easily. It’ll go right across grass or gravel with no problem, and if I want I can even go up and down stairs with it.

“I paid $70 for the toolbox and $15 for the dolly.”

The toolbox locks on solid to the dolly with six latches on each side. The latches are made from 3/4-in. conduit clamps, with two lengths of 1 1/2-in. sq. tubing used as spacers that make room for the toolbox lid to open. Bolts run from the toolbox through the tubing and into the clamps. A magnetic cabinet catch mounted on the dolly handle is used to hold the lid in the up position.

“The next one I build will have more ground clearance. When I go through door-ways now, I have to lift the toolbox over the door threshold,” says Vroman.

“I probably didn’t have to use as many latches as I did, but I wanted to make sure the toolbox would never come loose from the dolly.”

Contact: FARM SHOW Followup, James Vroman, 517 S. Hwy. 37, Monett, Mo. 65708 (ph 417 235-8461; email: [email protected]).

From the archive · Full text
Feature story

“Lazy Ole” Tool Holder

Featured source:

Frequently used tools are easy to get a hold of in Ole Wilner’s shop at Grove City, Minn., thanks to “Lazy Susan,” tool holders he built (or “Lazy Ole” tool holders, as his wife calls them).

“It took only a couple of hours to make and is really handy,” says Wilner.

He took an old car rim and welded 5/16-in. studs every 3 in. around the top. He cut holes around the bottom for hanging big wrenches from. Then he welded a 5-in. pulley to the center of the rim, so it would rotate on top of a 3-ft. pipe which is welded to a base made from a brake drum.

Contact: FARM SHOW Followup, Ole Wilner, 17585-545th Ave., Grove City, Minn. 56243 (ph 320 877-7786).

From the archive · Full text
Feature story

Wood Splitter Used To Bend Tubing

Featured source:

When the bottom rings on his round bale feeders began rusting through, Art Freymiller, Woodman, Wisconsin figured he could repair them himself.

He had a supply of the right sized square tubing to do the job. What he needed was a way to bend it.

After thinking it over, he turned to his 3-point mounted wood splitter.

Several years ago, he rebuilt the wood splitter, changing the ram from horizontal to vertical. The splitting wedge is attached to the ram, rather than stationary as it is on some hydraulic wood splitters.

“I figured if it could split wood, it could bend tubing,” he says. So, he made a die from scrap steel tubing, old wheels and strap iron to fit over the wedge. He added a piece of pipe on each end so the die wouldn’t crimp the tubing.

“I welded two pieces of steel onto the die to make a V in the center, so the die just fits over the wedge, without modifying the splitter at all,” he says. His die has a handle on it that lets him position it under the wedge when he’s bending.

“I was amazed at how well it works. I can bend a length of 1-in. or 1 1/4-in. tubing into a ring in just a few minutes with very little effort,” he says.

And, Freymiller notes, it didn’t cost a thing to make, since he made it from scrap parts he had on hand.

Contact: FARM SHOW Followup, Art Freymiller, 15161 Town Hall Rd., Woodman, Wis. 53827 (ph 608 533-3506).

From the archive · Full text
Feature story

Easy New Ways To “Pull” Nails

Featured source:

The Nail Kicker® denailer by RECONNX, Inc., is a handheld, air-powered nail remover that works up to four times faster than pulling nails by hand. It doesn’t just pull nails out. It “kicks” them out from the bottom.

It’s similar to a nail gun, but works in re-verse, kicking them out without damaging the wood.

According to RECONNX vice president and CEO Jon X. Giltner, the Nail Kicker can do a day’s worth of work in two hours.

“It can kick nails out of plywood, flooring, and even two-ply material without damaging the wood surfaces,” says Giltner.

“Of course, the nail size, lumber thickness, species, moisture content, and skill of the operator all affect the resistance of a nail. As with any tool, operators get more proficient with practice. We can say that if the Nail Kicker can fit over the nail, it will move the nail.”

The company’s “try-and-buy” return program allows customers to recoup the purchase price (minus a restocking fee), if they decide the unit doesn’t suit their needs.

The unit sells for $439 plus S&H. Contact: FARM SHOW Followup, Jon X. Giltner, RECONNX, Inc., P.O. Box 3009, Boulder, Colo. 80305 (ph 888 447-3873 or 303 554-8554; fax 303 554-8556; email: [email protected]; website: www.nailkicker.com).

The patent pending Nail Wrench by RECONNX, Inc., is a nail puller and screw remover that attaches to handheld drills. It removes nails and screws quickly by grabbing the head and spinning it out of the wood.

At a low to medium speed, the Nail Wrench drills into the wood and around the fastener like a hole saw, until the fastener is held firmly. It spins the drill or screw in place, so you can pull it out with the drill. The Nail Wrench goes into production later this year and will sell for less than $50.

Contact: FARM SHOW Followup, Jon X. Giltner, RECONNX, Inc., P.O. Box 3009, Boulder, Colo. 80305 (ph 888 447-3873 or 303 554-8554; fax 303 554-8556; email: [email protected]; website: www.reconnx.com).

From the archive · Full text
Feature story

Drill-Powered Pencil Sharpener

Featured source:

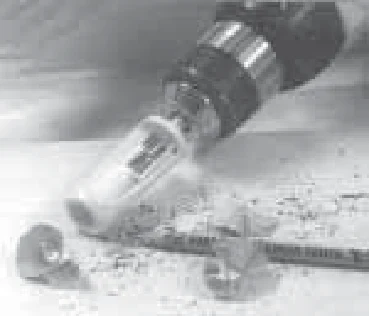
Dale Whitehead and Doug Henry work together making and installing cabinets, and both were tired of interrupting work to sharpen their pencils. Together they came up with the idea of a drill bit pencil sharpener that was fast and could be carried with them at all times. What resulted was the Pro-Sharp pencil kit.

The Pro-Sharp is made of heavy-duty plastic that is able to withstand the power of a standard 1/4-in. drill.

Because it fits almost any drill, the Pro-Sharp can be slipped on to sharpen a pencil in seconds and then quickly removed. It produces a long sharp point.

After building a prototype, Dale and Doug applied for and received a patent. They contacted the C.H. Hanson Co. to make and distribute the Pro-Sharp. The company makes other marking products, including a pencil holder that fits on a tape measure.

The Pro-Sharp kit, including 5 pencils, sells for $5.99.

Contact: FARM SHOW Followup, The C.H. Hanson Co., 3630 North Wolf Road, Franklin Park, Ill. 60131 (ph 800 827-3398; fax 800 827-5834; email: [email protected]; website: www.chhanson.com/prosharp).

From the archive · Full text
Feature story

State-Of-The-Art Oil Pumper

Featured source:

“Our customers tell us it’s the fastest and easiest-to-use hand transfer pump they’ve ever used,” says Sherry Walker, Hydraulic Problems, Inc., Days Creek, Oregon, about the company’s new Filter Pumper.

The unit can be used to handle any oils from 10 to 90 weight. It’s available in three different models that are designed to pump from 5, 16, or 55-gal. drums.

The pumps come with 6 ft. of hose. The models designed for 55-gal. drums thread into 2-in. bunge holes. A filter is available to re-move contaminants, if needed.

You can measure as you pump. Four complete strokes equals about one quart.

“Most commercial units pump only in one direction. The Filter Pumper pumps on both the up and down stroke so it works twice as fast,” says Walker.

“It can pump 5 gal. of hydraulic oil in only about 2 1/2 minutes. Another advantage is that it forms a tight seal on a 5-gal. container so if the container tips over, no oil will spill out. The pumps on other units don’t have enough power to pump oil through a filter. When used with quick disconnects or couplers, the oil is transferred without exposing the system to contamination.”

The model designed for 5-gal. buckets sells for $78 without the filter; $90 with it. The drum models sell for $15 more.

Contact: FARM SHOW Followup, Hydraulic Problems, Inc., Box 130, Days Creek, Oregon 97429 (ph 541 825-3690; fax 541 825-3692; email: [email protected]; website: www.filterpumper.com).

From the archive · Full text
Feature story

“Weight-Forward” Fiberglass Hammer

Featured source:

You wouldn’t think some tools could ever be improved but there’s always someone willing to try. The Weight Forward Hammer is a new version of one of man’s oldest tools from a company that’s been making hammers since 1923. The new hammer is slightly curved to place more weight at the point of contact, capturing power that the company says is normally lost to vibration.

The hammer’s fiberglass handle can withstand three times the pressure required by the American National Standards Institute.

The Weight Forward Hammer has a 21-oz. steel head. The face of the hammer can be smooth finished or milled and the handles come in lengths of 14 or 16 in. The head is inserted into the fiberglass handle and fastened at two points using a “Perma Fastening System.”

The handle itself is covered in a shock re-sistant grip that has been field tested for over two years. This ergonomically correct handle promises to reduce vibrations up to 50 percent.

The 14-in., smooth-faced hammer sells for $29.99, the 16-in., smooth-faced is $35.69 and the 16-in., milled-face hammer is $37.99.

Contact: FARM SHOW Followup, Estwing Manufacturing Co., 2747 8th St., Rockford, Ill. 61109 (ph 800 397-9558; fax 815 397-8665; website: www.estwing.com).

From the archive · Full text
Feature story

Home Built Shop Elevator

Featured source:

Instead of climbing stairs to get up to the 8-ft. high upper deck in his shop, Harry Engeland bought and modified an “electric-powered” platform. The unit was originally designed to lift a project up 3 ft. so it would be more accessible to work on.

Its electric motor drives a gearbox that winds a cable which raises or lowers the workbench.

“On back of it, there are rollers that run in a track and I just extended the track and put a new cable on. I also installed switches to start the lifting and lowering,” Engeland says.

Contact: FARM SHOW Followup, Harry Engeland, R.R. 4, Stratford, Ontario, Canada N5A 6S5 (ph 519 273-1983; fax 519 271-1826).

From the archive · Full text
Feature story

“Repair Trailer” Works Better Than A Truck

Featured source:

Lloyd Meffert, Hettick, Ill., does repair work for area farmers. When he heads out on a call, he always takes his home-built, 2-wheeled “repair trailer”.

He built the trailer out of an old camping trailer, angling down the frame in front so the trailer would pull level.

“I had been hauling all my repair equipment on a truck. A trailer is easier to use and also saves money on insurance and licenses,” says Meffert, noting that he saves at least $500 per year with a trailer compared to a truck. When the trailer is hooked up to his tow vehicle, the vehicle insurance carries over to the trailer.

Another advantage of the trailer is that he has access to his tools and equipment from all four sides, without having to climb over things or move stuff around.

The equipment that he hauls on the trailer includes four tanks containing oxygen, acetylene, carbon dioxide, and argon, as well as an 8,000-watt welding generator. An aluminum box in front of the trailer contains helmets, safety equipment, aprons, a sawzall, halogen lights, and a spool gun of aluminum wire.

On back there’s a 250-amp wire welder, an air compressor, a handyman jack, a set of mechanic’s tools, different kinds of welding rods, chains, binders, come-alongs and a sledge hammer.

“I use a dually 4-WD pickup to tow the trailer, so I’ve been able to get back into fields that were pretty muddy,” says Meffert.

“However, if I get into really bad field conditions I have the farmer put a tow ball on his tractor and then pull the trailer back where the work is.”

Contact: FARM SHOW Followup, Lloyd Meffert, RR 2, Box 73, Hettick, Ill. 62649 (ph 618 778-5519).

From the archive · Full text
Feature story

Drum Fix For Cyclo Planters

Featured source:

Crop Consultant Brian Freed says the most common complaint he’s heard over the years from his clients who use Case IH Cyclo Early Riser drum planters was that seed spacing in the row was uneven.

“When it comes to emergence, most feel it was better than other makes of planters, but they didn’t like the poor seed spacing,” Freed says.

Convinced that this was also costing his clients yield, Freed began looking for the reason for uneven seed drop that led to poor plant spacing.

“As I listened to the planter running, I noticed a continuous knocking or bumping sound. The source of this turned out to be the rubber wheels that shut off the vacuum and let the seeds drop down the seed tubes to the planting units. The wheels were bouncing into the dimples in the seed drum as they rolled,” he says.

Deciding that this bumping on the drum could cause the seed to drop unevenly, Freed had a local fabrication shop make a set of bands from flat aluminum stock that he could put over the drum in the path traveled by the cut-off wheels. Holes through the bands line up with the dimples in the seed drum, so the cut-off wheels still work properly. But since the dimples are gone from the wheel’s path, there’s no longer any bumping.

“Our experience is that this corrects the spacing problem and makes all those old Cyclo planters out there into the superior machines they were intended to be,” he says.

Contact: FARM SHOW Followup, Brian Freed, Ag Focus, Inc., 25033 N 2225 E Rd., Lexington, Ill. 61753 (ph 309 365-2771; fax 309 365-2781; email: [email protected]).

From the archive · Full text
Feature story

Kit Solves Gearbox Problems

Featured source:

Lyndal Hatton, DeBerry, Texas, came up with an inexpensive solution to a problem he had with his New Holland 616 mower.

“The mower is equipped with a big belt-driven gearbox that’s connected to a smaller gearbox underneath it, which powers a shaft that drives the sickle. One time all the oil drained out of the smaller gearbox which caused it to burn up. A new replacement gear-box cost me several hundred dollars.”

According to Hatton, the big upper gear-box is equipped with a vent that often gets covered with dirt, which can get under the vent’s relief valve and cause it to stick in the open position.

“Whenever you tilt the front part of the mower downward to adjust the cutting height, over time all the oil can drain out of the vent and ruin the gearbox. It’s hard to spot because the vent gets covered with dirt and leaves.”

To solve the problem, Hatton removed the vent and relocated it on top of the gearbox where it’s up higher and also out of the way of dirt and leaves. He installed a plug where the vent had been.

The small gearbox holds only 10 ounces of oil and tended to get hot. To add capacity, and to make sure he always knows there’s oil in the gearbox, he removed the fill plug from the gearbox and installed a manifold in its place. Then he connected a length of curved stainless steel tubing to the manifold. A hose runs from the tubing up to a section of 1 1/2-in. dia. clear plastic tubing that’s clamped onto the mower frame. The tubing serves as an oil reservoir. As oil inside the gearbox gets hot it expands up into the clear plastic tubing where it cools down.

“As long as I can see oil in the plastic tubing I know the gearbox has enough oil in it,” says Hatton.

“I made this modification three years ago and haven’t had any problems with it since then,” he says.

He’s now selling a $50 kit that includes the oil reservoir, vent fill replacement plug, hoses and tubing, and instructions.

“This kit can be used on all newer New Holland mowers including the 515, 616, and 717 models,” he notes.

Contact: FARM SHOW Followup, Lyndal Hatton, 389 CR 3311, DeBerry, Texas 75639 (ph 903 766-2320; email: tsargehatton @hotmail.com).

From the archive · Full text
Feature story

Air-Powered Shop Hoist

Featured source:

“It’s lightweight and much easier to use than hydraulic lifts and can be built a lot cheaper,” says Bruce Graham, Tyler, Texas, about his air-powered shop hoist.

A pair of air shocks are used to move the lift arm up and down. Air pressure is supplied by an on-board air compressor equipped with an electrical solenoid valve. The compressor motor runs off a battery that mounts on the frame. A non-powered hydraulic cylinder is used to lock the load into any position. A battery gauge and air pressure gauge mount just above the motor.

“I’ve used this unit in my shop for more than eight years and really like it,” says Gra-ham.

“I got the idea after the engine in my friend’s 4-WD pickup developed a valve train problem and we had to remove the cylinder heads. We put it together for that job and found it was a lot easier to use than a con-ventional hoist.”

The hoist can lift up to 150 lbs. Contact: FARM SHOW Followup, Bruce Graham, 13801 Eastside Road, Tyler, Texas 75707 (ph 903 566-1248; email: [email protected]).