Practical ideas from FARM SHOW MagazineSubscribe · Free issue · Send us your shop tip
Subscribe to FARM SHOW
Issues / Vol. 36, No. 5 (2012)

Vol. 36, No. 5 (2012)

Money-Saving Repairs & Maintenance Shortcuts · Printed section pp. 36–39

30 selected entries · Complete text of selected entries

This issue’s section includes reader tips and feature-length shop stories. Held items and editorial notices are not reproduced.

Archive text: prices, coupons, availability and contact details reflect the original publication, not current offers. Reader methods are not universal instructions; follow manufacturer guidance and proper safety practices.

Reader shop tips

From the archive · Full text
Reader shop tip

David Koepping

David Koepping, West Linn, Ore.

“Repairing a broken roller chain on my Case 1845 skidsteer was frustrating. I had trouble pulling the chain ends together and attaching the master link, all while working solo with oily and frozen fingers in a cramped space. Then I had an idea. I got a medium-sized plastic zip tie from my shop and slipped it over both chain ends. Then I cinched the zip tie up, pulling the ends together so I could easily attach the master link. It was a satisfying end to a frustrating day.”

From the archive · Full text
Reader shop tip 1 of 2

Steve Carey

Individual tip 1 of 2 from this reader’s published contribution.
Steve Carey, Boulder, Mont.

“One of my best money-saving ideas was switching to synthetic oil in pickups and going three times the recommended oil change intervals. The savings really add up.

From the archive · Full text
Reader shop tip 2 of 2

Steve Carey

Individual tip 2 of 2 from this reader’s published contribution.
Steve Carey, Boulder, Mont.

“A good time-saving idea is mounting an air hose near the shop doors. Makes filling up tractor and truck tires easier. Don’t have to mess with tangled-up hoses outside.”

From the archive · Full text
Reader shop tip

Richard Townsen

Richard Townsen, Camden, Tenn.

“I have problems removing the rechargeable batteries from power drills. It’s hard for me to push in the clips on both sides of the battery. I solved the problem by breaking out the clips on both sides and using duct tape to hold the batteries in place. Works just fine.”

From the archive · Full text
Reader shop tip

Kim Rudin

Kim Rudin, Owego, N.Y.

“I recently converted a used toilet into what I call a Redneck Shop Stool. The toilet mounts on a wood platform that rolls around on wheels off an old shopping cart, making the unit easy to move around. I use the tank to store cleaning supplies and stash rubber gloves and other supplies under the seat. The seat is about 30 in. high, so it’s the perfect height for my workbench. I can rest my feet on the platform, and the tank serves as a backrest for moments of relaxation.”

From the archive · Full text
Reader shop tip

Robert Dagen

Robert Dagen, Conneaut Lake, Penn.

“The vents on some of the newer gas cans are located inside the nozzles. So, if you remove the nozzle to pour a full stream you have no vent.

“I decided to come up with my own air vent. I drill a hole on top of the can and install an ordinary tire air valve in it, using a 2-ft. piece of wire to pull the valve up through the hole.”

From the archive · Full text
Reader shop tip

Art Spearman

Art Spearman, Independence, La.

“The inside clip that holds the pto lever in place on my 1961 Deere 1010 tractor came off. Rather than go through the trouble of breaking the tractor in half to replace the clip, I simply bolted a 3/4-in. thick by 5-in. long piece of flat bar across the pto shaft handle in order to hold it in place. I used a magnet to reclip.”

From the archive · Full text
Reader shop tip

Kevin Holland

Kevin Holland, Sandy, Vt.

“Here’s an idea I use whenever I want to work on the hydraulic pump on my 1939 Ford 9N tractor, or change out the pto shaft. I park the tractor on a slight hump in my yard so that its front end faces downhill at an angle. That way very little hydraulic fluid will run out at the back of the tractor.”

From the archive · Full text
Reader shop tip

Lonnie Rixen

Lonnie Rixen, Sabula, Iowa

“The shifting cables on Deere combines and choppers can become gummy, making them hard to shift. To solve the problem, I remove the cable and put an electric drill on the end to turn the center wire as I oil it. I turn the cable in the same direction as it was coiled in order to keep from damaging it.”

From the archive · Full text
Reader shop tip

Hemmings Motor News

Hemmings Motor News, (www. hemmings.com)

The popular auto magazine recently published a story about an old-time product designed to extend battery life. VX-6 was sold in a yellow and black box, often with a photo of NASCAR legend Lee Petty saying, “I’d rather race without tires than without VX-6 in my battery”. VX-6 is actually cadmium that’s supposed to prevent or halt the buildup of sulfation. The idea was to insert small doses into each cell of a new battery. Original VX-6 boxes and their contents have become collectable items, with an asking price of $5 to $20. They’re especially popular with lifelong N A S C A R f a n s .

However, the product hasn’t disappeared with time. Today, it’s marketed under the brand name Charge-It Concentrated Battery Additive. It’s sold in 2-oz. ($4.99) and 32-oz. bottles ($21.95) on www.amazon.com.

From the archive · Full text
Reader shop tip

Stephan Rodamaker

Stephan Rodamaker, Janesville, Iowa

“I own Deere 2505 and 2210 tractors. By cutting an access hole in the floor and cowel I can lubricate the U-joints and yoke. Otherwise, it’s a costly expense.”

From the archive · Full text
Reader shop tip

Mike Marshall

Mike Marshall, Orchard Park, N.Y.

“I work for a local milk processing plant and recently made this portable removable vise for our service truck. Works great for road calls.

“The vise bolts onto a square steel plate that bolts onto a vertical length of 2-in. sq. tubing. A round tow hook off a Volvo semi truck is welded to the bottom of the tubing and pins onto the pickup’s receiver hitch. Whenever we need to use the vise on a job, we just bolt it onto the plate and go. The only limitation is that with the vise mounted we can’t open the tailgate. However, it takes less than 5 min. to remove the 3 bolts from the plate.”

From the archive · Full text
Reader shop tip

Harold Fratzke

Harold Fratzke, Cottonwood, Minn.

“Putting on dual wheels doesn’t have to be a difficult job. All I do is jack up the tractor. I made 2 stud bolts that screw into the casting. I roll the dual up to the casting and turn the tractor wheel to line up the stud bolts with the holes in the dual. Then I slip the dual onto the stud bolts and install the other bolts. The final step is to remove the stud bolts.”

From the archive · Full text
Reader shop tip

Greg Perry

Greg Perry, Casper, Wyo.

“We have a service truck to fix equipment in the field. The truck has a hose reel that pulls out and hooks up to the oil pan to suck out used oil which eliminates a drain pan and all that mess.”

From the archive · Full text
Reader shop tip

Wesley Walker

Wesley Walker, Cooper, Texas

“I had a problem with the gearshift lever on my IH 86 Series tractor. The lever is made out of common bar stock and it wears around the vertical transmission shaft, which makes shifting gears difficult. To solve the problem, I cut the shaft hole in line with the bar and then welded a 3/8-in. nut on 1 side of the cut and a 7/16-in. nut on the other side. Then I put in a 3/8-in. bolt, dropped it over the shaft, and tightened the bolt. No more slack in the gearshift lever.”

From the archive · Full text
Reader shop tip 1 of 2

Curtis Footh

Individual tip 1 of 2 from this reader’s published contribution.
Curtis Footh, Stanley, N. Dak.

“I built this portable service rack for my shop out of an old front end alignment rack that I bought at an auction for $150. I use it with tall jackstands and a high-lift hydraulic jack to change the oil and to do repair work on cars and pickups. The rack rides on a pair of old 4-ft. high steel wheels, making it easy to move in or out of my shop. I use a loader tractor to pick up the opposite end and steer it.

“The rack is about 25 ft. long including a pair of 5-ft. ramps. The wheel channels are 14 in. wide and spaced 6 ft. apart.

“The rack was originally fastened to the floor by a pair of steel I-beams. I bolted a pair of 2-in. angle irons on back in place of the I-beams and a pipe on front to keep the wheel channels stable.

“The wheels are attached to a pipe axle and can be removed by pulling a pin. The jack stands have steel discs welded on the bottom to keep them stable.

“The big advantage of this rack is the vehicle is high enough that I can sit up instead of having to lay down on a creeper.

From the archive · Full text
Reader shop tip 2 of 2

Curtis Footh

Individual tip 2 of 2 from this reader’s published contribution.
Curtis Footh, Stanley, N. Dak.

“I used a 4-ft. length of railroad rail and angle iron to build this heavy duty sawhorse and anvil. Works great whenever I need to split a tractor. I slide the sawhorse under the tractor frame and shim it to keep it at the height needed; then roll the tractor away on a jack. Also works great for straightening out dented parts.”

From the archive · Full text
Reader shop tip

Bob Depperman

Bob Depperman, Kennard, Neb.

He has been installing his own zerks on farm equipment for the past 40 years. He warns that zerk repair can be tricky.

“To install a zerk, lay the dust cap (inside up) on a block of soft wood, and use a punch to make a dent where you want the zerk. You want to place it so when the zerk is installed, it will clear the spindle nut. Flip the cap over and drill a 3/16-in. hole through the now protruding dent. The hole is perfect for tapping in a 1/4-in., 28-thread, automobile style grease zerk.

“If a zerk comes loose or won’t hold, you can braze a 1/4-in., 28-thread nut over the hole,” he says.

From the archive · Full text
Reader shop tip

Glen Schweppe

Glen Schweppe, Syracuse, Neb.

Glen recently sent FARM SHOW photos of how he replaced the incandescent light bulbs on his old mercury vapor outdoor yard lights with compact fluorescent light bulbs (CFL), which are less costly to operate. He removes the transformers from the outdoor lights, leaving the crossbar that holds the shade on and leaving the electric eye on top. He drills 2 or 3 holes in the shade to accept snap-in porcelain lamp holders. Then he installs three 13-watt bulbs, which replace the yard light’s original three 60-watt bulbs.

“We’ve replaced all our mercury vapor outdoor lights with CFL bulbs this way, with no problems. As a result we’ve saved a lot on our electric bill,” says Schweppe.

“The CFL bulbs aren’t as bright as the original bulbs but they’re cheaper to operate. And if one bulb burns out there’ll still be two working lights. The shade comes with a round hole in the center, where I glue in a screen to keep bugs out.” Proper electrical rewiring is important, says Schweppe.

“All the outdoor lights I’ve worked on have 3 wires coming out of the electric eye. On the wires coming in, I use the black as positive and hook it up to the other black wire on the electric eye. I hook white or negative to all white wires. I hook up the red wire from the electric eye to all black wires from the lamps.”

Shop feature stories

From the archive · Full text
Feature story

He Put An Oil Leak To Good Use

Featured source:

Hank Psolka of Dallas, Penn., recently sent FARM SHOW photos of how he put an oil leak on his tractor to good use.

“The diverter valve on my International 3414 tractor leaked from day one,” says Psolka.

“Oil would slowly drip onto the coveralls on my left leg, which drove me crazy. The problem persisted no matter how many times I changed the O-rings.

“Rather than fix the leak I decided to get creative. I got a Penzoil oil bottle and cut it out so it would fit in back and underneath the valve body. Now when the valve drips the oil bottle catches the oil and it flows to the bottle’s spout. I screwed in a 1/4-in. insert coupled to a length of Tygon tubing. The oil flows through the tubing to the tractor’s lower frame where it’s used to constantly lubricate some big bushings.” Contact: FARM SHOW Followup, Hank Psolka, 411 Old Mill Rd., Dallas, Penn. 18612 (ph 570 333-5226).

From the archive · Full text
Feature story

“Backwards” Engine Hoist Makes A Great Shop Crane

Featured source:

“I came up with a portable shop crane by turning a standard engine hoist backwards,” says Steve Brouillard of Early, Texas.

“The engine hoist worked great for lifting engines, but was not so great as a utility hoist because the legs kept me from getting close to what I wanted to lift,” says Brouillard. He solved the problem by turning the mast around and adding a big chunk of I-beam as a counterweight to the other end. He also welded the folding frame together to add rigidity and stability to the hoist.

“For an additional $100 I replaced the original hand-pumped hydraulic lift cylinder with an air-over-hydraulic cylinder, to speed up the lift,” says Brouillard.

“I also added ‘remote’ operating rods to the crane’s air valve and hydraulic release valve, which allows me to operate both valves from the front of the unit while controlling a load. I also welded a ‘T’ handle onto the I-beam counterweight, which I use to roll the unit around.” While the original hoist was rated at 2 tons, Brouillard says his redesigned model will lift 800 lbs.

“If I need more capacity I can simply add more counterweight,” he says. Contact: FARM SHOW Followup, Steve Brouillard, 1121 N. County Road 310, Early, Texas 76802 (ph 325 646-2701; [email protected]).

From the archive · Full text
Feature story

Air Intakes, Exhausts Boost Diesel Engine Efficiency

Featured source:

You can boost the performance and efficiency of diesel engines with aftermarket products that modify air intakes and exhausts. Several products are available for diesel pickup engines and brand name farm equipment. internet only company that offers a modified air intake package for the 12 and 24-valve Cummins diesels used by Dodge Rams and the Powerstroke diesels used in Super Duty Ford pickups. Pusher says that its Cross Air intake system will increase air flow, boost turbo speed, lower EGT’s and produce better fuel economy. The Cross Air system has 3 1/2-in. intake tubing that’s nearly the same size as the perimeter of the square shaped inlet of the factory Cummins intake plate. This tubing provides the maximum laminar airflow to the engine without machining off the side of the head. Pusher says the 16 gauge tubing increases the intake volume by 27.4 percent over the OEM intake. The Cross Air intake system includes the manifold, feeder tube, boots, clamps, and hardware. Prices range from $159 to $399, depending on engine size. Installation is done by tapping into a freeze plug port at the rear of the intake plenum. The Cross Air splits off the boost tube and creates another parallel path of air flow in addition to the stock plumbing. The Cross Air is made from mandrel bent steel tubing and uses top quality 4-ply silicone couplers, stainless clamps, and 1 1/2 by .095-in. DOM pipe. Pusher intakes can be customized as needed and come ported for all boost (input/output) applications. The kit is available in several colors. Prices range from $199 to $699 depending on the engine application. Contact: FARM SHOW Followup, Pusher Intakes, (www.pusherintakes.com). and exhaust tuning systems, electronic performance chips, exhaust upgrades, fuel injection kits and other engine performance parts for diesel truck and farm equipment engines. The company says anyone who owns diesel-powered equipment can increase its efficiency and power output by installing a performance air intake system. The intakes work because they allow the engine to intake a larger amount of air through higher volume intake tubing. When the engine gets more air flow, the fuel burns more efficiently and produces more horsepower. Parley’s high flow performance filters are washable and reusable. Some of the company’s performance diesel intake systems are designed with heat shields or are fully enclosed to keep hot air out of the intake stream. They also take advantage of technology like mandrel-bent intake tubes, powder coating, and high-quality hardware designed to reduce air restrictions and intake temperatures. Cold air intake systems even take inlet air from outside of the engine compartment where the inlet air is cooler. Cooler inlet air temperature translates to more power during the combustion process because cool air is more dense than warm air. Parleys says a standard factory exhaust system can also rob a diesel engine of power and economy. They use the analogy of blowing through a tube the size of a Bic pen filler compared to blowing the same amount of air through a soda straw. With a restricted exhaust, the engine is always “forcing” the exhaust gases out, wasting fuel in the process. Parleys suggests installing a larger diameter exhaust system with a smooth mandrel bent radius. That could improve fuel mileage slightly and provide additional power from the engine. The company goes on to say, “even if your diesel is equipped with a catalytic converter or a particulate filter, adding a larger diameter exhaust after the emission control device will still help improve your diesel fuel economy.” Prices for various kits range from $199 to about $1,200. Contact: FARM SHOW Followup, Parley’s Diesel Performance, St. George, Utah 84790 (ph 801 938-4891; www.parleysdieselperformance.com).

From the archive · Full text
Feature story

20-Spline Pto Shaft Fits Older Deere Tractors

Featured source:

“If you’ve got an older Deere tractor that you want to hook up to a manure spreader or a mower or some other tool with a 20 spline pto shaft, this insert shaft makes it real easy,” says Curt Goeckner, co-owner of R and G Machine in Effingham, Ill. Goeckner and his partner, Mike Rieman, made the specialty shaft after Dave Behrns, a Dieterich, Ill., farmer showed them a mockup that he had welded together. Goeckner says, “Mike and I looked at what Dave had in mind and we drew it up on AutoCAD. We used the dimensions from a 20 series Deere tractor pto shaft so our shaft would fit into the tractor just like the OEM shaft. Before we built it I talked to a metallurgist to make sure we had the right grade of steel to handle the stress that a tractor pto shaft encounters.” The 1 3/4-in. 20-spline tractor shaft that R and G built is the same length as an OEM tractor shaft. An implement pto connects to the R and G shaft just like it does on the OEM model, sliding on easily and locking securely in place. Goeckner says their insert shaft is easy to install.

“Just remove the snap ring that holds the OEM shaft in place, pull that one out and put ours in.” He recommends that the rear of the tractor be elevated slightly during the process so oil doesn’t run out when the shafts are switched.

“If a person is really fast you can do it on level ground,” Goeckner says, “but if you fumble around a cup or more of oil can run out fairly quickly.” The R and G insert fits on Deere series 20, 30, 40 and 50 series tractors. Behrns says there are thousands of older tractors out there now being used with newer implements that have 20-spline, 1,000 rpm shafts. He doesn’t like the idea of using a bolt on adapter because it adds 4 in. or more to the tractor shaft. That creates stress on the tractor and the implement pto.

“I know of a couple people who have either bent the implement shaft or have broken the knuckle because the angle with that shaft extension was too harsh. In both cases it was expensive to repair the implement shaft, and the problem at the tractor didn’t go away,” Behrns says.

“This design works a lot better than a bolt-on extender and it’s easier on the tractor and the implement.” R and G has built a dozen of the insert shafts and had farmers test them on different tractors.

“They’re running in Kansas, Arkansas, Nebraska and Illinois,” Goeckner says, “and they’re all working well.” R and G has applied for a patent on its insert shaft and thinks there’s a market for the product. Goeckner says the price for their insert will be comparable to bolt-on adapters. Contact: FARM SHOW Followup, Dave Behrns, P.O. Box 14, Dieterich, Ill. 62424 (ph 217 925-5257) or Curt Goeckner, R and G Machine, 1303 Parker Ave., Effingham, Ill. 62401 (ph 217 342-6622; r&[email protected]; randgmachine.com).

From the archive · Full text
Feature story

Easy Way To Change Broken Teeth On Wheel Rakes

Featured source:

“This photos show how I can change the broken teeth on my wheel hay rake. The clamps free up my hands to replace the teeth, as well as to replace the brackets and bolts,” says Jim Brashears, Olathe, Kan.

“I start by cutting four 1 by 2’s about 6 in. long. I put a block on either side of the good teeth, in front of and behind the bad tooth. Then I use 4-in. C-clamps to tighten the blocks against the teeth, positioned under the last ring on the wheel.

“This idea is really handy and saves a lot of time, because I don’t have to fight several teeth for alignment with one hand while putting the brackets and bolts together with the other.” Contact: FARM SHOW Followup, Jim Brashears, 11035 S. Waverly St., Olathe, Kan. 66061 (ph 913 909-1347; [email protected]).

From the archive · Full text
Feature story

Gas-Powered Circular Saw

Featured source:

“It’s compact, lightweight, easy to use and completely eliminates the need for electrical cords and generators,” says Andrew Stoltzfus, Cooper Saws, Inc., about his company’s new gas-powered circular saw. The first-of-its-kind saw is powered by a 1.7 hp, 1.8 cu. in. gas engine and equipped with a specially-designed gearbox that drives the blade.

“We basically remove the electric motor from a DeWalt DW364 circular saw and then make the gearbox to get the right speed ratios,” says Stoltzfus.

“As a result, our gas-powered circular saw weighs only 7 oz. more than the electric-operated models.” The saw is designed for easy starts in tough situations and has a centrifugal clutch so when the engine is idling the blade doesn’t turn. It comes with a single top handle that has a built-in throttle, which makes it easy to use with one hand. The concept of a gas-powered circular saw isn’t completely new, says Stoltzfus.

“Years ago Homelite offered a gas-powered circular saw, but it was much heavier at 22 lbs. compared to 14 lbs. for our saw. One company still offers an attachment for a chainsaw that replaces the saw’s bar and chain, but it’s much heavier than our model. The only limitation to our model is that you don’t want to use it inside a building for very long because of the exhaust fumes.” Stoltzfus is setting up dealers and service centers.

“The customer typically purchases a new chainsaw and we convert it at their request, or we can convert a chainsaw that you already own. The conversion is only available for specific chainsaw models, which can be obtained by calling Cooper Saws, and involves modifying the engine so it can be we provide a new warranty for the saw.” The turn-around time for the saw conversion is usually 2 weeks.

“You can buy a saw at a local Stihl dealer and send it to us, or you can buy one from a Stihl dealer close to our manufacturing facility and we’ll make the conversion before shipping the saw to you,” Two models are available – one has a 7 1/4-in. blade and sells for $995 plus S&H; or you can purchase an upgrade to an 8 1/4-in. blade for $50. Contact: FARM SHOW Followup, Andrew Stoltzfus, Cooper Saws, 245 Cooper Dr., Kirkwood, Penn. 17536 (ph 717 529-6155).

From the archive · Full text
Feature story

Chopsaw Powered By Weedeater Engine

Featured source:

Elmer Fisher is in the business to provide customers – mostly Amish – with power tools that don’t require electricity. But his chopsaw powered by a weedeater motor may attract a wider variety of customers. The owner of Midwest Power Tools in Oak Grove, Ky., he came up with the idea when a customer requested a chopsaw that could run off something besides an air compressor.

“It’s easy to move around and very portable,” Fisher says. He designed an attachment for two models of DeWalt chopsaws (DW718 and DWS780) out of aluminum and stainless steel (for the drive shaft). The customer buys a Stihl FS130 weedeater (bike handle style works the best), removes the shaft, and slips the engine on Fisher’s attachment shaft. It’s fast and easy to make the switch so the weedeater can still be taken out and used for its intended purpose as well. Fisher’s customers include professional carpenters, but farmers and fence installers like it also. The weedeater engine is lightweight, easy to start as it uses the weedeater’s throttle and switch, and it uses less gas than a 13 hp air compressor. There adapted to our gearbox. After the conversion is also no vibration, because of the rubber shock in the weedeater’s mounting plate. Fisher sells the attachment kit for $225. A DeWalt chopsaw with the attachment sells for $799. An optional exhaust port is available for using the weedeater engine indoors. The weedeater is not included. Contact: FARM SHOW Followup, Midwest Power Tools, 3837 Millers Mill Rd., Oak Grove, Ky. 42262 (ph 270 885-8584; 270 348-1951 for voicemail).

says Stoltzfus.

From the archive · Full text
Feature story

Exhaust System Keeps Shop Air Clean

Featured source:

The shop exhaust system sold by Central Pointe, Inc., normally goes to implement repair shops, truck shops and other commercial operations. That’s changing, according to Mike Passkewitz, Central Pointe.

“We are selling more systems to farmers across the nation,” he says.

“Farm shops are getting nicer, and farmers want to keep their walls clean and the air healthier.” The system is designed to be easy to install. The hose reel and blower unit simply bolt to the wall or ceiling and vent to the outside. The standard blower is powered by a single phase, 2 hp motor and can be wired either 110 or 220V.

“It comes as a kit with hose reel, mounting bracket, bolts, discharge pipe, hood and damper,” says Passkewitz.

“Everything is there for just under $4,000.” While some systems use a general ventilation fan to exhaust foul air off their ceiling along with their warm air, the Central Pointe system uses a 2 hp pressure blower with high temperature hose to hook right to the stack. Passkewitz explains that a pressure blower is needed to produce sufficient vacuum for suction across the 40-ft. length of hose included in the kit. A direct mount hose reel keeps the hose out of the way until it’s needed. Less expensive hose drops are also available. Other attachments include a variety of stack canes to fit over tractor and combine exhausts, as well as a 20-ft. extension hose.

“We’ve recently added a welding cabinet for farmers who want to exhaust welding smoke,” says Passkewitz.

“It’s a 2-ft. square, 10-in. deep cabinet with a side draft grid to pull in the smoke. It will go anywhere the hose can reach.” The welding cabinet is priced at $365. Other attachments run from $240 to just under $400. Contact: FARM SHOW Followup, Central Pointe, Inc., 1317 E. Bridge St., Redwood Falls, Minn. 56283 (ph 507 644-4040; toll free 866 574-4040; www.whirlwindexex.com).

From the archive · Full text
Feature story

Crank-Type Chainsaw Sharpener

Featured source:

Just turn the crank on the Timberline Chainsaw Sharpener, and the carbide cutter does the rest. Once in place, the body rides the bar as the operator pulls the chain through to quickly sharpen each tooth. Every tooth is sharpened to the same height, length and angle.

“As a tooth slides into place, an adjustable stop or pawl slides over and behind it to hold it in position,” says Phil Krantz, Timberline Chainsaw Sharpener.

“Just slip the cutter through the guide hole, and it will be held perpendicular to the bar. As you turn the crank on the carbide cutter, it produces a razor sharp edge on the tooth.” The body of the Timberline Sharpener has two guide holes to match left and right teeth. Krantz suggests doing only one angle at a time, as that doesn’t require completely withdrawing the carbide cutter for each tooth. Once one side is done, shift to the second side and complete the chain. FARM SHOW ordered a Timberline Chainsaw Sharpener and put it to the test with a well-worn chain. Before it was sharpened, the chain on my older Stihl 029 was so dull it took 30 sec. to crawl through a 10-in. green ash log.

Setup was fast and easy. Once the aluminum cast body was in place and balanced on the bar, sharpening went quickly. Fine filings made it clear the carbide cutter was doing its job. After sharpening, cutting through that 10-in. ash log took just 10 sec. Although the guide holes are lined up to match the angles of the teeth in each pair, that was not always the case. At times one was perfectly in line and the other wasn’t, while the next pair would be fine. In talking to Krantz, he pointed out that if the chain had previously been sharpened, it might not have been sharpened evenly. Thus, one tooth might not line up as well if it was over-sharpened compared to its partner.

“When teeth don’t line up as they should, I recommend users simply sharpen the one that does line up,” says Krantz.

“After a few uses, the teeth will again match up.” Thanks to the guides on the Timberline Sharpener body, unequal sharpening on a chain being resharpened for the first time should not be possible. The universal body accepts multiple size carbide cutters to match different chainsaw chains. A set screw on the crank makes changing cutters easy. The Timberline Chainsaw Sharpener comes with your choice of carbide cutter for $124.95. Additional carbide cutters are available for $20 each. Angles are set at a standard 30 degrees; however, more experienced users may prefer guides of 25 or 35 degrees. They are available for $10.

To see how the sharpener works, visit www.farmshow.com. Contact: FARM SHOW Followup, Timberline Chainsaw Sharpener, 2300 N. Yellowstone, Idaho Falls, Idaho 83401 (ph 208 405-2020; [email protected]; www.timberlinesharpener.com).

From the archive · Full text
Feature story

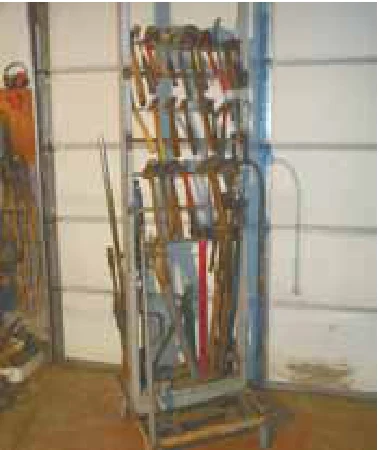
Simple Rack Keeps Hammers Handy

Featured source: Larry Fulton

Larry Fulton’s hammer rack makes it easy to find the right hammer. Wheels on the rack allow him to move it to where the work is, so he doesn’t have to go back for a different hammer in the middle of a job.

“A friend of mine built one, and I liked it so well that I made one myself,” says Fulton.

“I made mine with bigger wheels so it rolls easily.” The simple rack consists of two 82-in. tall uprights salvaged from old office equipment. Six sets of cross members are welded to the uprights. Each one alternates between being attached to the front or the rear of the rack. This creates a slight angle as the hammers hang from the first and rest against the second cross member. A single cross member hangs about 30 in. from the base for hanging longer handled hammers and a pipe bender. The 25 by 26-in. steel base keeps the rack stable and provides more storage. Fulton butt welded pipe stubs to the base to hold bars and other odd tools. Four 5-in. wheels attach at the base.

Contact: FARM SHOW Followup, Larry Fulton, 4504 E. 17th St., Cheyenne, Wyo. 82001 (ph 307 634-7042; [email protected]).

From the archive · Full text
Feature story

Expert Relines Brakes And Clutches

Featured source:

If you have old brakes and clutches that need relining, Tim Doran of All Frictions Co. can help. His company has lined all sizes of friction clutches and brake drums up to 56-in. dia. – big enough to stand in. He also does custom fabrication and prototyping. Currently he’s working on tiny centrifugal clutch kits that come on kit race cars.

“Usually the smaller it is, the harder it is to work on,” says Doran.

“The availability of materials flexible enough to work with is limited, and the jobs take more time and effort.” The list of machines the company has worked on includes construction equipment, ski lifts, elevators, logging equipment, small tractors and antique cars. All Frictions does bonding rather than rivets as most others do. The company also sells friction materials to customers who prefer to line their own clutches and brakes.

“We work on anything with a friction material on it,” says Doran.

“If you don’t have the brake or clutch, but you do have a blueprint, we can fabricate what you need. If you need it relined, we can reline it. If it’s broken, we can repair it.” Contact: FARM SHOW Followup, All Frictions, Co., LLC, 131 Freestone Ave., Portland, Conn. 06480 (ph 860 342-2001; [email protected]; www.allfrictions.com).